Showing posts with label Summer Sewing Essentials. Show all posts

Saturday, July 03, 2010

Burda Magazine 1-10-133

This is one of those garments I overlooked until someone else made a beautiful rendition. (Michele, I'm talking to you!)

Here's the line drawing:
As soon as I saw Michele's gorgeous tunic, I knew the exact fabric I could use. I've had it for nearly 12 years! It's a beautiful, creamy lawn with mauve/lavender flowers and tiny turquoise sprigs. I had the perfect mini-piping in my stash too, for the yoke & collar.

Sorry, this isn't a modeled photo. It's raining and I just wanted to get the pictures quick! Here's a photo from of the front:


I had read Michele's blog both times she made this top, so I was aware that the front pleats were probably going to be unflattering. Still, I decided to go ahead and put them in, just to see, and yup, she was right. Totally preggo. I don't know what those Burda pattern drafters were smokin when they made this one. It would have been so cute if they had just drafted a flat front tunic!

I fixed it though, I topstitched them down, all the way to the hem. They ended up looking like pintucks:


My favorite part is the rounded yoke insert. I loved the piping in the magazine photo, and I really like the pop of turquoise. I haven't found/decided on buttons yet, so no buttonholes either. I can still wear it with a cami & no buttons.


The sleeves have little pleats, and a vent with cuff. I was going for a more feminine, airy feel, so I added these bias ties to the sleeves instead of a cuff:


The tunic features that awesome mandarin collar, also piped:


I don't know if you've noticed yet, but there are alot of fiddly bits with this pattern. Lots of extra detailing, most seams are topstitched.


Here's the back view. I had the same poufy effect that Michele had in back too. I didn't stitch these pleats down (like the front), because I don't think it would have worked as well, and I didn't want to mess up the fit. Instead, I opted to insert bias ties into the side seam. I'll just tie up some of the excess in back and live with the "blousing" effect.


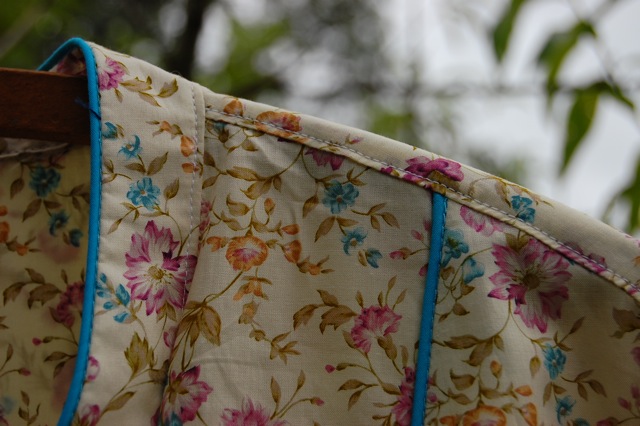
Here's a close up of the back yoke & pleats. The lawn presses to crisp and smooth!


Even the hem was fiddly. It's just a turned up (twice) hem, 1/4-3/8" deep. I failed to take a photo of it, but it has a shirttail hem. I don't think its noticeable in the magazine until you go to look at the layout. I like it! I just don't have a picture of it. Here's the hem though:


And that's it! This has been the thing occupying my sewing time for the better part of 2 days (and I cut it out the day before I started my 1940s shorts, so it languished on the table for 48 hours!)

Next up, I really want to cut out a couple more of the 1940s pattern in shorts length and possibly one pair in capri pants. I'm not sure how that wide leg will translate to that length? Anyone have some cute period photos I can use for inspiration?

I'm also waiting for this to come in the mail, I have been stalking ebay & etsy for a while now for it. It was only listed a few minutes when I snatched it up, HA!


It annoys me that I had to buy it. I bought it back before it was OOP, years and years ago. I just can't find it, drat it. Have absolutely NO idea what happened, but I wonder if I loaned it to my sister or a girlfriend. Because I can't imagine I would have gotten rid of it. Anyway, I can't wait to make my own Audrey wardrobe. Well, in Audrey-esque plus size wardrobe, anyway.

I even watched Funny Face last night, in preparation.


Have a good holiday weekend to my US friends!!

Friday, July 02, 2010

Vtg Simplicity 1230

Shorts recap: Yesterday, on a lark, I decided to muslin this great vintage Simplicity pattern in my stash:


Here are the finished shorts (front view) in a peachy-pink linen:


Side view: (which I rarely take a photo of! You're going to get my side AND back view. You're so lucky.)


And because I never know where to place my arm in a side view (leading to aLOT of awkward photos, another reason I rarely bother):


You can see the curve of my backside better with my arm up. I'm happy my bum doesn't look quite as flat in these as in most pants. :D

Back view:
The back does show a tiny wedge that needs to be removed for a bit of swayback. I have now made that alteration on the back pattern piece. I didn't see it in the muslin, but I didn't fully complete the waistband, so it's possible I had the muslin pulled up too high in back.

But other than that, the back is fairly perfect. Let me tell you, starting with a pattern that nearly fits is SO much easier to fine tune! Because of a weird vertical fold near the center back, I scooped the back crotch about 3/4" (in 1/4" increments until I felt it was perfect, and still really comfortable). I tapered that change up the CB seam, to about the level of the bottom of the dart. I pinned this in first and tried on (wrong side out, pins on outside). Then I basted it and checked again. That's it for the back. I didn't make any other changes.

For the front, I deepened the crotch seam about 1/4" (and after I sewed the muslin, I had done a fisheye dart to remove some crotch length in the front).

This pair has 1/2" removed around the entire top (front and back). I'll probably go ahead and remove that from the pattern piece, because I love the fit and where the waistband hits.

So let's go through some details... The front of the shorts have stitched-down pleats, which I LOVE. They are just soooo 1940s. Pretty much ever authentic 40s photo of women in trousers I have seen feature these topstitched pleats.


The back also features one topstitched pleat, but I did a long dart. It was actually a mistake when I was tracing; I marked dots that seemed to be a "dart", but in fact the lowest marking was something else. I like the dart though, I don't think I would get as nice a fit in the derriere with a topstitched pleat, so I made the change permanent on my pattern.


This pattern called for snap closures (which I've seen called "poppers" or "studs" in vintage patterns) along the side seam, but I inserted a lapped zipper. The waistband was my 2nd version. The first was too narrow (I didn't use the pattern piece for this straight waistband, but tore a strip approximately the right length & width). It looked very 1980s. So off it came and the 2nd one is a tad too wide. But its growing on me.


The seam finish recommended was straight stitching along the seam allowance and pinking, which I might have tried if my pinking shears didn't need a good sharpening. I straight stitched seams, and zigzagged seam allowances together. I do have a serger, but not the right color of thread. I finished seams like this for years before I had a serger, so I know its sturdy.

I encased the raw edge of the waistband with Seams Great, zigzagging on.


I left enough for a deep hem. I wanted more weight to the hem because of the fullness of the legs (and my chubby thighs). I'd like the shorts to remain in proper position as much as possible. The hem is turned under 1/4" and again 2" and stitched.


And because someone usually asks about my shoes, I took a closer picture of them too! I'm such a shoe whore. (Sorry, it's true.) These incredible summer wedges are from Modcloth. Gorgeous! I think they are just modern enough but still have a retro twist.


Another parting shot of the shorts, after I had walked around and taken LOTS of photos. They still look great! I can see lots more of this pattern in my future!


This post is cross posted at We Sew Vintage!

Thursday, June 24, 2010

in progress - Simplicity 3835 & BS 2/10

I've been muslining a pair of super-fitted stretch pants (nearly leggings) from Burda Style 2/2010, #111. I saw them on a flickr for the Summer Essentials Sewalong, and decided I must have them. Here's the line drawing:


No, they're not a style that would be particularly flattering for this plus-size girl. No, I don't normally wear my pants quite so fitted (except for leggings that never show). But there's something so chic about these pants. I muslined once in a very stretchy denim, and immediately tossed them. Showed every lump and bump and crevice. Ugh. (They weren't exactly a self-esteem booster.)

The next day I hacked and drew and taped the pattern making changes from the first pair and muslined again in a beefier stretch denim. Ahhh...now we're getting closer. Would I wear them in public without a tunic? Nope. But I can see possibilities. So I added here, split there, taped tissue in places and I'm ready to muslin again. Here's the denim (the 2nd muslin actually).


It's very darkwash, with the perfect stretch. (The denim in the photo above is pretty accurate as far as color, but my grass is NOT chartreuse, haha. I think I had the wrong lighting set on my camera.) I have just enough for one more pair, so my next muslin will be out of unwanted cotton before I cut into the real stuff.

I've also cut out a Simplicity 3835, in the dress length, from my "trees" fabric.


It's stitched together to the point that I'm ready to attach the neckband and the invisible zip:


I really, really love this fabric, so I do NOT want to screw this up. I hope its as cute as I envision it! Hopefully the dress (if not both projects) will be finished today.

Monday I had a school-oriented workshop that was actually pretty fun, and on my way home I stopped at a local flea market to peruse their vintage patterns. No patterns to be found, but I did get these amazing buttons.


Note that not a single button was made in China. No, they were all made in the USA except for the black glass buttons, which were made in France & Germany.


It's funny how one little thing, like the manufacturing origin of these color little buttons, triggers a visceral response.

I recently had the opportunity to watch an HBO documentary called "Schmatta - Rags to Riches to Rags". It was a very enlightening program about the history (and decline) of the garment industry in the United States. If you can catch it on HBO or even a few clips on the HBO site (or *cough* youtube *cough*), I highly, highly recommend it.

I've been struggling for a while now with the purchased clothing concept. And not from a size standpoint (although, being a girl who's a non-standard size, there is that too.) When was the last time you were able to find a mass-produced garment made in your home country? What was the price tag?

Better yet, what's the TRUE price we, as a country (any country), pay for consuming cheap clothing? Is that $6 tee really worth what's happening to us, all around us globally, as a result? For me, the answer is ultimately no.

I can't in good conscious contribute to what greed and profiteering have done to the garment industry. I'm now a label-checker. And its hard, because I'm a bargain shopper by necessity! But I'm also resourceful and lucky in that I can sew my own clothing.

I'm doing some other things as well. Exploring second hand and thrifted clothing, even DIY'ing those pieces that might otherwise be unwearable. Teaching my children about being good stewards of our disposable income, our planet, and about basic human rights.

Along that same vein, I'm participating in the aforementioned Summer Sewing Essentials sealong. My essentials list is quite a bit longer than some, just because I only have time to sew really in the summer, and I'd like to have some transition to fall pieces as well. As soon as I have a proper list or plan sorted out, I'll post more about that.

I've also pledged to join Self-Stitched September. I, Angie.A, sign up as a participant of Self-Stitched-September. I endeavour to wear a minimum of one handmade or refashioned item of clothing every day for the duration of September 2010.

My ultimate goal would be for this to be every day, for the rest of my life! Baby steps.

As long as we're talking about essential clothing pieces, and things to wear "every day"...the February issue of Burda Style is amazingly full of classic, wearable pieces I didn't notice on the first viewing. The above, chic, slim pants. And also this fabulous boatneck tee:

And look, I have this great navy/white striped knit in stash:


There's also this simple a-line skirt:
And a basic "white shirt" pattern too:

A great little pencil skirt:

And not to mention this FABULOUS shirt dress in the plus section:


(The plus section in general is fabulous in this issue with a "Chanel" jacket, a basic trouser, a gorgeous sheath dress, a trench coat, and another great top pattern.)

That's what I love about Burda magazine. An issue can percolate for months (or more) and then WHAM. I'm inspired by everything in it!

Ok, this post is WAY TOO LONG. But if you made it to the end you win a cookie. (Ok, not really, but feel free to go to your cupboard and have a cookie on me.)