Showing posts with label beginning sewing. Show all posts

Monday, May 02, 2011

Vintage Vogue 9523 - in progress!

In between rainy day naps this weekend I got nearly finished with my pink lawn Vogue sundress.  Here's a peek:


I used a tropical print lawn (Fashion Fabrics Club, last spring) and lined the bodice in pink Imperial batiste.  I don't have quiiiittteee enough Imperial to line the skirt.  Er, I could but it will be too short.  I'm debating whether to just make (or purchase) a matching half-slip.  I've thought about adding some wide pink lace to the hem of the lining too, which should lengthen it enough.  I'll have to dig through the lace stash.  That might be really pretty!

Wish I could show you more, but my camera battery died.  Rats.

I should have been able to make three of the little sundresses in one weekend considering how simple construction was.  Instead, here's a little sampling of my cohorts and their bad example...


Fat Kitty clearly needed more direction.  Or a chore or something.  Sheesh.

Hey I did get some fun stuff in the mail on Saturday!  My new Colette patterns came!  Have you seen them yet?  They're "beginner" patterns, and I probably didn't need them, but you know how it is.  I already have all the others (except the men's shirt); why stop now?

Here is Violet (all images from the Colette website):


The little peter pan collar is so sweet (hopefully not "too" sweet though), and I LOVE the back yoke & gathering.  So cute.  What I'm not terribly crazy are things easy to fix: the gathered elastic sleeve "cuff" and the lack of vertical darts in front/back for shaping. I think these were omitted to make the pattern beginner-friendly, which I honestly think is pretty awesome.  Here are some pretty pictures from the website of example garments:


The 2nd new pattern is Ginger:


A basic a-line skirt with three waistband variations.  I have a "TNT" a-line skirt hand-drafted from the SWS book, but I do love these shaped waistbands.  And the instruction booklets are always fun to read (even if I skip or alter some of the steps!)  Two examples:


Of course I'm all about the stripes!  Wish I knew where that fabric could be had.

Now I'm off and running....It's Monday!

Saturday, January 15, 2011

Vintage Sewalong: trouser grading tutorial

My pattern arrived this week!  In case you've forgotten or missed that post, for the Vintage Sewalong '11 I'm making McCall 4803, a 1940's trouser:


Lovely, right?

Of course, as is the case with many of my vintage patterns (especially bottoms) this one is way too small.  Pattern waist = 26 inches.  angie.a's waist = more than that.

(Oh all right.  In the interest of full discloser, 10 inches more than that.)

So, how about a little tutorial on upsizing a vintage trouser/short pattern? (And when I say little, I mean in miniature.  hehe.)

Step 1:  Gather supplies.  I use at least 2 colors of pen or marker, scotch tape (or acid free if you have it), scissors, things to use for weighting down tissue/tracing paper.


Step 2: Carefully press out any wrinkles in vintage tissue if necessary (I never use heat since that would degrade tissue further.  I just gently press with my fingers on a smooth, hard surface).  I also carefully tape any tears or rips in the (usually very old and brittle) tissue. 

Trace pattern transferring all markings to tissue or tracing paper. (I use a 36" roll of tracing paper from Dick Blick Art Supplies).


Step 3:  Math.  I need to add 10" to my pattern at the waist and hip.  There are 4 side seams (2 front, 2 back), and I have always had good luck with pants and skirts by just adding to the side seams.  Some books say no more than 2" but I've added more than that lots of times.  You will probably have to fiddle with your pleat/dart placement later.

So, 10" divided by 4 seams = 2.5".  I make a mark near the top (waist) 2.5" from the side seam with a new color pen. 


Slide your original pattern piece over to the  mark and line up the waistline.  Look at the grainline markings on both your tracing and the original (you can see through the original tissue) to make sure they are parallel.  Trace your  new side seam.


Step 4: Alot of people need to remove crotch depth in 30s/40s trousers, but I personally like to add a bit more.  I have a full high hip, and am very short waisted (so, conversely, I'm long from waist to crotch).  Generally a 40s trouser pattern's extra long crotch depth is usually good for me as drafted.  I'm adding 1" here because this particular pattern doesn't appear to have that gigantic crotch length I'm used to seeing in this era.

Using a similar slide method, I measure up from the waistband 1" and make a mark.  Then slide the waist of my original pattern up and retrace the waistline at 1". 


Slide pattern piece over to align at your new side seam and trace the rest of your widened) waistline.


**Note that if you have a more normal "crotch length" style of pant and you need to grade up, you would likely need to add to the crotch length in this same manner.  I just don't have to do this with the extra long length in 30s and 40s patterns as a rule.

Step 5:  Now let's adjust those tucks!  Remember though, dart and tuck and pleat placement is pretty relative.  You can always pin them and try on your muslin and adjust placement until they are in the most flattering spot.

The original pattern shows the tuck placement to be approximately in the center of the pant front.  So, I just scoot the original over so that there's an equal distance from side seam and center front (to the original), like this:


Then I redraw the darts in their new placement (with the new color so I don't get confused).


I will probably have to increase the distance between the tucks too, so the proportions are still good. That's what a muslin is for, right?  
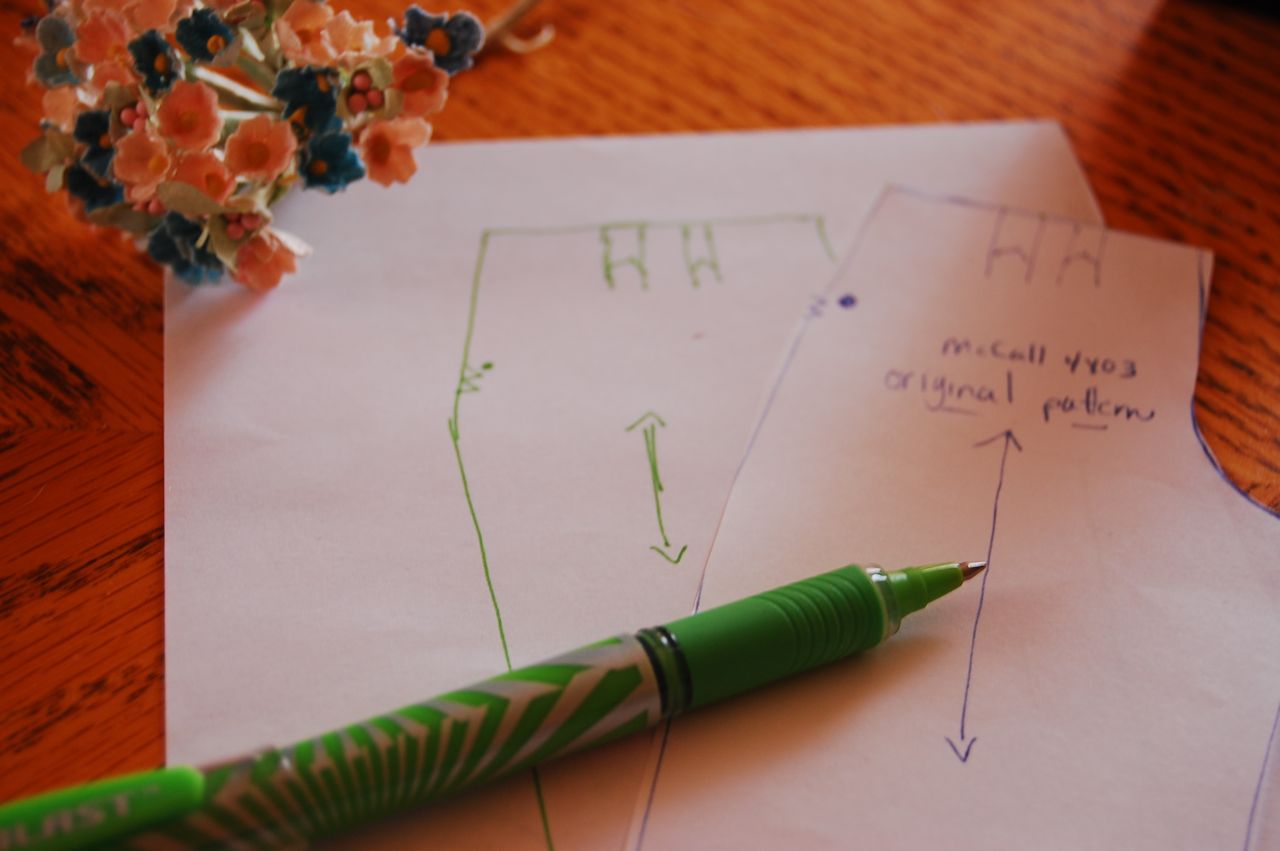
Here's my actual (graded) pattern tracing:


I hope this might help some of you who are putting off trying those too-small vintage patterns in your stash (or your etsy cart!)

Next up, MUSLIN!

Sunday, August 15, 2010

Lu's pink organdy heirloom dress.

This is my very favorite dress from Lu's closet.

The pictures just can't do it justice, it's such a beautiful dress and a large part of its charm is the colors and textures that I think are better displayed in person. (I also had pitiful indoor lighting today since it started to rain just as I was preparing to take pictures!)

Can you stand the cuteness that is little Lu & G-man in 2004??


(G helped make his shirt, picking out all the "Mad Scientist" machine embroidery designs from...?? Lordy I'm getting old because I can't remember the name of this embroidery design artist! Threadsketches! SUCH cute designs. Alas, my kiddos have long since outgrown her.)

The bodice of the dress is white Italian organdy, embellished with a machine embroidery design I combined using Embird. I don't remember the card with the floral oval, but the fairy alphabet was a freebie from several years ago. I don't even have it on this computer to look it up. It's saved on a backup disk somewhere...


The bodice has puffing strips and beading lace, and every seam, including sleeves, is joined with pink entredeaux.


The white organdy sleeves have a shaped lace loop, pinstitched in place by machine...


Sleeve beading and lace ruffles:


The rest of the dress is a pale pink over-embroidered organdy. I had little more than one yard of the pink, and I saved it for a few years until I had the skill to design the perfect project. The skirt is almost entirely made of the pink, except for the shaped loops in the center front; each features machine embroidered white organdy center.


I used the same design card for the florals as the bodice, and added two of the fairies from the freebie alphabet. Here is a closeup of one of the side loops. All of the fairy wings and the "wing needle work" below is stitched with silver thread:


Here is the entire skirt front, flat:


The hem has a ruffle edged in lace, joined to the skirt with pink entredeaux.


This little dress is a size 6 and was Lu's Easter dress in 2004. Lu, age 6:


And one of my favorite photos of the 3 of us, all in pink (I must have really planned that year):


I wanted to show this dress because by this point in my sewing experience, I had enough skill to tackle the machine embroidery, the lace shaping, the fancy color entredeaux and expensive organdy fabrics. Sometimes as a beginner, you just KNOW you aren't ready for a project.

I had had the pink fabric from the time Lu was a small toddler, and I kept it stored safely away until I knew I was ready. And this turned out to be the perfect project to showcase it!

I hope you're all having a wonderful weekend! I'm going to try to concentrate my next sewing adventure on fall things for ME. I'm participating in Self-Stitched September and, well, I have nothing to wear! Yikes.

Tuesday, August 10, 2010

Sew Beautiful Blog Tour - Pt 5: Pintucking

If you've been following along in my sewing adventures for very long, you might remember that Sew Beautiful magazine was pivotal in my early interest in sewing. In fact, it could be said that if it weren't for the Easter issue of Sew Beautiful in 1998, I may never have found this wonderful hobby.

As a longtime subscriber & reader, I was thrilled a few months ago to be asked to participate in a special blog tour as part of Sew Beautiful's September/October issue! (Psst...To go right to the Pintucking video, scroll down this post!)


Sew Beautiful graciously asked me and several other heirloom enthusiast bloggers to join their blog tour, featuring a series of videos that the SB experts have filmed, highlighting just how attainable these beautiful techniques are. Even for beginners!

Along the tour route, you will learn all of the techniques required to complete this gorgeous camisole:


At first glance, such a lovely creation might seem overwhelming to someone unused to heirloom sewing. But the truth is, the basic techniques needed to complete this project are quite simple. You need little more than a straight stitch and zigzag stitch!

Each video "class" shares a basic technique needed to complete this pretty camisole, recreated from a vintage nightgown. SB shares the instructions and templates needed to create this camisole in their September/October issue #132.


You may click the button below to go to the very beginning of the tour, or scroll down this page to view the video for Part 5: Pintucking. And don't forget to enter my blog giveaway! SB has prepared a fabulous package of gifts for you. Detail are at the end of this post.


And now it's on with the show! The video below features Pintucking. It has been divided into 3 parts; click the links below the video to continue on to parts 2 & 3.


And don't forget to pick up the issue #132 of Sew Beautiful, for the written directions to accompany the tour videos!


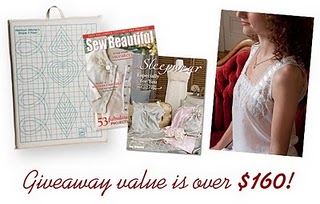
And now for the really fun part! Sew Beautiful has prepared an incredibly generous giveaway for readers of my blog. Total prize value is $160! Here's what the winner will receive:
• complete kit needed to make the Vintage Inspiration camisole, from sizes XS (2-4) to 3X (26-28). This kit also includes Maline laces and Swiss beading!
• a copy of the book: Sleepwear Especially for You. This book contains the basic tank top pattern suggested in the instructions.
• a copy of the new issue of Sew Beautiful
• a June Tailor Heirloom Stitcher's Shape 'N Press board

Leave a comment on this post by Friday, August 20 at 11:59 pm to be entered for a chance to win this fabulous prize package! I will use a random number generator to choose a comment, and will announce the winner on Saturday, August 21.

Additionally, Sew Beautiful and the Martha Pullen Co. would like to give ALL of my readers a special treat! They would like to offer a discount code for the Martha Pullen store at http://store.marthapullen.com/. The code is BLOGTOUR and is good for 25% off your order There is no minimum order, one use per customer, and the code expires on Oct 31, 2010.

I hope you'll join me in exploring this heirloom sewing blog tour, and in sewing this beautiful camisole. I personally think we should have a little sewalong!

And a great big thank you to Shannon Miller, Kathy Barnard, and the rest of the staff at Sew Beautiful and the Martha Pullen Co. for asking me to participate in such a wonderful event. I am honored to be included as part of such a talented group of bloggers.

Wednesday, July 07, 2010

Vtg Mail Order 1839

How I got this vintage pattern is kind of a mystery to me. I either received it in a pattern lot from ebay, got it from a flea market (unlikely since it's my size. That never happens!) or possibly one of you kind souls who sends me goodies sent it? :) I just can't remember!

In any case...it's a mail order pattern and I do not have the envelope, and there is no identifying company, just a number: 1839. It's a bust size 38.


While I really like the 3/4 sleeve blouse and the late 1940s skirt silhouette, check out that very, very sweet cap sleeve version of the blouse! Lace trimmed placket and collar! Gathered yoke!

I chose a lavender eyelet (that I had stashed away for Lu. Shh.) for my version:


It turned out so, so cute. And, it was surprisingly easy to fit. I'm telling you, I truly believe patternmakers of the past either way understood the geometry of the human figure better, or they were using more realistically proportioned bodies to begin with. Or both. Note the inverted pleats in front to further shape the bodice.

Here's a close up of the lace-trimmed collar:


I used a "French edging", and gathered by hand using the pull thread in the lace header. (If you've never used French laces, it's pretty awesome. It's cotton, so the "look" is very dainty and pretty. Also, there are 2-3 header threads that you can use for gathering and lace-shaping.) I didn't add any interfacing to the collar, since I was using an eyelet.

I added lace to either edge of the placket, but did not gather it. I thought it would be easier to keep pressed that way (cotton lace wrinkles!) I used shell buttons.


The back at shoulder level is taller; it wraps around to the front forming a yoke above the front shoulder gathers.


The back neck has two small pleats or darts (they were shaped like darts, but they formed pleats because of the direction they point.) I love darts in the back neck! Eliminates all my back neck fitting difficulties.


The little cut-on cap sleeves had to be widened about 1/2". I just started the side seam a 1/2" lower than the dot. I turned up a tiny hem, 1/4" twice. The pattern above shoes a lace edging on the sleeve too, but I think it would make me itchy.


The bottom hem is also just turned up twice and stitched.

Other minor alterations: I did a pivot/slide to add to the waist & hip. I did a sort of FBA by slashing through my (traced) pattern from the middle of the shoulder to near the hem and spread 3/4". I lengthened the front & back by 1/2". I also dropped the height of the front pleats by 1".

I love this little top so much! I'll try to get a photo or two of me wearing it tomorrow if the weather is nice. I hope to cut out one more before summer is over too! I've also traced the 3/4 sleeve version, and I'm excited to try that one too!

Hope you're all having a productive week. :)

This post is cross posted at We Sew Vintage!

Saturday, July 03, 2010

Burda Magazine 1-10-133

This is one of those garments I overlooked until someone else made a beautiful rendition. (Michele, I'm talking to you!)

Here's the line drawing:
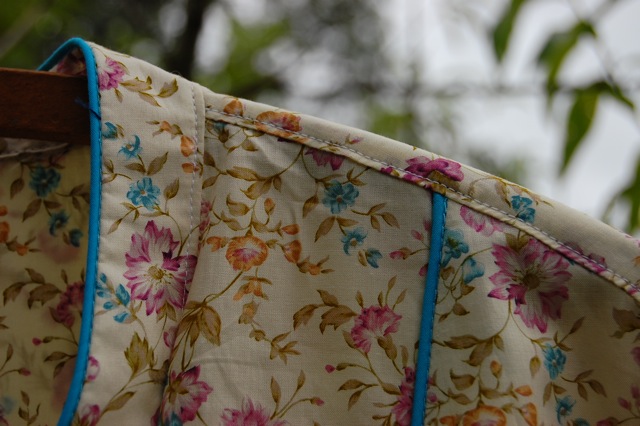
As soon as I saw Michele's gorgeous tunic, I knew the exact fabric I could use. I've had it for nearly 12 years! It's a beautiful, creamy lawn with mauve/lavender flowers and tiny turquoise sprigs. I had the perfect mini-piping in my stash too, for the yoke & collar.

Sorry, this isn't a modeled photo. It's raining and I just wanted to get the pictures quick! Here's a photo from of the front:


I had read Michele's blog both times she made this top, so I was aware that the front pleats were probably going to be unflattering. Still, I decided to go ahead and put them in, just to see, and yup, she was right. Totally preggo. I don't know what those Burda pattern drafters were smokin when they made this one. It would have been so cute if they had just drafted a flat front tunic!

I fixed it though, I topstitched them down, all the way to the hem. They ended up looking like pintucks:


My favorite part is the rounded yoke insert. I loved the piping in the magazine photo, and I really like the pop of turquoise. I haven't found/decided on buttons yet, so no buttonholes either. I can still wear it with a cami & no buttons.


The sleeves have little pleats, and a vent with cuff. I was going for a more feminine, airy feel, so I added these bias ties to the sleeves instead of a cuff:


The tunic features that awesome mandarin collar, also piped:


I don't know if you've noticed yet, but there are alot of fiddly bits with this pattern. Lots of extra detailing, most seams are topstitched.


Here's the back view. I had the same poufy effect that Michele had in back too. I didn't stitch these pleats down (like the front), because I don't think it would have worked as well, and I didn't want to mess up the fit. Instead, I opted to insert bias ties into the side seam. I'll just tie up some of the excess in back and live with the "blousing" effect.


Here's a close up of the back yoke & pleats. The lawn presses to crisp and smooth!


Even the hem was fiddly. It's just a turned up (twice) hem, 1/4-3/8" deep. I failed to take a photo of it, but it has a shirttail hem. I don't think its noticeable in the magazine until you go to look at the layout. I like it! I just don't have a picture of it. Here's the hem though:


And that's it! This has been the thing occupying my sewing time for the better part of 2 days (and I cut it out the day before I started my 1940s shorts, so it languished on the table for 48 hours!)

Next up, I really want to cut out a couple more of the 1940s pattern in shorts length and possibly one pair in capri pants. I'm not sure how that wide leg will translate to that length? Anyone have some cute period photos I can use for inspiration?

I'm also waiting for this to come in the mail, I have been stalking ebay & etsy for a while now for it. It was only listed a few minutes when I snatched it up, HA!


It annoys me that I had to buy it. I bought it back before it was OOP, years and years ago. I just can't find it, drat it. Have absolutely NO idea what happened, but I wonder if I loaned it to my sister or a girlfriend. Because I can't imagine I would have gotten rid of it. Anyway, I can't wait to make my own Audrey wardrobe. Well, in Audrey-esque plus size wardrobe, anyway.

I even watched Funny Face last night, in preparation.


Have a good holiday weekend to my US friends!!