Showing posts with label tutorials. Show all posts

Monday, September 18, 2017

DIY: Watercolor Journal


Hello friends! What have you all been up to the past...three (four?) years?? I'll save the what I've been doing with my life post for another day and get right down to basics. 


This journal.

Around last Christmas, I found myself in need of a new creative outlet. I had spent the previous 3.5 years working on my master's degree (and traveling the world!), which didn't leave much time for creative pursuits. (I haven't sewn a single piece of clothing in YEARS, outside of a t-shirt refashion this summer!)

But in December, I graduated, and suddenly there it was. FREE TIME. I don't like to be idle. I like to learn and think and practice. I'm weird that way, and it's why I've always been such a good student. Rather than jump back into sewing, I wanted to learn something new. This all coincided with something else, a recent interest in pursuing more traditional art, inspired by a friend's participation in the month-long drawing challenge "Inktober" that takes place every October. 

I haven't drawn in YEARS. Well--I doodle. I'm a doodler. So if we count doodles, I've drawn since I could hold a pencil. But I had never considered my doodles "real drawing" or "real art" before, and for some reason I had this silly notion that I was too "old" to draw or learn something that I should have pursued as a young person "if I was ever going to be good". 

NEWSFLASH: Everyone can do art. It's never too late to learn something new, and that includes drawing and painting. The pursuit of making art is not about being "good". It's about making something and enjoying the process. That's what you used to do as a child, with crayons and pencils and paint and a fresh sheet of paper, and somehow that simple enjoyment became eclipsed by the need to be "good". 

I didn't do Inktober last year. I was still struggling with the "I'm not good enough" mindset and I was smack in the middle of writing and editing my thesis. But it niggled there, in the back of my mind, the memories of drawing and painting, an after school art lesson or two from my art teacher (when my parents probably didn't really need to spend the money). 

I bought a sketchbook and some pencils. Then I bought a few more. Then I bought a different sketchbook because I realized I didn't really love the first one. I started watching YouTube tutorials on drawing and sketching and fell in love with one adorable artist named Fran Meneses (frannerd on YouTube) who used a lot of Copic markers and watercolors. I had never learned watercolor; in school we painted with acrylic and oil. Watercolors were those long trays of ovals with a skinny plastic brush and not a lot of payoff. But what Fran was using was different and I was intrigued. I switched my YouTube viewing from sketching and drawing to watercolor painting. 

My friends, I was hooked. 

Since December, I've amassed a nice collection of watercolors and sketchbooks (still searching for the holy grail), signed up for Skillshare, bought half a dozen books, and watched a million tutorials. 

I totally suck. It's the most fun I've had in years. 

Which brings me to this very brief and non-tutorial-y DIY: That beautiful sketchbook up there. 

Over the past several months I've discovered a few things about my watercolor-loving self: I prefer transparent watercolors (Schminke might be my favorite) and hot press paper. The Schminke I've got covered (after saving up forever) but the hot press paper CAN. NOT. BE. FOUND. in a journal form. It's become really important to always have a sketchbook or journal with me, and carrying around full size paper pads or blocks isn't practical. 

So I made my own. I have this Cinch binding machine, from a Hobby Lobby gift card and 50% off coupon two years ago: 

It's  on the pricy side (about $79 on Amazon), but if you love making papercrafts and photo journals or the like, it might be worth watching for a sale. It was REALLY easy to use. 

I used this pad of Arches hot press paper in 9x12 sheets: 


There are 12 sheets in a pad (for about $10 on Dick Blick's website); I cut each sheet in half for a 6x9 finished book size. I kept the paper pad's back cover too, which is a nice piece of firm cardboard, and cut it in half to make the journal covers. 

I used the Anna Griffin Garden Party scrapbook paper pad in 12x12 size (also purchased at Hobby Lobby for 50% off) to cover the cardboard pieces: 


Here's the inside of the covers, with a coordinating print: 


Binding the book was a cinch (ba dum tissss). No but really, it was easy. The Cinch machine punches the holes (even through that thick, scrapbook covered cardboard cover!!) and has a little hole-holding doo-hickey that ensures all of your holes are aligned. (If you want a tutorial on using the Cinch, let me know and I'll do one!) The side of the machine has hooks to making placing all the pages and covers on the O-wire simple, and the back of the machine has a "cincher" that squeezes the O-wires closed. 

Voila. finished sketchbook. 

It's still empty, but it's only 48 hours old. I'll confess I'm still getting past the "not good enough" mentality and it can be a struggle to put pen or brush to paper sometimes, especially GOOD paper. 

On the other hand, what's a sketchbook without art. That pad of Arches has sat in my craft drawer for going on 8 months, untouched, because of fear of failure. Here's the thing though: this is mine. No one but me ever has to see it. It was made for me, by me, and I'm the only one who ever has to peek inside. 

I may never show you my finished pages. But I will finish them. 

And that's the point. 

Sunday, February 17, 2013

Counterfeit Dresden Petal Handbag Pattern: Los Angeles Needlework

Thank you to the lovely blog reader Kathy, who let me know that the losangelesneedlework dot com (not feeding their traffic with a  link!) was SELLING my Dresden Petal's handbag pattern.

damn straight I'm a 5-star author. I'm also FREE.


WOW. If you're a blogger who shares patterns and tutorials on your blog or website for free, you might go have a look. I recognized a few others' work while I was there for the five minutes it took me to submit a CEASE AND DESIST notice on them.

Son of a gun. People are scumbags.  They even added the absolute WORST font choice ever on top of my images. (I teach graphic design. Don't screw around with me on font choice. It ticks me off.)

**UPDATE** A little sleuthing on whois led me to this domain company (as the domain contact for LA Needlework): https://www.domainsbyproxy.com/Default.aspx

Please click on that link and choose "File a Claim". There is a place to report any of their websites that host copyrighted or trademark-infringing materials.  Thanks guys for reporting! I'm feeling pretty blessed at all of you who have emailed to let me know my pattern was up, even 24 hours after this post, I'm still getting emails from concerned bloggers and I appreciate all of you!

**UPDATE #2** I have heard from Domains by Proxy and they provided additional contact for the hosting provider for Los Angeles Needleworks. Here is that contact info. Feel free to flood their email with complaints.  (Note that this info is also publicly available under the Whois.com website as well. Just giving you folks another contact point.)

Hosting Provider:
Nerdie Networks LLC
3941 E Chandler Blvd, #106-211
Phoenix AZ 85048


Now let's shut this !@#$% down.  (As of 4  p.m. 2/18, my content is still on their site and available for purchase. Grrr.  I have heard from at least one other blogger who has had her content removed.)

Meanwhile, if you'd like to access the Dresden Petal Handbag Pattern for FREE...


Just click to your little hearts content right here.


Monday, August 08, 2011

weekend wrapup & a mini-tutorial

Between the oppressive heat (we're on day 36 of 100+ temps...many of those above 110!!  WITH 80-90% humidity.  It's like breathing soup.) and starting back to school last Monday, I'm pretty wiped out. 

That's saying something seeing as this is MONDAY.  Oof.

I did get a tiny bit of quality time with the '78 Bernina this weekend though; no clothes (which I desperately want to work on), just classroom stuff.  I whipped up this cute bunting for my very plain computer lab walls:


We moved into a brand spanking new building last week, so everything is shiny and new.  It's a little overwhelming to tell you the truth!  But I feel very lucky.  I teach the MOST fun classes, and now I have the best space possible to do that in. 

Here are 2 storage cubes I decoupaged this weekend for my room.  This one is for decorative scissors, punches, rulers and interior design templates, etc:


And it's matched mate is for cardstock or construction paper (when the budget gets tight!)


I painted stripes along the backside before I built the cube, in pretty, colorful stripes.  You can't really see them until you bend over at eye level (or are a student in a desk facing that cube!) but it's a nice little surprise for those who do!

The cubes are from Hobby Lobby and are those stackables you can "build your own" creative storage center.  I bought white cubes (I think they come in black too), glossy Mod Podge, and white with red polka dot gift tissue.  Cut the tissue to match the outer dimensions of each side and Mod Podge them in place!  I used 3 coats on top for durability.  

I have a 3-drawer storage piece I decopauged using this method several years ago when I first started teaching (zebra tissue!) and it looks amazing still even after sitting on my desk for 7+ years!  The tissue can be a little finicky to place (if you accidentally touch the Mod Podge while placing it, it's a bear to remove and reposition.  But if you take your time, it's a cool "painted" effect without all the work!  Think of all the cool patterned gift tissue there is out there!

I hope to get most of my stuff in place and on the walls today, so I'll take my camera and get some photos of my finished room to share!  You'll have to forgive my Teacher Geek for a few more days...it's that time of year!

Saturday, January 15, 2011

Vintage Sewalong: trouser grading tutorial

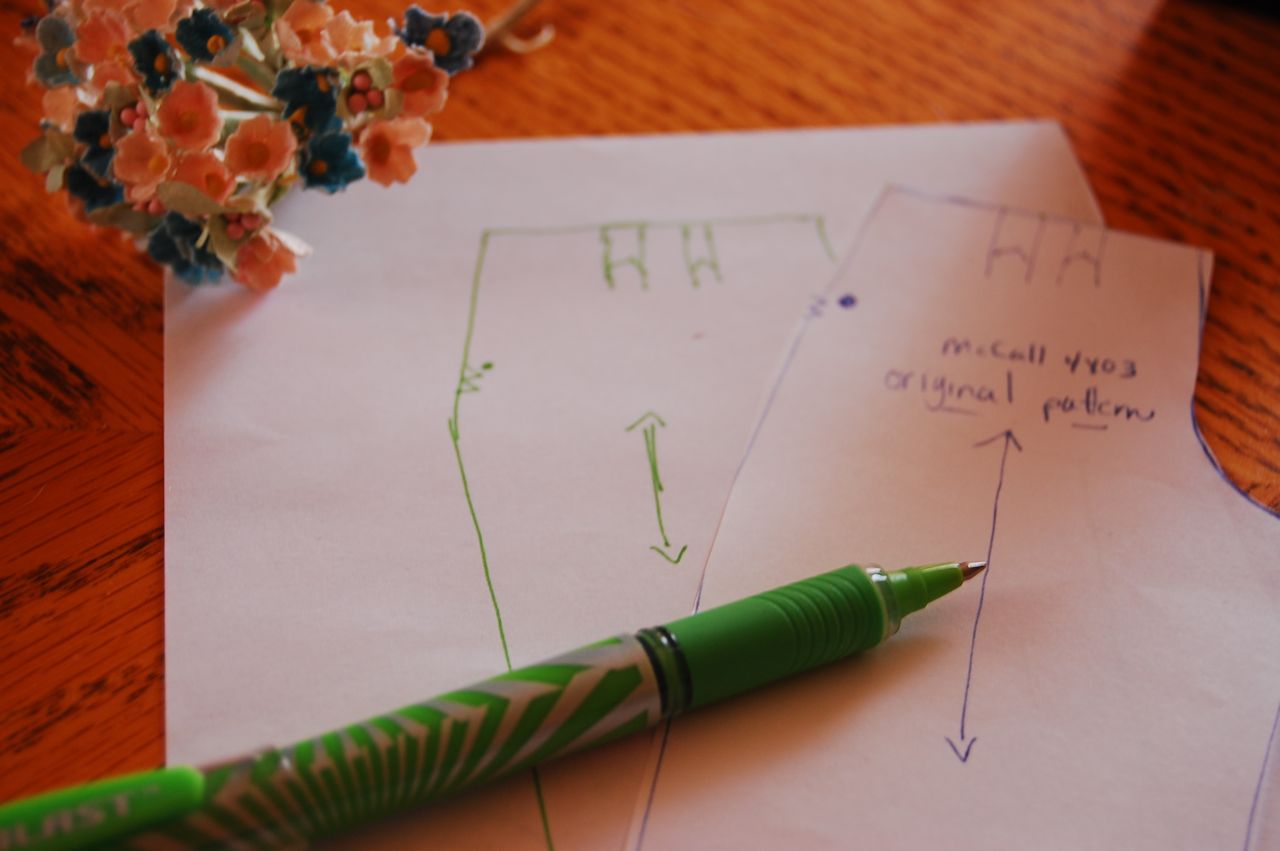
My pattern arrived this week!  In case you've forgotten or missed that post, for the Vintage Sewalong '11 I'm making McCall 4803, a 1940's trouser:


Lovely, right?

Of course, as is the case with many of my vintage patterns (especially bottoms) this one is way too small.  Pattern waist = 26 inches.  angie.a's waist = more than that.

(Oh all right.  In the interest of full discloser, 10 inches more than that.)

So, how about a little tutorial on upsizing a vintage trouser/short pattern? (And when I say little, I mean in miniature.  hehe.)

Step 1:  Gather supplies.  I use at least 2 colors of pen or marker, scotch tape (or acid free if you have it), scissors, things to use for weighting down tissue/tracing paper.


Step 2: Carefully press out any wrinkles in vintage tissue if necessary (I never use heat since that would degrade tissue further.  I just gently press with my fingers on a smooth, hard surface).  I also carefully tape any tears or rips in the (usually very old and brittle) tissue. 

Trace pattern transferring all markings to tissue or tracing paper. (I use a 36" roll of tracing paper from Dick Blick Art Supplies).


Step 3:  Math.  I need to add 10" to my pattern at the waist and hip.  There are 4 side seams (2 front, 2 back), and I have always had good luck with pants and skirts by just adding to the side seams.  Some books say no more than 2" but I've added more than that lots of times.  You will probably have to fiddle with your pleat/dart placement later.

So, 10" divided by 4 seams = 2.5".  I make a mark near the top (waist) 2.5" from the side seam with a new color pen. 


Slide your original pattern piece over to the  mark and line up the waistline.  Look at the grainline markings on both your tracing and the original (you can see through the original tissue) to make sure they are parallel.  Trace your  new side seam.


Step 4: Alot of people need to remove crotch depth in 30s/40s trousers, but I personally like to add a bit more.  I have a full high hip, and am very short waisted (so, conversely, I'm long from waist to crotch).  Generally a 40s trouser pattern's extra long crotch depth is usually good for me as drafted.  I'm adding 1" here because this particular pattern doesn't appear to have that gigantic crotch length I'm used to seeing in this era.

Using a similar slide method, I measure up from the waistband 1" and make a mark.  Then slide the waist of my original pattern up and retrace the waistline at 1". 


Slide pattern piece over to align at your new side seam and trace the rest of your widened) waistline.


**Note that if you have a more normal "crotch length" style of pant and you need to grade up, you would likely need to add to the crotch length in this same manner.  I just don't have to do this with the extra long length in 30s and 40s patterns as a rule.

Step 5:  Now let's adjust those tucks!  Remember though, dart and tuck and pleat placement is pretty relative.  You can always pin them and try on your muslin and adjust placement until they are in the most flattering spot.

The original pattern shows the tuck placement to be approximately in the center of the pant front.  So, I just scoot the original over so that there's an equal distance from side seam and center front (to the original), like this:


Then I redraw the darts in their new placement (with the new color so I don't get confused).


I will probably have to increase the distance between the tucks too, so the proportions are still good. That's what a muslin is for, right?  
Here's my actual (graded) pattern tracing:


I hope this might help some of you who are putting off trying those too-small vintage patterns in your stash (or your etsy cart!)

Next up, MUSLIN!

Sunday, August 29, 2010

shhh. ebay shopping secrets inside.

Probably the most common comment or question I get from everyone on this blog is "How do you find such wonderful stuff?" Now, I can't help you with the condition or contents of your local flea market/thrift shops/estate sales. But I don't mind telling my ebay/etsy "secrets" to you! We're all family, right?

Besides, they aren't really secrets. Just techniques. First up, eBay. (I'll save Etsy for another day.)
Numero Uno: Know thy wants (and how much you're willing to pay for them.)
This might be the most important tip. Know what you want; the age, the condition, and your absolute top dollar if you had to pay for it locally, and include tax and gas to get there (and possibly lunch). Why? Because that price is your maximum bid on ebay. (It will also save you from buyer's remorse when you inadvertently get into a bidding war over something you really didn't want in the first place.)

Note the vastly different starting prices on these patterns.
Do your research before you bid!


This concept is very personal. I can't tell you what your maximum bid should be on a gorgeous vintage slip with beautiful black lace & rosebuds.


Only you can know that. Your max price might be $10. Mine might be $30. In which case, I would win. Reverse the roles, and you would win. Lots of people only look for real bargains on ebay, which is fine if that's what you set out to do. But there are some wonderful items that really do deserve more than rock bottom prices. You decide what your limit is, but at the same time, don't let something you really love get away just because it's not yard sale priced.

My gauge of price is always this: If I don't buy it, will I be up at all hours of the night thinking about how I let it get away? A 1940s Vogue pattern magazine priced at $50, no. At $20? Yes. I would be kicking myself for letting that shiny piece of history slip out of my vintage lovin fingertips.

Numero Dos: Set thy Favorites and Searches.

You might already know you can save a seller as a "favorite". Do that, for example, when you find a cool vintage pattern seller who doesn't charge an arm and a leg, combines shipping, and typically has patterns in your size. Then, while you're in the "Favorite Sellers" portion of ebay, sign up for the seller's newsletter if they have one, and also check the box that will allow ebay to email you a weekly list of "Items from your Favorites".


Ebay's weekly newsletter will email you a few items from each of your favorites, up to about five. After that, you'll have to go directly to ebay and look at your favorites page to see the rest. I don't often find patterns to purchase in this newsletter because most of my faves have a huge inventory. I usually get my pattern goodies using the next method.

The Saved Searches method is different and I think it's a hidden gem at ebay. Most people probably never pay attention the little tag that asks if you want to "save this search". But, if you regularly search for 40s vintage patterns in a size 18...and your search is regularly coming up with things you want to buy, save that search! Ebay will mail you DAILY with new listings! Woot!


Saved Searches is my secret weapon. It's great because YOU come up with the search parameters, ebay does the rest. I've purchased many things through this method, especially with "Buy it Now" on something just listed that day.

Numero Tres & Cuatro: SHIPPING & FEEDBACK.
Tips #1 & 2 are my big ones, because I think most people get hung up on one or both of them. These two are oldies but goodies. First, READ THE FEEDBACK. I'm rarely disappointed on ebay because I read feedback**, every time. If they have a negative or a neutral on their feedback page listed, click the grey or red number and ebay will take you directly to that feedback so you can see it. Sometimes the 1 negative feedback is from a moron and you can disregard it.


**Note that these days, it's becoming pretty rare for a seller to have 100% positive feedback because of ebay's new policy whereas buyers can leave negatives, but seller's can't. That's one reason I no longer sell on ebay. Read the feedback and make an informed decision. In previous years, I would never buy from someone with less than 100% but I've had to make changes in how I shop because that's harder and harder to find.

READ THE SHIPPING COSTS. It's right under the bid portion, so glance at that and decide if its fair. My rule is basically never to pay more than a suitable flat rate USPS box costs. I rarely pay more than $10 for shipping unless its really heavy/large, etc. I typically pay about $2 or less for a vintage pattern, or $5-7 for a group of patterns, or a piece or two of fabric. (Flat rate box prices can be viewed on the USPS website.

And hey, if you think the seller could ship it cheaper using a flatrate box, just ask them before you bid if that might be an option. All they can say is no. (Just so you're aware, flat rate boxes are FREE, as are Priority Rate boxes AND the labels used on them. The USPS will even ship an entire case of them to a seller's house for free. Don't let someone rip you off by charging additional handling for the cost of a priorty/flat rate box and labels.)

If you're buying more than one item from a seller, make sure they combine shipping too. Conversely, if they combine shipping and you just bought a pattern, go peruse the rest of their stuff. It's like "free shipping" on everything else in their store!

Numero Cinco: Bidding with the Big Timers.
Sigh. When it comes to something that can easily be resold, you have to deal with shop owners bidding against you. Just like you have to fight off the flea market vendors at the estate and yard sales.

Vintage patterns on ebay are often gobbled up --ironically-- by vintage pattern sellers. I recognize most of their ebay "code" names now because I buy alot, so I sort of know whose purse is deeper than mine and I can call it quits early on.

Here's the cold hard truth about this whole scenario: All's fair in love and war and ebay. They have the money, they can bid against you. Often, they have MORE money to bid than you, especially on a fabulous large lot of vintage dress patterns in YOUR size. (and if you're me, that's one of the most popular sizes, unfortunately.)


Yes, it sucks. It sucks HARD. But the good news is...they're going to be reselling those patterns individually and you might still be able to get your hot little hands on the ones you really love, in the not too distant future. You'll just be paying a little more per pattern. If you know who "they" are, I suppose you could send a friendly email and say... I want this one. Really bad. Maybe they'll let you know as soon as its ready.

Or maybe they'll say, Please stop stalking me. (To be honest, I've never done this, but I've been sorely tempted a couple of times.)

(psst...Even if you don't know who "they" are, wait a week or so and see if they leave feedback for that item. There ya go. Now you know.)

Also, pattern sellers are typically not bidding against you in the single pattern race unless its dirt cheap. I can't win against a pattern seller in a really good lot. It's almost impossible. Their disposable income for that lot is much bigger than mine. They're hoping to make back the purchase price doubled or tripled. It's just business. BUT...they're not going to pay $10-20 for a complete, pristine, WW2 vintage pattern in my size, the way I will. They can't afford to, because they can't resell it and make a profit. So the singles are a much more realistic win for me.

Do I bid on the large, wonderful lots? You bet your ass I do! :P Once in a great, great while, I'll slip by the big timers and win one too. I just won a GREAT one a few weeks ago, that I plan to share shortly. It happens, but not often.

Numero Seis: Know the Lingo.
The title of a listing is what is searchable in ebay. If you're searching vintage, VTG also works in your search. You get varied results when you search 1940 and 40. Some people list pattern/dress bust measurements in their title and some don't. Some put their items in the correct category, and some don't. In other words, try a variety of things.

There are also search terms that buyers & sellers have coined over the years, and sellers put those in their titles to help you find their items. I don't know what you want, so you're going to have to investigate that part for yourself. One example is a "cutter".


A cutter is vintage clothing that has holes or damage, but could still be used for fabric or to recreate the pattern from. So you could search dress cutter and see what pops up. Remember tip #2, when you find a search parameter that is the Holy Grail for you, save it.

Sometimes the best buys don't have any of those things though. That's because they're being sold by NEWBIES who don't know any better! Bad for them, good for us. That means, they get overlooked or lost in the shuffle. Try mispelling vintage or pattern or whatever you're looking for and see what hidden gems you find. Transposed letters are the biggest goof I see in listing titles.

Lastly...

It may seem like you'll never, ever find such a fabulous item in this condition anywhere on earth again, as long as you live. But trust me, it only seems that way. Nearly everything I've ever bought, wanted, ogled or had sniped away on ebay, has shown its lovely face once again at some point. Unless it's OOAK (one of a kind), there's one out there, just for you.

Waiting for you to find it.

Sunday, July 04, 2010

perfect piping tutorial.

Jana asked about inserting piping, and the puppy got me up good and early this morning, so I decided to do a little mini-tutorial!

To start with, you need piping and a zipper foot. And 2 seams to sandwich the piping in. (I used piping on the mandarin collar, and bib front of my Burda magazine tunic here.) I buy mini-piping, because I like the narrower width better. The technique would be the same for the larger piping though.

I buy my mini-piping at Elegant Stitches in the package or Farmhouse Fabrics by the yard. Farmhouse Fabrics has a TON of variety. There are dots, checks, florals, solids, satins...you name it. They probably have a piping in it.


Step 1: Cut your piping to the length of the seam. I usually walk the piping along the seam because I'm lazy and don't measure very often. Either way will work. I do leave a little "extra", about 1 inch, for security purposes (i.e. I screwed up.)

Step 2: Pin your piping along one seam, matching raw edges. Your piping will be encased between 2 seams, but you sew them separately. Make sure you measure the seam allowance on your piping and make any adjustments to your pattern piece as needed so that they are the same. Otherwise you may end up with perfectly piped seams that don't fit!


Step 3: Place your zipper foot on your machine and slide it so you are sewing to the left. Butt your corded edge of the piping right against the edge of the foot as shown below, just as you would butt the coils of a zipper up to the foot. Note that the piping has a stitched seam; I move my needle position (or position the piping) so that my stitching will fall on top of or just a thread or so to the left of that seam.


I don't know if you can see above (you cal click the picture to enlarge) but the corded edge of the piping will run under the foot. There's a little "ledge" right under where the foot attaches to the machine and it is not flush with the machine bed. It is elevated to allow the zipper coil (or in our case, piping) to run freely under the foot as you sew.

Here's the piping stitched to the first seam (you would stitch the entire seam, I'm just doing a few inches as a sample):


Step 4: Now we will make our piping sandwich! Place your second piece of fabric on top of the piped fabric, right sides together, matching the raw edges.


Flip the sandwich over, keeping everything aligned, so that you can pin in place. We want to stitch from the side that we can see the previous stitching line. That will serve as a guideline for our next stitching:


Step 5: Place your sandwich under the zipper foot, aligning the previous stitching line with the needle. It should fall just under the leading edge of the zipper foot as below:


Stitch, stitch, stitch! Stitch right on top of the previous stitching.

Step 6: Open your sandwich and behold your perfect piping!


I hope this little mini-tutorial was helpful! Something I didn't take a photo of was going around a corner or curve...you can clip into the seam allowance of your piping strip before pinning, to make it more moldable. It will then go around any curve or corner. I clip right up to (but not through) the piping stitching. You can pin or hand baste the corner to hold it in place until permanently stitched; I recommend handbasting until you have the hang of it!

Mini-Piping Footnote...If you want to make your own mini-piping, it's super easy! The pros are that its cheaper and you have an unlimited variety of colors and prints available. If you have the fabric, you can make mini-piping. Basically you cut a strip of bias (the width of your seam allowance X 2, plus I usually add 1/16 of an inch for turn of cloth & cord). For the cording, I generally use pearl cotton, but in a pinch I've used sport weight yarn or crochet cotton. You can buy cording for mini-piping too from the sources above.

I press my bias strip in half lightly, then insert the cord into the fold. Stitch as above using a zipper foot, close to the cord.

Have a great day!

Saturday, June 19, 2010

summer shirred skirt tutorial

If you have a yard and a half of cute cotton print, some elastic thread, and oh, say, an afternoon...you can have a cute summery shirred skirt like this:


Let's get started!

First, we'll tear our cotton fabric into front and a back skirt panels. The size of your panels will be determined by your measurements. You'll need to measure your HIP and decide on FINISHED LENGTH (how long you want your skirt to be).

FRONT/BACK PANEL WIDTH: Hip x 2 **If you're making an adult version, you can just tear 2 full-fabric widths for front & back. Because of the way we'll construct the side seams to fit, you can trim away the excess.

FRONT/BACK PANEL LENGTH: Length + seam allowance - ruffle. For example, I wanted a knee length skirt with about a 4" ruffle. I measured from my waist to knee, added 1/2" for seam allowance and subtracted 4" for my ruffle. This is the length of my front/back panels. (Mine was 20.5")

RUFFLE: I wanted a nice, full ruffle that was fairly deep (4"). A good rule of thumb for ruffles is to double the length of the flat fabric you're attaching the ruffle to. Since I started with 2 widths of fabric (skirt front + skirt back), I tore four 4-1/2" strips for my ruffle. (the 1/2" is for seam allowance). **I planned to roll hem my ruffle using my serger, but if you're going to hem the ruffle with your sewing machine, don't forget to add that seam allowance too.

So, for example, my skirt panels were two pieces 20" x 44" for front & back, and 4 strips of 44" that were 4.5" wide.

Now for the fun part!

Step 1: Seam your front & back piece together on one side. Press seam open.


(oops. I was lazy and didn't trim away the selvedge. Hehe.)

Finish the top edge of your skirt. I used the serger to do a rolled hem, but you could do a small turned & stitched hem too. I forgot to take a picture until after I shirred, but here's the top edge of my skirt.


Step 2: Shirring may look complicated and a bit scary, but its really not. It's pretty dang easy, and its sort of soothing to sew all those rows one after the other, in nice, straight lines. Your mind can wander off and the hum of the sewing machine is comforting. Like Mr. Rogers.

To shir, you need elastic thread to wind on your bobbin. It's thicker than regular thread, and is actually a nylon fuzzy fiber wrapped tightly around a cord of elastic. It comes in a package in the notions section of your sewing & craft store. (It will be hanging up with the other precut elastics, not with the yardage to be "cut".)

Most shirring tutorials advise that you hand-wind the elastic onto the bobbin. It sounds like it will take forever, but it really doesn't. The hand-winding is supposed to prevent the elastic from being stretched to capacity from your sewing machine bobbin-winder. (Hint: I'll tell you a secret. Sometimes I'm lazy & use my bobbin-winder anyway. I've never had a problem with doing so. Just go slow. Shhh.)


I usually wind as many bobbins as I can. I can shir 2 rows across 2 full widths of fabric with one bobbin. My finished skirt has 14 rows of shirring. That would be 7 bobbins!! I only had 3 empties which means I still had to stop and rewind bobbins a couple of times.

Load your bobbin just like normal in your machine. I do turn the handwheel one time to catch & pull the thread up and place it under the presser foot. I use regular poly/cotton thread in the needle.

Now, you're going to have to fiddle with your stitch length and your tension. Generally you need to increase your stitch length, and increase your tension. Don't go overboard though. You want to shirring to be sturdy enough to last (it is a garment, after all, and will be washed multiple times). I wouldn't increase your stitch length more than 3.5-4. You will also have to increase the tension a bit, somewhere between 6-8 is usually sufficient.

Hint: My settings on the Bernina Activa 220 for this skirt: Stitch Length 3.0; Tension 8

Begin stitching, placing your first line of stitching approximately 1/2" from the hem edge. You can use your regular sewing bed markings for this initial row, but from here on out you will be using your presser foot edge as a guide. Stitch, Stitch, Stitch, lining up each row so that the previous row is on the edge of your presser foot.

Hint: I backstitch at the beginning and end of each row (tutorials vary on this step, but I always feel more secure with a backstitch!) You can also leave thread "tails" to tie into a secure knot at the end of each row.

Your first and even second or third row, you may see very little change in your fabric. You might even suspect its not working right (it's not drawing up enough). Trust me, the more rows you sew, the more the shirring effect will happen. Just keep going. (**There's also a magic step at the end! Of course. I like magic!)

Hint: Two full widths of fabric can be a little unwieldy, so what I do is roll up the fabric so that I only have the leading edge & about 10" or so to deal with. Then, as I sew the line of stitching, I unroll the next 10" or so as necessary. I also pull the fabric flat as it passes under the needle.

Here's the "magic"...Steam! When all finished, with a nice, hot iron, steam the bejeezus out of your shirring. Just hover your iron, don't "touch" the threads. You'll see it immediately begin to draw up into nice, tight shirring.


Here's your finished shirring from the front:


And from the back:


So...how many rows to sew?? Well, you might have to do a little math, but I just eyeballed it. Actually, 10 rows was probably sufficient for this little skirt. That made an approximately 4" waistband of shirring. I added a few more rows because I had the insane idea that I could make this a dual garment, functioning sometimes as a "top" and sometimes as a "skirt".

I have too much boobage for that it would seem. So I stopped the madness at 14 rows.

Step 3: Now let's get busy on that ruffle! Seam all of your ruffle strips together. You'll have one, gigantically long strip of fabric. And you'll be cursing me at the thought of all those basting stitches to gather up by hand. Ugh. But wait! I have more magic for you!

It's called a gathering foot. Get thyself to the sewing machine dealer pronto and buy one. Mine looks like this:


I heart mine. Alot.

Before we can gather, though, we need to take care of those raw hem edges on the ruffle. Again, I used the serger to do a roll hem. Nice and tidy (and FAST):

yards and yards of rolled hem ruffle

Now put your gathering foot on and again, we'll play with tension and stitch length to make it work. The longer the stitch length and the higher the tension, the more gathering effect you will get. I've been using my foot for a while, so I can judge pretty well the way different weights of fabric will gather (lightweight fabric gathers up more/tighter than heavier or beefier fabrics).

Hint: My settings: Tension 7, Stitch Length 4.0

I used the 3/8" marking on my machine bed to line up the raw edge of the fabric (you could use your presser foot edge too) and begin stitching. There is no magic final step here, so if its not gathering up enough, try a longer stitch and/or higher tension. (If you can't access a gathering foot, then I'm afraid you'll have to gather the old fashioned way! Curses!)

You'll end up, very quickly I might add, with this:


Hint: I always press my gathers before stitching them to the next piece of fabric. It makes everything lay nice & flat and its much easier to see what you're doing when stitching!


Step 4: Stitch the ruffle to the bottom of your skirt front/back panel, right sides together.


Finish the seam. I used a serged edge, but you could use a wide zigzag too.


Step 5: Now it's time to sew up your last side seam! Almost finished! "Try on" your skirt, to see where you need to stitch the side seam. Your elasticity from shirring (and your machine's tension, fabric type, etc) may vary quite a bit from garment to garment, so pin it on. You want the skirt to be snug enough at the waist so that it doesn't fall off at some inopportune time.

Say, at church. Or in line at the movies.

When you find that "perfect snugness", pin carefully and step out of your skirt. Finish pinning down the entire side seam to ensure all the edges line up: front/back of shirring match, front/back ruffle seam matches, front/back hem edge matches.


If you're like me and used 2 full widths of fabric, you might end up trimming away quite a bit of edge (I trimmed away about 2" from each edge). If you'll be trimming away shirred portions, then you will need to reinforce those areas before cutting, so that all your hard work (elastic thread) doesn't come "undone".

I stitched three lines of straight stitching, right next to each other, in what would become the new "seam allowance" of my side seams. In other words, I stitched right outside of where I pinned to fit, perpendicular to the shirring lines. This stitching will catch and anchor the shirring so that it won't come undone later.

Step 6: Stitch your side seams with a straight stitch. Don't forget to put your regular foot back on and change your tension settings/stitch length to normal first!

Finish the seam. I used my serger.


Step 7: A special hint for you sergers-ers out there. When you're making a garment like this, where the edge of your serging won't be caught in another seam, what do you do with the tail that's left over??


Your serger manual probably tells you to use a bodkin or something to weave the tail into the serged seam. Of course, in my experience, this tends to work its way back out over time, or is next to impossible to do. Here's what I do instead. I cut the tail to approximately 1" and fold it back along the seam, inside the seam allowance like this:


Using the regular sewing machine and a wide zigzag, I catch the serger tail in the zig and the seam allowance edge in the zag. I zigzag along the serger tail for a bit and voila. It's neatly taken care of and will never come undone!

Step Finished! And that my friends, is all there is to it! Now you can go out and wear your cute new skirt!


(And hopefully your legs aren't as pasty pale as mine.)

ps...The fabric used in my skirt is from the fabulous Jennifer Paganelli's Sis Boom line.