Showing posts with label vintage sewalong. Show all posts

Sunday, November 04, 2012

Tuppance Ha'penny's Pencil Skirt Sew-along

OOh, I've been procrastinating on fall/winter sewing for REASONS (dunnnn duh dun dun) but Tuppance Ha'penny's wily sewalong ways have swayed me.  I'm joining her vintage pencil skirt sewalong!


Firstly, Charlotte is so dang cute I want to hang out with her and be her bestie so we can share clothes.  Yup.

(translation: so I can wear all of HER clothes)

Secondly, this (to quote Kristine) amazeballs vintage pencil skirt pattern has been haunting me for something like two years:


That hip bow!  It kills me.

I also have Simplicity 4769, with an interesting pocket/button flap thing.


And New York 1181, which is a tad fuller than your traditional pencil skirt, but has really interesting shaped/cut-on pockets:


And lastly, this McCalls 3733, possibly the most interesting darts I've ever seen:


For now, the plan is to go with the hip-bow version of McCalls 4579.  It's so adorable.  And I have been saving this fabric for a pencil skirt too, deep royal blue linen:


I don't know if you remember or not, but I was on this royal blue kick a year or so ago, and I ended up with several pieces of fabric (solids and prints) that feature this color.  I think I ended up with one garment, a top, but the rest of it has been waiting for it's day in the sun.

First up though, I AM going to finish my Crepe today.  It's so easy.  Why do I procrastinate on the simplest projects??

Head over to Charlotte's blog for more info on the sewalong.  She is awesome.  She's got a calendar of events planned and since this is a "beginner" sewalong, it should be really informative too!  It's just started, so come along and join us!

Sunday, February 20, 2011

Vtg McCalls 4115 - finished!

Yay!  And what a different experience...I sewed something I loved from start to finish and it fits.  This must be what those really productive people feel like.  Here's a full body shot, but I cut my head off in every one.  Sorry, my tripod is AWOL, so I was using a chair. :)


In case you're just joining me, here's the pattern photo:


Obviously I'm missing the illustration's wasp waist. ha.  Other than that, I really love it!  Makes me feel like spring is coming!

I did decide to topstitch the tabs and collar.  I'm glad, it really added a finished touch.


I chose a pearly button from my vintage button box.  They were probably ivory originally, but look pale yellow on the gingham.


I used a pale yellow bias to bind the armholes.


I only had 5 of these buttons, so I had to limit myself to 3 down the back tab:


The skirt is very, very full!  It's nearly 180" of skirt!  On a windy day like today, it's a Marilyn moment waiting to happen.


The bodice fits better than anything I own.  I think that might be a testament to the muslin process? 


If I were a bullet bra and girdle kind of girl, I could have made the bodice closer fitting, which would be more period-appropriate.  I kinda prefer to breathe though.

Shoe shot, "pewter" ballerina flats from Naturalizer.com:


I'm even more excited to have this well-fitted bodice because I have several similar patterns that I can check fit on with these pattern pieces (a'la a personal sloper). 

Off to post at We Sew Vintage and the Vintage Sewalong!  Hooray for the first finished project of 2011!

Friday, February 11, 2011

Vtg McCalls 4115 - in progress

I made a lot of progress the past two days on my yellow gingham dress!  Here is the pattern photo:


I'm making the full skirt version, with the button on tabs from the slim version.  First, here are in-progress photos I just snapped of the bodice for you picture lovers.  Then, I'll list the changes I made for fitting for the detail lovers.  ;)

Bodice front, keep in mind I'm more endowed than my dressform! Note the cute little button-on tabs peeking out from under the collar.


Close up of the cute v-neck.  I'm debating topstitching it.  What do you think?


Bodice back, with the back tab.  I LOVE the tabs!  I can't wait to dig around in my stash for buttons.  White?  Pearl?  Yellow??


Inside shot.  I've been following the vintage directions exactly, and used pinking shears to cut out/finish my interior seams.  This is the shoulder seam with the collar flipped up so you can see the facing.  I used the "turn under and edge stitch" finish for the facing raw edge.


The opposite shoulder seam with a better view of the facing.  Because of my changes to the neck, I had to redraw the facing and it seemed a tad too large.  That was probably a drawing/tracing error on my part.  The facing ever so slightly flares out at the bottom edge.  I've adjusted the pattern piece for next time. 


The inside facing at the v-neck.  I still need to tack the facings down.  I should end up with several tack points to keep the facing in place: the CF, shoulder seams, and under the tabs at front and CB.


I turned under 1/8" and edestitched the facing edge:


I topstitched all of the tabs, although the pattern did not call for it.  I thought they looked better with topstitching!  And that could be one of those things that are "left out" of vintage patterns because it was assumed you knew to do that.


I didn't happen to take pictures of the bodice during the muslin stage.  Because it is a simple, fitted bodice, I was able to use my experience & pattern from Simplicity 3430 to help gauge fit.  My first muslin was near perfect (again the front bodice WAS perfect, needing only a re-angled & shorter waist dart, and a lowered side dart). 

The back had some issues that were similar to 3430 with an additional fold of fabric under my neck.   I must be walking around with a hump back there.  Why haven't any of you mentioned that?? haha.)  I added to the sides using the Rasband book, did a swayback adjustment to remove some length at CB, and then removed that little fold/pouch of fabric under my neck by slashing the pattern and overlapping it about 1/2".  I also lowered the back neckline by about 5/8", which I find I have to do on a regular basis. 

None of the fitting books give the slash/overlap as a fix for that fold, by the way.  Pretty much all the fitting info I could find (in books or online) suggested the opposite...ADDING fabric there.  I did try that and it exacerbated the fold.  My instinct was to pin it out and lower the neckline, so I did, and voila.  Perfectly fitted to MY back.  Sometimes you need to go with your instinct! 

Now I'm off to gather the skirt pieces and pray I have a suitable zipper.  This is another side-lapped zipper, and dang it all if this pattern doesn't give any instructions at all!  I'll have to google  or dig through the pattern box I suppose.  I hate the instructions I used last time.

Hope you're all staying warm and toasty!  We still have 19" of snow on the ground (as of 4 pm last night) after a little melting and settling yesterday.  We ended up with over 25" by the time it stopped Wednesday.  That's the most snow we've ever had here. 

Happy Friday!

Wednesday, February 09, 2011

snowmageddon. and gingham.

I've lived here quite a while (30 years? haha) and I don't think I've ever seen the snow come down this fast or this deep.  This is what I call Crazy Snow. 

When I open the back door, I see this:


When I open the front door, I see this:


And Priscilla jumps in.


So her face looks like this:


My poor little car is stuck in the garage with 21" (and counting) behind her:


But I'm lucky because during last week's snowpocalypse, I muslined this:


And Sunday I cut it out in this:


ps...I think poor Stick Girl got snowed in, in town.  Stick Girl, call me!

Stay warm everyone!!

Tuesday, February 01, 2011

Vtg Simplicity 3430 - in progress #3

After a few days "away" from this dress, I have tried it back on to reassess and discovered the following things:
  1. It fits perfectly through the bust, neckline/shoulder, and armscye in front.
  2. It's too tight across the mid-back but too high at the back neck, and the center-back seam has a funny curve to the left.  
If I could've figured out how to take a picture of my back that could capture all of that, I would have!  What's most confusing to me is how perfect the front can be, with plenty of ease at the waist/bust, etc, just PERFECT...and yet the back is a hot mess and feels super uncomfortable.  Weird weird weird.

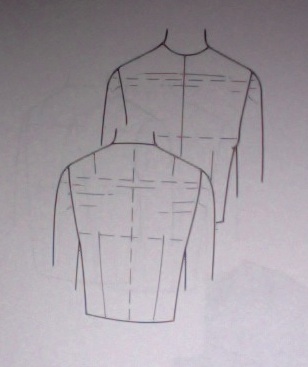
A little research in my two favorite fitting books and I think I've found my problem.   First I went to Jan Minott's Fitting Commercial Patterns.  The closet wrinkle chart in this book I could find was this one:


I do have pulling/tightness right there at mid-armhole in back but my tension wrinkles continue across mid-back and even lower.  I have used this adjustment in the past though.  It requires you to redraw the armhole, and I'm never sure I've done that adequately (and you won't know until you muslin!) 
So I went to the next book with helpful wrinkle charts, Fitting & Pattern Alteration by Liechty, Pottberg and Rasband.  I really like this book.  I'm such a sewing geek sometimes I just read it for fun. 

And here is where I found my first back wrinkle: 


What I love about this book is that it gives you a variety of pattern change methods.  If you're a pivot/slider, you have a diagram.  If you're a slasher/spreader, you have a diagram.  If you're one of those cut into the seam and spread people, you have a diagram.  (I wish I was one of those people.  That method always looks like it constrains proportions of things like armhole/neckline, etc. best). 

And I didn't realize it until I saw the wrinkle chart, but I have this wrinkle too:


Overall the back is too narrow, but the armhole is fine. The funny curve I get in the CB might be the fiddly zipper insertion.  I had to re-do it several times and it's possible I took up more than the seam allowance at that curvy CB level.  For now, I'm not going to address that.

To check and see if these alterations would fix my problem (before I go any further with another method) I did a terrible thing (haha).  I used the slash method (first alteration photo, far top left) and slashed my dress as shown, on each side.  Then I tried it on.

I know.  Those of you who really loved this dress so far are crying.  Sorry!  I did not love it.  In fact, it's been looking more and more Gunne Sax (and not in a good way) hanging there on my dressform.  Taunting me with it's floral print and too long skirt.  Trust me, I was never going to wear it.  The skirt was too narrow, even with 2 full widths of fabric.  It needs 3 minimum for this style (or maybe 2 widths of 60").

The good news is, the back dropped into place and smoothed out, revealing I need about 1" more in width (if I go by the amount of skin showing through the slash!)  I also need about 1" more at waist level, so I did the 2nd slash as shown in the 2nd set of photos above.  That created a new wrinkle, one that showed the CB length is too long (which I suspected anyway).

I'm altering the pattern today and I'll recut bodice only in another scrap fabric to check.  Then it's off to find another suitable fabric.  I got several lovely shirting pieces from Fabric.com's recent clearance sale! I can't resist shirting cottons, especially at $1.99 and $2.99 a yard.

Meanwhile, I'm watching it snow.  I'm stuck home in a blizzard warning, a surreal experience for those of us in Oklahoma.  Praying I don't lose power and water (and thus my sanity).


If you're anywhere east of me, it's coming your way, so stay safe and stay warm!

Wednesday, January 26, 2011

Vtg Simplicity 3430 - in progress #2

Ok, this is turning into one of those projects.  You know the ones.  Where everything SEEMS to be perfect and sunny and then whammo...some stupid mistake or fitting issue rears its ugly head.

How about some pictures though (taken with flash and my son's little camera, because I left my card at school!)  First, the back "fix".  I decided to go with the strip of matching fabric because as much as I loved Kristine's idea, I didn't have a coordinating color solid. 


I like it. It turned out really cute!   Wish I'd carried it all the way around front.  (I didn't think I'd like it, so I didn't do the front too.  I figured I wouldn't be the one looking at it, being in the back and all.) 

And you see that flash of color in the zip?  Yeah.  Who doesn't have a WHITE zipper on hand?  Yours truly, that's who.  I don't know if that has ever happened.  I ALWAYS keep white zippers (it's a thing.  I don't know why.)  Anywho, I had the perfect color of purple.  A color I almost never wear.  Perfect length too, so I just did a side-lapped zipper:


It doesn't really show this much when it's all zipped up.  I love that it matches the purple though, even if no one knows but me. (and you).  It was a bear to put in though.  I've been trying to follow the vintage directions exactly (or as near as possible) and I had to cull a side zip set of instructions from another pattern since this one featured a center back zip. 

Well.  The directions said to stitch the side seam, leaving an opening for the zipper.  Baste the opening, press seams open.  Here's the tricky part:  turn under left side of seam allowance and press at approximately 1/8 inch.  If you do that, there's not enough room under the "seam allowance" for that much turned seam.  Does that make sense?  Or it's really, really close. 

Then you slide the zipper underneath and topstitch on the 1/8" fold.  This was nearly impossible.  Shifty, horrendous mess.  I ended up hand-basting the whole thing and I still had to rip out twice.  It's in now though, and looks pretty.  I'll be searching for a new method of side lapped zip instructions though!

Here's the front with the skirt attached.  I didn't have enough fabric for the extra full cupcake skirt.  This is 2 full widths of 45" fabric (one for front, one for back).  It's just "regular" full, not "50's" full.
 

Unfortunately I can't show you a photo ON me because the dang thing is too tight!  I don't know how that happened because it was perfect to the point I was afraid it'd be too loose.  I guess I overzealously stuck to the 5/8" seam allowances. 

Now comes the fun of picking them out and stitching with 1/4" seams to see if I can wear it this spring.  Oh, and Lean Cuisines for dinner.  (Which, I was going to do anyway.  Apparently the steroid/antibiotic combo I had the joy of receiving recently added a bit of weight.  After I went to all the work of getting really sick and losing some!)  So...skinnier seams + skinnier me = pretty spring dress.

Leaving you now with this lovely photo of Priscilla and her favorite person (me), taken by my rotten 16 y/o who said really it was most important that PRISCILLA be featured in the majority of the shot.  Gee, thanks.

Saturday, January 22, 2011

Vtg Simplicity 3430 - in progress


This is totally not my original Vintage Sewalong pattern choice!  The original plan was for Hepburn style trousers and a pretty 1940s-inspired blouse.   I did finally receive my patterns in the mail last weekend and I altered the pants.  I still don't have a clue what to use for fabric for either pattern.  Hmph. 

So...in the interest of other patterns calling my name, I've moved on for now.  Yesterday I traced and altered this sundress because...fitted bodice! square neckline! RICK RACK!  AND...a little princess seam bolero?  Awesome.  

I haven't finished altering the bolero, but I did get the bodice for the dress cut out this morning.  I used this spring-ish pink and lavender print.  It's cotton, and has a stripe woven in.  I have NO idea where I got it, but it has been in my stash for at least 10 years.  I thought it was perfect for this dress.


Bodice Front:  I had to add 2 inches to the to the front using the pivot/slide method (Nancy Zieman), and I added 1" length.  I also  lowered the bust dart approximately 1" after trying on my tissue and marking bust point.  I had to re-angle the waist dart about 3/8".

Apparently all my fiddling was worth it because the front fits really well through the bust and waist.  This is my "padded" dress form:


Can you see my boo boo in this photo?  (No?  You're looking at that pointy 50's shaping, aren't you?)


Well.  Let me tell you about the bodice back.  I altered the back with 1.5" using pivot/slide (this was a size 36 bust and my full bust is 45").   I knew from previous experience with this era of patterns that a size 16 or 18 neckline is pretty perfect for me, but the bust and back requires quite a bit of additional room. (Weirdly, no additional FBA though).
I also lengthened the bodice back by 1".  Or so I thought.  But look at the side seams:


Well, rats.  I have no idea what went wrong.  I must have "intended" to add the additional 1" and didn't.  Who knows.  At this point I have to decide whether or not to fix this somehow or just scrap the bodice and save the skirt pieces and scraps for a pretty skirt instead.  

Which would be such a shame since the neckline is so pretty and fits so well:


The choices as I see it are, trim off the excess from the front bodice to match the back (easiest), OR, add two strips cut from my straps, to the bottom of the back bodice pieces, trying to match the print and the woven lines in the fabric.   Stinky.  But, probably the best choice in the end since I really need that extra inch.  

Or just scrap this one altogether and move onto another fabric.  The good news is, if I do try the "strip" method to piece back onto the back bodice, I can cover the seam with the rickrack rows (in theory).  

And honestly?  Who's ever going to notice but me?

I hope your weekend is going well!

Saturday, January 15, 2011

Vintage Sewalong: trouser grading tutorial

My pattern arrived this week!  In case you've forgotten or missed that post, for the Vintage Sewalong '11 I'm making McCall 4803, a 1940's trouser:


Lovely, right?

Of course, as is the case with many of my vintage patterns (especially bottoms) this one is way too small.  Pattern waist = 26 inches.  angie.a's waist = more than that.

(Oh all right.  In the interest of full discloser, 10 inches more than that.)

So, how about a little tutorial on upsizing a vintage trouser/short pattern? (And when I say little, I mean in miniature.  hehe.)

Step 1:  Gather supplies.  I use at least 2 colors of pen or marker, scotch tape (or acid free if you have it), scissors, things to use for weighting down tissue/tracing paper.


Step 2: Carefully press out any wrinkles in vintage tissue if necessary (I never use heat since that would degrade tissue further.  I just gently press with my fingers on a smooth, hard surface).  I also carefully tape any tears or rips in the (usually very old and brittle) tissue. 

Trace pattern transferring all markings to tissue or tracing paper. (I use a 36" roll of tracing paper from Dick Blick Art Supplies).


Step 3:  Math.  I need to add 10" to my pattern at the waist and hip.  There are 4 side seams (2 front, 2 back), and I have always had good luck with pants and skirts by just adding to the side seams.  Some books say no more than 2" but I've added more than that lots of times.  You will probably have to fiddle with your pleat/dart placement later.

So, 10" divided by 4 seams = 2.5".  I make a mark near the top (waist) 2.5" from the side seam with a new color pen. 


Slide your original pattern piece over to the  mark and line up the waistline.  Look at the grainline markings on both your tracing and the original (you can see through the original tissue) to make sure they are parallel.  Trace your  new side seam.


Step 4: Alot of people need to remove crotch depth in 30s/40s trousers, but I personally like to add a bit more.  I have a full high hip, and am very short waisted (so, conversely, I'm long from waist to crotch).  Generally a 40s trouser pattern's extra long crotch depth is usually good for me as drafted.  I'm adding 1" here because this particular pattern doesn't appear to have that gigantic crotch length I'm used to seeing in this era.

Using a similar slide method, I measure up from the waistband 1" and make a mark.  Then slide the waist of my original pattern up and retrace the waistline at 1". 


Slide pattern piece over to align at your new side seam and trace the rest of your widened) waistline.


**Note that if you have a more normal "crotch length" style of pant and you need to grade up, you would likely need to add to the crotch length in this same manner.  I just don't have to do this with the extra long length in 30s and 40s patterns as a rule.

Step 5:  Now let's adjust those tucks!  Remember though, dart and tuck and pleat placement is pretty relative.  You can always pin them and try on your muslin and adjust placement until they are in the most flattering spot.

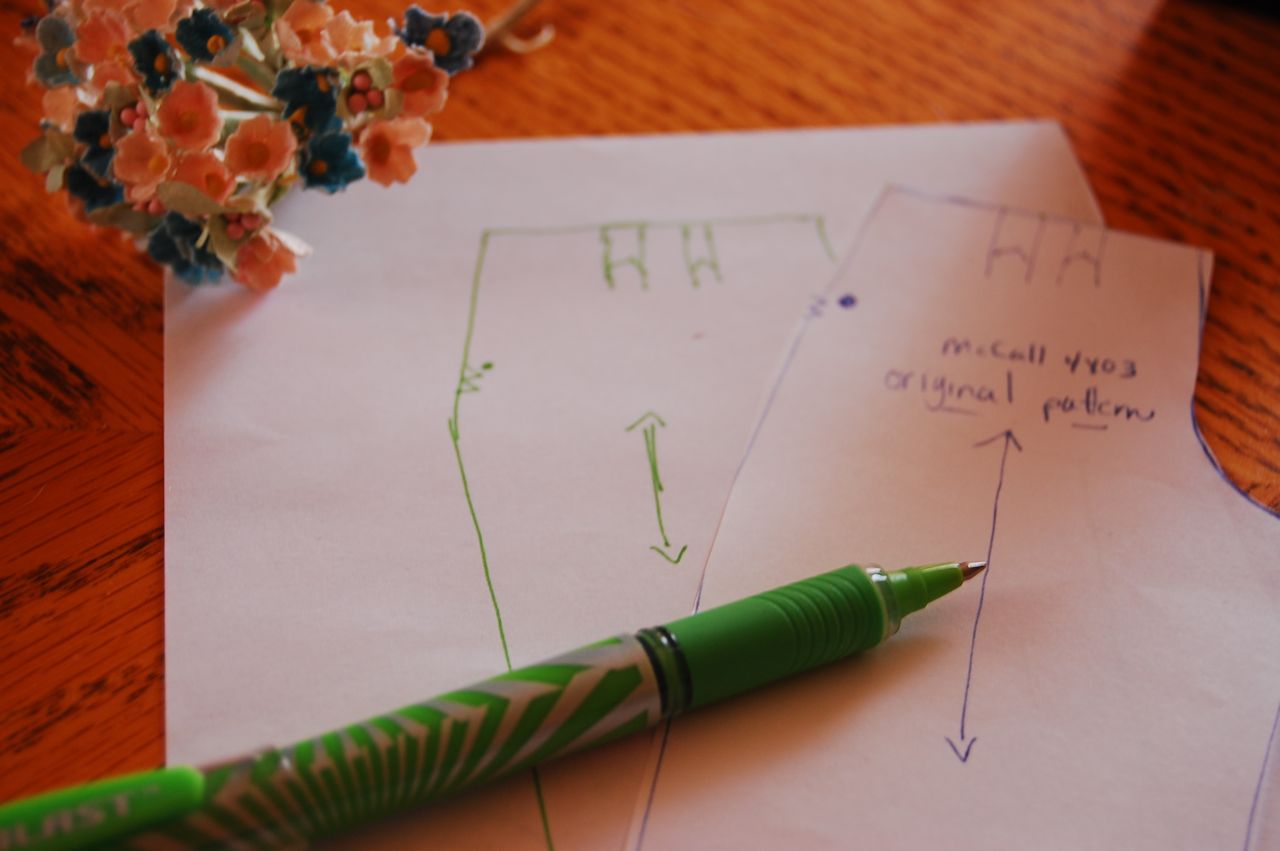
The original pattern shows the tuck placement to be approximately in the center of the pant front.  So, I just scoot the original over so that there's an equal distance from side seam and center front (to the original), like this:


Then I redraw the darts in their new placement (with the new color so I don't get confused).


I will probably have to increase the distance between the tucks too, so the proportions are still good. That's what a muslin is for, right?  
Here's my actual (graded) pattern tracing:


I hope this might help some of you who are putting off trying those too-small vintage patterns in your stash (or your etsy cart!)

Next up, MUSLIN!