Showing posts with label we sew vintage. Show all posts

Wednesday, July 13, 2011

Vtg Simplicity 2757 ~ the Bicycle Dress


This dress started out as one of *those* projects.  Let me start at the beginning...

I bought this adorable vintage pattern last winter, Simplicity 2757:


Lovely, right?  Scooped square neckline, elbow sleeves, tiny bows.  And in a larger bust size!  Score! I must have pulled it out of the pattern box a dozen times before last week.  Finally, my project table is empty and I'm feeling the vintage dress bug, so I began tracing.

I traced the bodices first, then went back and used the bodice from this pattern that fit so well, to make any additional adjustments.  I skipped the muslin because, you know, that McCalls dress fit so well.  Uh huh.  I sadly used an adorable polkadot chambray that I have been hoarding for this fiasco of a bodice.

Main problem...TOO BIG.  I cut away at least 2 inches from the side seams and that only partially helped.  Long story short...I set it all aside and then Monday had a stroke of "OMG, I am so stupid sometimes" (ha.  You thought I was going to say genius, didn't you.) I had cut away about 2" from the side seams of the polkadot monstrosity....and I had added about the same amount in my "adjustments".  What if I straight muslin the actual pattern?  Presto!  Almost perfect.


I didn't actually  need much in the way of adjustments after all; a broad back adjustment, re-angle the shoulder seam, and move the shoulders in about 3/4 of an inch.  (I really need a 38 bust for my shoulders, but it's not so hard to adjust a slightly bigger pattern).

I did leave off the  waist darts because I wanted to forgo the zipper and just pull this over my head.  Likewise, I didn't fool with pleats this time, just gathers.  My favorite part, the tiny bow at center front:


I'm calling this the Bicycle Dress, because look...not grey polka dots, tiny BICYCLES.  All over.  (This is a Free Spirit quilting cotton called Weekends).

Other stuff...I didn't have quite enough fabric for a hem (ahem, haha!), so I added a cheeky ruffle.

Armholes finished with pink bias...

Inside seams all serged...


Bodice lined in white batiste, except I didn't cut it quite long enough.  Oops.  I had to stitch it to the top of the skirt/bodice seams, and it didn't quite cover them up!  Oh well.  Who's going to know?  (Except me and the couple hundred of you, that is.)


It is SO HOT and SO SUNNY here, I'm melting.  (Not literally).  I hope you're staying cool wherever you are!

Sunday, February 20, 2011

Vtg McCalls 4115 - finished!

Yay!  And what a different experience...I sewed something I loved from start to finish and it fits.  This must be what those really productive people feel like.  Here's a full body shot, but I cut my head off in every one.  Sorry, my tripod is AWOL, so I was using a chair. :)


In case you're just joining me, here's the pattern photo:


Obviously I'm missing the illustration's wasp waist. ha.  Other than that, I really love it!  Makes me feel like spring is coming!

I did decide to topstitch the tabs and collar.  I'm glad, it really added a finished touch.


I chose a pearly button from my vintage button box.  They were probably ivory originally, but look pale yellow on the gingham.


I used a pale yellow bias to bind the armholes.


I only had 5 of these buttons, so I had to limit myself to 3 down the back tab:


The skirt is very, very full!  It's nearly 180" of skirt!  On a windy day like today, it's a Marilyn moment waiting to happen.


The bodice fits better than anything I own.  I think that might be a testament to the muslin process? 


If I were a bullet bra and girdle kind of girl, I could have made the bodice closer fitting, which would be more period-appropriate.  I kinda prefer to breathe though.

Shoe shot, "pewter" ballerina flats from Naturalizer.com:


I'm even more excited to have this well-fitted bodice because I have several similar patterns that I can check fit on with these pattern pieces (a'la a personal sloper). 

Off to post at We Sew Vintage and the Vintage Sewalong!  Hooray for the first finished project of 2011!

Tuesday, August 03, 2010

Vtg Simplicity 4657

Ok, this was a really long time coming. More than one of you will be very happy to see this finished skirt! This is a vintage 1950s "cupcake skirt", Simplicity 4657.


Note that I paired it with my new/vintage McCall top! I love it tucked in. Here's the skirt pattern photo:


I decided it might be prudent to finish a nearly-complete UFO skirt before starting a brand new UFO. Call me crazy. I love the cumberbund in the pattern illustration, but alas that piece isn't included in the pattern. Drat. I do have another skirt pattern that has a similar cumberbund though, I just need to dig it out. Of course I don't have any more of this great fabric to make one, so it will have to be for a future version.

I started this skirt way back in March. It is so stinking hot outside that I didn't fool with taking detail shots. Sorry! I do have a picture from March, of the lapped metal zipper in a nearly perfect green. (Check out all those gathers!)


That zipper is from a huge bundle of vintage metal zippers I got at the flea market last September for $2. I beat my sister to it by oh, three steps or so. She was furious. Ha.

The only adjustments I made to the pattern were to lengthen the waistband to my own waist measurement plus overlap/seam allowances, and to shorten it to knee length. I don't think I could wear it much longer (unless I was going to wear a poufy slip under it, which would require a bit more length).

I'm not sure if this cupcake silhouette is one I will find myself wearing often, but it IS fun and swishy. I feel so first season Betty Draper. I'll probably pair it with a more fitted tee or tank/cardigan more often than with this fuller blouse. I love the blouse, and I love it tucked in, but I think it might be a better silhouette for me if it's tucked into a slimmer fitting trouser.

Still, there's something very nostalgic about this outfit. I like it.


Gratuitous shoe shot:


Yummy pink flat with zipper ruffle from Modcloth.

The End.

ps...I'll be cross-posting at We Sew Vintage! :-) Just click on my name in the sidebar to view all my vintage projects!

Friday, July 30, 2010

Vtg McCall 5600

Here's McCall 5600, a mid-1940s blouse pattern:


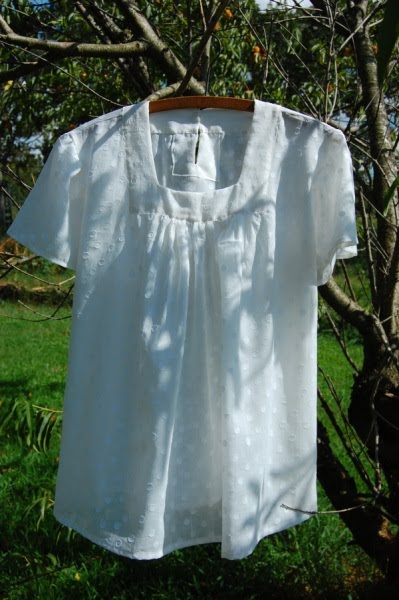
It is SUCH a sweet little blouse! I love it! I made my version in a white spotted voile, nearly a dead ringer for the cover illustration. I made View B, with the yoke from View A.


View B has a separate pattern piece for the yoke, a straight piece with darts marked to miter a straight piece of lace or ribbon to create the yoke. Very clever! View A has a traditional square-shaped yoke piece that is self-fabric faced. I love the gathered center front! I needed no alteration to this pattern other than scooting the CF away from the fold 1.5" to allow for a bit of an FBA.


The yoke is applied to the bodice front/back by turning under the seam allowance on the yoke, then topstitching in place. I see this technique all the time on 1930s and 1940s patterns. There were so many interesting seams in that era, and using this technique would be the easiest way to achieve intricate seaming. Here's a closeup of the topstitching:


The facing is then handstitched to the inside, covering the seam.


The back bodice has a small, faced placket. The placket & facing square are slit, stitched along the edge of the slit, then the facing turned in. Edges are turned under and topstitched. Very simple and actually very pretty! There is a loop & button closure at the neckline.


I used a vintage white rhinestone center button. It's just faded and "old" enough to make me very happy to see it at the back neck! Hopefully the rhinestone doesn't fall out the first time I handwash this blouse! (I have spare rhinestones, no worries!) My blanket-stitched button loop is just sad. I'll be cutting it off and redoing it shortly. I'm out of practice!


There are tiny turned up hems at the sleeves and hem. I did not gather and apply the binding to the short, puffed sleeve. It was a last minute decision because I thought the fluttery effect was well suited to this voile blouse.


I will say the center front gathering does have the slightest maternity look if untucked. But the fabric is lightweight enough that it does not pouf out in the least. I've already worn it! I wore it to the movies last night with my buddy StickGirl. I didn't get a photo of it on, but I'll try to get one in the next couple of days. I spilled coffee on it getting in the car for the ride home of course! So it's already been handwashed and needs pressed again.

Love, Love Love this. I can see more in my future! One of the things I've been learning from my vintage pattern endeavors, is to slow down and pay attention to the experience of creating garments. There are so many little bits of sewing information and techniques that require you to take your time or at least put a little though into them.

For example, carefully pressing under the seam allowance of the yoke with precision so that it matches the seamline of the blouse, or creating a blanket-stitched thread loop by hand. Every few steps in the instructions there is reason for me to pause and take my time in the creation process.

Nothing I've encountered has been difficult or, to be honest, better replaced by a more modern technique. In fact, I find I'm preferring the vintage techniques over modern shortcuts.

Next, I've got to finish a couple of skirts! I have 5 days of summer vacation left and I plan to make the most of them! One more parting shot of my pretty, vintage blouse:


I'll be cross-posting at We Sew Vintage!

Wednesday, July 07, 2010

Vtg Mail Order 1839

How I got this vintage pattern is kind of a mystery to me. I either received it in a pattern lot from ebay, got it from a flea market (unlikely since it's my size. That never happens!) or possibly one of you kind souls who sends me goodies sent it? :) I just can't remember!

In any case...it's a mail order pattern and I do not have the envelope, and there is no identifying company, just a number: 1839. It's a bust size 38.


While I really like the 3/4 sleeve blouse and the late 1940s skirt silhouette, check out that very, very sweet cap sleeve version of the blouse! Lace trimmed placket and collar! Gathered yoke!

I chose a lavender eyelet (that I had stashed away for Lu. Shh.) for my version:


It turned out so, so cute. And, it was surprisingly easy to fit. I'm telling you, I truly believe patternmakers of the past either way understood the geometry of the human figure better, or they were using more realistically proportioned bodies to begin with. Or both. Note the inverted pleats in front to further shape the bodice.

Here's a close up of the lace-trimmed collar:


I used a "French edging", and gathered by hand using the pull thread in the lace header. (If you've never used French laces, it's pretty awesome. It's cotton, so the "look" is very dainty and pretty. Also, there are 2-3 header threads that you can use for gathering and lace-shaping.) I didn't add any interfacing to the collar, since I was using an eyelet.

I added lace to either edge of the placket, but did not gather it. I thought it would be easier to keep pressed that way (cotton lace wrinkles!) I used shell buttons.


The back at shoulder level is taller; it wraps around to the front forming a yoke above the front shoulder gathers.


The back neck has two small pleats or darts (they were shaped like darts, but they formed pleats because of the direction they point.) I love darts in the back neck! Eliminates all my back neck fitting difficulties.


The little cut-on cap sleeves had to be widened about 1/2". I just started the side seam a 1/2" lower than the dot. I turned up a tiny hem, 1/4" twice. The pattern above shoes a lace edging on the sleeve too, but I think it would make me itchy.


The bottom hem is also just turned up twice and stitched.

Other minor alterations: I did a pivot/slide to add to the waist & hip. I did a sort of FBA by slashing through my (traced) pattern from the middle of the shoulder to near the hem and spread 3/4". I lengthened the front & back by 1/2". I also dropped the height of the front pleats by 1".

I love this little top so much! I'll try to get a photo or two of me wearing it tomorrow if the weather is nice. I hope to cut out one more before summer is over too! I've also traced the 3/4 sleeve version, and I'm excited to try that one too!

Hope you're all having a productive week. :)

This post is cross posted at We Sew Vintage!

Friday, July 02, 2010

Vtg Simplicity 1230

Shorts recap: Yesterday, on a lark, I decided to muslin this great vintage Simplicity pattern in my stash:


Here are the finished shorts (front view) in a peachy-pink linen:


Side view: (which I rarely take a photo of! You're going to get my side AND back view. You're so lucky.)


And because I never know where to place my arm in a side view (leading to aLOT of awkward photos, another reason I rarely bother):


You can see the curve of my backside better with my arm up. I'm happy my bum doesn't look quite as flat in these as in most pants. :D

Back view:
The back does show a tiny wedge that needs to be removed for a bit of swayback. I have now made that alteration on the back pattern piece. I didn't see it in the muslin, but I didn't fully complete the waistband, so it's possible I had the muslin pulled up too high in back.

But other than that, the back is fairly perfect. Let me tell you, starting with a pattern that nearly fits is SO much easier to fine tune! Because of a weird vertical fold near the center back, I scooped the back crotch about 3/4" (in 1/4" increments until I felt it was perfect, and still really comfortable). I tapered that change up the CB seam, to about the level of the bottom of the dart. I pinned this in first and tried on (wrong side out, pins on outside). Then I basted it and checked again. That's it for the back. I didn't make any other changes.

For the front, I deepened the crotch seam about 1/4" (and after I sewed the muslin, I had done a fisheye dart to remove some crotch length in the front).

This pair has 1/2" removed around the entire top (front and back). I'll probably go ahead and remove that from the pattern piece, because I love the fit and where the waistband hits.

So let's go through some details... The front of the shorts have stitched-down pleats, which I LOVE. They are just soooo 1940s. Pretty much ever authentic 40s photo of women in trousers I have seen feature these topstitched pleats.


The back also features one topstitched pleat, but I did a long dart. It was actually a mistake when I was tracing; I marked dots that seemed to be a "dart", but in fact the lowest marking was something else. I like the dart though, I don't think I would get as nice a fit in the derriere with a topstitched pleat, so I made the change permanent on my pattern.


This pattern called for snap closures (which I've seen called "poppers" or "studs" in vintage patterns) along the side seam, but I inserted a lapped zipper. The waistband was my 2nd version. The first was too narrow (I didn't use the pattern piece for this straight waistband, but tore a strip approximately the right length & width). It looked very 1980s. So off it came and the 2nd one is a tad too wide. But its growing on me.


The seam finish recommended was straight stitching along the seam allowance and pinking, which I might have tried if my pinking shears didn't need a good sharpening. I straight stitched seams, and zigzagged seam allowances together. I do have a serger, but not the right color of thread. I finished seams like this for years before I had a serger, so I know its sturdy.

I encased the raw edge of the waistband with Seams Great, zigzagging on.


I left enough for a deep hem. I wanted more weight to the hem because of the fullness of the legs (and my chubby thighs). I'd like the shorts to remain in proper position as much as possible. The hem is turned under 1/4" and again 2" and stitched.


And because someone usually asks about my shoes, I took a closer picture of them too! I'm such a shoe whore. (Sorry, it's true.) These incredible summer wedges are from Modcloth. Gorgeous! I think they are just modern enough but still have a retro twist.


Another parting shot of the shorts, after I had walked around and taken LOTS of photos. They still look great! I can see lots more of this pattern in my future!


This post is cross posted at We Sew Vintage!