Sunday, July 11, 2010

Vtg Mail Order 1839 (again)

It's official, I love this little pattern! Here's my second version in a vintage cotton print:


It's a little windy today so the shape was hard to capture. It has the same waist darts in front & back, and gathering at the yokes.


I left the collar plain.


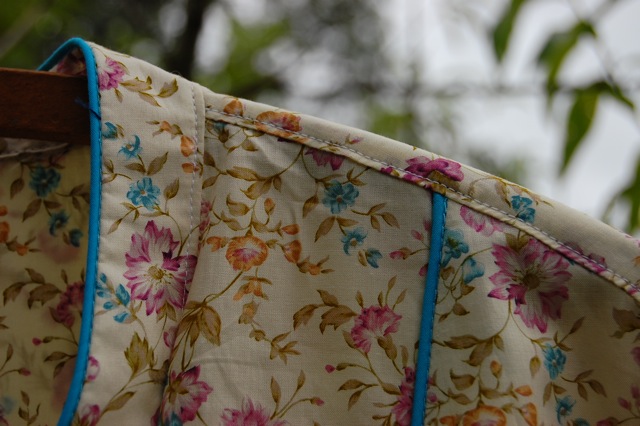
But I trimmed the plackets with a tatting-look edging, a sweet vintage find from an ebay lace bundle. (Someone selling off their grandmother's collection of sewing items from the 1950s. I will truly never understand people, but I hope her grandma would be happy to know I'm loving & using the items!)


You can see the lace a little better in this one, and the sweet fabric. It is SO soft! It was only 35" wide, but I'm no good at dating fabrics. I have no idea when the widths became 42" and 44"?


The buttons are vintage too, from an Etsy seller, a carded set of 6. I have never removed vintage buttons from a card before! It felt a little sacrilegious.


The darts on the back neckline, and the collar back:


And another windy shot of the blouse front.


I've got one more of the cap-sleeve version I'd really like to make right away because its so fast and easy, but I did trace off another copy to make the sleeve version too. You use the same pattern pieces, it just had perforated dots to show where to cut for the armscye. I traced it all off onto another sheet of tracing paper rather than cut up my original tracing of course. Now I have 2 blouse patterns already fitted!

The only change I made to the sleeve version was to add 2 inches. This is a short blouse, which I think is part of the style. I wanted a longer length that would tuck in easier, and be a little more modern pant friendly.

I can't believe how fast July is speeding by. I'll be going to a school-related conference this week, so I really only have Monday and Tuesday for sewing and blogging activities. (Um, and packing. Packing has to be done at some point too.) I hope you all have a great week! Sew lots so I have lots of pretties to look at when I get back!

Wednesday, July 07, 2010

Vtg Mail Order 1839

How I got this vintage pattern is kind of a mystery to me. I either received it in a pattern lot from ebay, got it from a flea market (unlikely since it's my size. That never happens!) or possibly one of you kind souls who sends me goodies sent it? :) I just can't remember!

In any case...it's a mail order pattern and I do not have the envelope, and there is no identifying company, just a number: 1839. It's a bust size 38.


While I really like the 3/4 sleeve blouse and the late 1940s skirt silhouette, check out that very, very sweet cap sleeve version of the blouse! Lace trimmed placket and collar! Gathered yoke!

I chose a lavender eyelet (that I had stashed away for Lu. Shh.) for my version:


It turned out so, so cute. And, it was surprisingly easy to fit. I'm telling you, I truly believe patternmakers of the past either way understood the geometry of the human figure better, or they were using more realistically proportioned bodies to begin with. Or both. Note the inverted pleats in front to further shape the bodice.

Here's a close up of the lace-trimmed collar:


I used a "French edging", and gathered by hand using the pull thread in the lace header. (If you've never used French laces, it's pretty awesome. It's cotton, so the "look" is very dainty and pretty. Also, there are 2-3 header threads that you can use for gathering and lace-shaping.) I didn't add any interfacing to the collar, since I was using an eyelet.

I added lace to either edge of the placket, but did not gather it. I thought it would be easier to keep pressed that way (cotton lace wrinkles!) I used shell buttons.


The back at shoulder level is taller; it wraps around to the front forming a yoke above the front shoulder gathers.


The back neck has two small pleats or darts (they were shaped like darts, but they formed pleats because of the direction they point.) I love darts in the back neck! Eliminates all my back neck fitting difficulties.


The little cut-on cap sleeves had to be widened about 1/2". I just started the side seam a 1/2" lower than the dot. I turned up a tiny hem, 1/4" twice. The pattern above shoes a lace edging on the sleeve too, but I think it would make me itchy.


The bottom hem is also just turned up twice and stitched.

Other minor alterations: I did a pivot/slide to add to the waist & hip. I did a sort of FBA by slashing through my (traced) pattern from the middle of the shoulder to near the hem and spread 3/4". I lengthened the front & back by 1/2". I also dropped the height of the front pleats by 1".

I love this little top so much! I'll try to get a photo or two of me wearing it tomorrow if the weather is nice. I hope to cut out one more before summer is over too! I've also traced the 3/4 sleeve version, and I'm excited to try that one too!

Hope you're all having a productive week. :)

This post is cross posted at We Sew Vintage!

Tuesday, July 06, 2010

Sunday, July 04, 2010

perfect piping tutorial.

Jana asked about inserting piping, and the puppy got me up good and early this morning, so I decided to do a little mini-tutorial!

To start with, you need piping and a zipper foot. And 2 seams to sandwich the piping in. (I used piping on the mandarin collar, and bib front of my Burda magazine tunic here.) I buy mini-piping, because I like the narrower width better. The technique would be the same for the larger piping though.

I buy my mini-piping at Elegant Stitches in the package or Farmhouse Fabrics by the yard. Farmhouse Fabrics has a TON of variety. There are dots, checks, florals, solids, satins...you name it. They probably have a piping in it.


Step 1: Cut your piping to the length of the seam. I usually walk the piping along the seam because I'm lazy and don't measure very often. Either way will work. I do leave a little "extra", about 1 inch, for security purposes (i.e. I screwed up.)

Step 2: Pin your piping along one seam, matching raw edges. Your piping will be encased between 2 seams, but you sew them separately. Make sure you measure the seam allowance on your piping and make any adjustments to your pattern piece as needed so that they are the same. Otherwise you may end up with perfectly piped seams that don't fit!


Step 3: Place your zipper foot on your machine and slide it so you are sewing to the left. Butt your corded edge of the piping right against the edge of the foot as shown below, just as you would butt the coils of a zipper up to the foot. Note that the piping has a stitched seam; I move my needle position (or position the piping) so that my stitching will fall on top of or just a thread or so to the left of that seam.


I don't know if you can see above (you cal click the picture to enlarge) but the corded edge of the piping will run under the foot. There's a little "ledge" right under where the foot attaches to the machine and it is not flush with the machine bed. It is elevated to allow the zipper coil (or in our case, piping) to run freely under the foot as you sew.

Here's the piping stitched to the first seam (you would stitch the entire seam, I'm just doing a few inches as a sample):


Step 4: Now we will make our piping sandwich! Place your second piece of fabric on top of the piped fabric, right sides together, matching the raw edges.


Flip the sandwich over, keeping everything aligned, so that you can pin in place. We want to stitch from the side that we can see the previous stitching line. That will serve as a guideline for our next stitching:


Step 5: Place your sandwich under the zipper foot, aligning the previous stitching line with the needle. It should fall just under the leading edge of the zipper foot as below:


Stitch, stitch, stitch! Stitch right on top of the previous stitching.

Step 6: Open your sandwich and behold your perfect piping!


I hope this little mini-tutorial was helpful! Something I didn't take a photo of was going around a corner or curve...you can clip into the seam allowance of your piping strip before pinning, to make it more moldable. It will then go around any curve or corner. I clip right up to (but not through) the piping stitching. You can pin or hand baste the corner to hold it in place until permanently stitched; I recommend handbasting until you have the hang of it!

Mini-Piping Footnote...If you want to make your own mini-piping, it's super easy! The pros are that its cheaper and you have an unlimited variety of colors and prints available. If you have the fabric, you can make mini-piping. Basically you cut a strip of bias (the width of your seam allowance X 2, plus I usually add 1/16 of an inch for turn of cloth & cord). For the cording, I generally use pearl cotton, but in a pinch I've used sport weight yarn or crochet cotton. You can buy cording for mini-piping too from the sources above.

I press my bias strip in half lightly, then insert the cord into the fold. Stitch as above using a zipper foot, close to the cord.

Have a great day!

Saturday, July 03, 2010

Burda Magazine 1-10-133

This is one of those garments I overlooked until someone else made a beautiful rendition. (Michele, I'm talking to you!)

Here's the line drawing:
As soon as I saw Michele's gorgeous tunic, I knew the exact fabric I could use. I've had it for nearly 12 years! It's a beautiful, creamy lawn with mauve/lavender flowers and tiny turquoise sprigs. I had the perfect mini-piping in my stash too, for the yoke & collar.

Sorry, this isn't a modeled photo. It's raining and I just wanted to get the pictures quick! Here's a photo from of the front:


I had read Michele's blog both times she made this top, so I was aware that the front pleats were probably going to be unflattering. Still, I decided to go ahead and put them in, just to see, and yup, she was right. Totally preggo. I don't know what those Burda pattern drafters were smokin when they made this one. It would have been so cute if they had just drafted a flat front tunic!

I fixed it though, I topstitched them down, all the way to the hem. They ended up looking like pintucks:


My favorite part is the rounded yoke insert. I loved the piping in the magazine photo, and I really like the pop of turquoise. I haven't found/decided on buttons yet, so no buttonholes either. I can still wear it with a cami & no buttons.


The sleeves have little pleats, and a vent with cuff. I was going for a more feminine, airy feel, so I added these bias ties to the sleeves instead of a cuff:


The tunic features that awesome mandarin collar, also piped:


I don't know if you've noticed yet, but there are alot of fiddly bits with this pattern. Lots of extra detailing, most seams are topstitched.


Here's the back view. I had the same poufy effect that Michele had in back too. I didn't stitch these pleats down (like the front), because I don't think it would have worked as well, and I didn't want to mess up the fit. Instead, I opted to insert bias ties into the side seam. I'll just tie up some of the excess in back and live with the "blousing" effect.


Here's a close up of the back yoke & pleats. The lawn presses to crisp and smooth!


Even the hem was fiddly. It's just a turned up (twice) hem, 1/4-3/8" deep. I failed to take a photo of it, but it has a shirttail hem. I don't think its noticeable in the magazine until you go to look at the layout. I like it! I just don't have a picture of it. Here's the hem though:


And that's it! This has been the thing occupying my sewing time for the better part of 2 days (and I cut it out the day before I started my 1940s shorts, so it languished on the table for 48 hours!)

Next up, I really want to cut out a couple more of the 1940s pattern in shorts length and possibly one pair in capri pants. I'm not sure how that wide leg will translate to that length? Anyone have some cute period photos I can use for inspiration?

I'm also waiting for this to come in the mail, I have been stalking ebay & etsy for a while now for it. It was only listed a few minutes when I snatched it up, HA!


It annoys me that I had to buy it. I bought it back before it was OOP, years and years ago. I just can't find it, drat it. Have absolutely NO idea what happened, but I wonder if I loaned it to my sister or a girlfriend. Because I can't imagine I would have gotten rid of it. Anyway, I can't wait to make my own Audrey wardrobe. Well, in Audrey-esque plus size wardrobe, anyway.

I even watched Funny Face last night, in preparation.


Have a good holiday weekend to my US friends!!