Wednesday, May 28, 2008

Ottobre Woman 2-2007: Capri

These started out as my muslin, but they turned out so good, I wore them to work today!! (excuse the wrinkles!)


This is the Wide-Leg Capri Pant from Ottobre Woman 2-2007. I have been wanting to make these ever since I saw JuliaS' wonderful capri's on PR. I'm pretty amazed at how few alterations I will need to make these really nice-fitting pants!

My measurements put me between a 48 and 50 in Ottobre's size charts, but I'm chicken and always expect LOTS of alterations, so I cut a 52. I used a fairly lightweight cotton gabardine from stash (no stretch).

For this pair, I made NO alterations whatsoever to the pattern, because I wanted a true muslin. They fit pretty awesome right out of the box!! They are definitely a size too big, especially through the waist, which I tugged at all day to keep from slipping down. I probably could have used a 48 in the waist area. (I will probably trace off a 46 waist, 48 pant for those times when I want to use a stretch woven, because there is lots of room in this non-stretchy fabric.)

Since I sew and expect a REALLY good fit, there are things I will still change. There's something going on in the crotch area, but it's hard to decipher since the pants are so roomy (I can pull these on and off without unfastening the waist/unzipping!) I think I need to scoop out the back crotch a bit. They also sit pretty far down from my waist (definitely more than an inch) and I will be raising that. Don't want to be flashing anyone!

Here's a back view:


Really, not a bad fit in the back either, although I do have some smile lines! Is that the crotch thing?? But you know, these fit as good or better as any RTW pants I own. (I'd really like PERFECT capris, still, of course!)

When I cut these out, I only cut one waistband and forgot to cut the facing! Duh. Since they were a muslin and I was feeling frisky, I cut the facings from zebra quilting cotton. :D (And I smiled every time I went to the restroom today and saw that waist facing!) I also used trouser hooks instead of buttons on the waistband tab.


I really, really like these pants. And they went together SO fast. The instructions were pretty straightforward, although I did use Sandra Betzina's Fly Zip tutorial from Power Sewing (I always watch the video on the Threads website if I need a refresher too!)

I'll be making more of these for sure! And I'm pretty excited about trying out the denim capri's in the same issue out of some stretch denim in stash.

Monday, May 26, 2008

Short Project

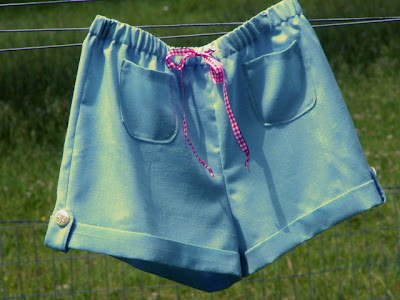
Another quick project for Lu, brought to you by the holiday weekend...Simplicity 4162:

Simplicity 4162 View E

Pull-on shorts that were quick & easy to sew, but have an added little zip with little pockets on the front and a button tab & cuff on the hem. I used a linen blend from stash in aqua blue. I really like the cuff with button tab. We used a fun JHB button from stash:


There is also a drawstring ribbon tie, but the drawstring is non-functional. You stitch 2
buttonholes on either side of the CF seam, and then after the waistband is finished, thread a length of ribbon through the button holes to tie in a bow. I stitched in the ditch in the CF seam after running the ribbon through to keep it in place. Normally I would have made a self-fabric tie, but these little blue shorts needed some "zip", even after we added the snazzy buttons, so we picked out a hot pink gingham ribbon from the stash bucket.

The pocket pattern is the same size for all sizes in the package, which is probably my only complaint. We've had this pattern a while and made it a couple of years ago and the pocket was cute on that size. It looks a bit small, however, on this size. Next time I'll enlarge the pocket a bit.

Next up on the sewing table is the sleeveless top from this pattern, View C.

Sunday, May 25, 2008

Saturday Afternoon No Brainer

This UFO has been sitting by the sewing machine for 2 weeks waiting for ribbon ties.


Fun project to do because it's ONE SEAM! All of the other design work is done for you. These pre-smocked/gathered panels were on sale at Hancocks a few weeks ago, so Lu picked out this juicy summer stripe for a sundress/top.

We scored the perfect matching ribbon for ties.

I finished this project & planned another while rewatching the BSG miniseries (Season 1), i.e. the good old days.

We miss you too, Captain Apollo.

Saturday, May 24, 2008

BWOF 2-2008 #122

A "Mod Tunic"...not my usual style, but with all the skinny leg stuff in the stores, I thought it was worth giving a whirl! Plus, I had this Mod-ish knit that might work in stash.


As I said before, I added an FBA to the front pieces, and eased that new dart in the side seams rather than actually make a dart. I suppose I could have rotated the dart into the pleats in the front, but I was worried enough (rightly so) that this top already had too much fullness over my bust.

The neckline is VERY cute on. But the shoulders are very narrow and very widely spaced...almost falling off my shoulder spaced. Here's a closer shot of the neckline:


Sadly, I'm not thrilled with THAT much fullness falling from my bust area. It's TOO full. I'm thinking I might decrease the pleats to just tucks instead. The tunic actually does have some shaping to it, you just can't tell with all that fullness in the front.

I didn't do the back zip, but cut the back pieces on the fold instead. I'm working with a knit instead of a woven/stretch woven as suggested. Surprise, surprise but the instructions for this one are really pretty decent! The only thing that was cagey was the yokes, because it sort of left out the part where you stitch the yoke facings to the yokes RST. It does tell you to turn them though. (It's just up to you to figure out what to turn!)

I also stitched the sleeves flat before doing the side seams. With a woven I would have followed the directions. Sadly, I stitched the sleeves in BACKWARDS!!! Entirely my fault, and I didn't notice until everything was serged and basically finished except for hems. Drat it.

I'm not sure if I want to fiddle with ripping it out and re-doing the sleeves. That's an itty-bitty seam. Plus, there are a few other things I'd like to tweak on this one. Like maybe widening that shoulder area on the yoke, and lowering the armscye a bit. It's pretty snug under my arm, although I can't really tell how much of that is the BACKWARD SLEEVE. Argh. AND since I'm not crazy about the fullness in front, I can adjust that too and have another go.

Luckily, I have another Mod-ish print in stash, but I'm not sure I've got enough to give it a go with this tunic. I'll have to lay it out and see.

More later!

Friday, May 23, 2008

Yay for the Long Weekend!

First up is clearing out some UFO's! A LH Swing Skirt in blue rose print with a dotty pocket:


and this cute tunic from BWOF 2/2008-#122:

And the line drawing...I used a funky knit for this one (unknown origin!) I did add a FBA, which I will ease in on the side seams rather than make a dart in my knit. Now hopefully the goofy thing will fit. The square neckline is a bit weird. It's very wide. I think I may have to wear a tank top or something under it to cover my bra straps. Shoulda made a muslin!

I cut the back yoke on the fold (minus seam allowance) since I was using a knit and don't plan on inserting a zip. Ditto for the back piece. The front & back yokes/linings are finished, understitched and all. The neckline was way too wide at first, so I made a center seam to take out the extra. With this print, you can't really even see it though. See below :


Barely noticeable, huh?! I've also got the pleats basted down on the front:


Now it's just a matter of sewing the backs & fronts to their respective yokes, add sleeves (which I will be adding flat rather than set-in as directed), side seams and hems. Yeah, OK, that sounds like a lot. But it should go fast.

Be back later, hopefully with good results!

Monday, May 19, 2008

And Introducing....

New ME piccie. See it? Over there on the left?

Taken last month at a conference. That's why someone else's forehead is sorta in the way....almost in danger of being stabbed by my pointy chin. AHHH!!! :P

Most of you already know I'm one and the same, but for those who didn't, I changed my profile name from jemima bean to angie.a. Now it matches my PR name (which just so happens to be my real one.)

Huh. I guess I can no longer use my split personality disorder as a crutch. Dang.

Although now things should get really ineresting as no one is going to recognize me out there when I comment on their blogs. Hmmm. I could probably have fun with this, eh?

When I started this blog, it was called Jemima Bean because that's the name of my teeny tiny children's clothing & toy biz on the side. I hoped to use this blog as a marketing tool.

Of course it ended up being my sewing cronies hangout instead.

So the point of this rather pointless post is that when you see me out there posting as angie.a, hopefully you'll recognize my face. Or my name. Or both.

lurv you all,

Sunday, May 18, 2008

Skirt Loudly.

Simplicity 4236

This one is probably going to be a "miss", but I thought I'd share anyway. I actually love the loud Lilly Pulitzer/Pucci-esque fabric. I have been hoarding this fabric for a couple of years now waiting for the perfect project.

Then last week I was inspired by TriniLove's LP knockoff skirt. Very cute!! Since I loved Toy's finished skirt, I began with the same pattern and proceeded to knock off her knockoff! I liked Toy's idea of increasing the 4-panel skirt into an 8-panel skirt. With all that volume, additional vertical seaming would hopefully be slimming too.
I began with Simplicity 4236, View A. I then folded the pattern piece in half to create my pattern piece for the 8 panels. I did decrease some of the volume at the base of the pattern piece by about 3".

This pattern seems to run rather large, at least in the 12-20 size package. I tried on the skirt after seaming the panels together and it was HUGE! I took in each panel an additional 3/8 of an inch. That helped with fit around the waist, but man there was a lot of skirt left everywhere else. I don't have any full or circular skirts, so I just went with it because I thought maybe I was being self-conscious about something that looked normal (for what it was.)

Before stitching the final side seam and inserting the zipper, I topstitched the seams in hot pink, (not that this print needs any additional interest!) I had to pull out my Singer New Sewing Essentials book to insert the lapped zipper, it's been a couple years since I put one in! HA! I love this book, it has easy to read instructions with lots of color photographs for each step. The only thing it's missing is spiral binding.


The waist is finished with twill tape (I used grosgrain ribbon) instead of a facing or waistband for a nice, clean finish. Since by this point I knew I was going to have fit/enjoyment isses, I used Steam-a-Seam to iron up the hem allowance. That will make the hem a lot easier to sew when I DO decide to hem it, but won't make yet another seam to rip out if I decide to "Fix It".

Grosgrain Ribbon Waist Stay

Here's the problem. As it turns out, my "perfect" fabric for this skirt ended up being NOT so perfect for this skirt. Too much volume in the pattern for this full-body fabric. The skirt stands away from my hips too much. See the little folds by each hip?

Hip Fold

In a lighter weight fabric, or one with more drape, this wouldn't be as noticeable. I also feel like the skirt is still a size too big. The front waist is slipping down as I move around. Still...the fabric does make me smile! (In person, this tank doesn't match AT ALL! The sunset was doing a number on the colors!)


Really, this is about the easiest skirt you could ever hope for. SO fast and easy to make. And there's a simple A-line view too, that I definitely will be making. My next project was going to be the Jalie Sweetheart top in hot pink to match my fun LP skirt, and the pattern is altered & ready to go.

Since I'm not loving the skirt right now, and I have the BWOF #103 pattern altered I think I'll go back and make it up instead. It's definitely a Frankenpattern now!! Look at all that tissue grafting!! :P Click for a larger image.


Any ideas for altering my skirt to make it more wearable?? Keep in mind that I have topstitched all the seams and the zip is in/waist finished. Argh. Still, any suggestions appreciated!

Thursday, May 15, 2008

BWOF #103

I think I'll consider this first one a muslin! Ha! Excuse the tiny bit of peekage (and my missing head. Haven't quite got the hang of my camera timer.)


I graded the pattern up to about a 48 and added an FBA. I think this was a tiny bit too much. Should have gone with a 46 with a bigger FBA. For one thing, by adding the extra size to the shoulder height, now it's way too low cut (this pic is after I raised the V about an inch!) You can't tell, but it is also a little "flappy" around my upper chest. I could pull that in with clear elastic possibly?

There's also this weird curving hem in the center front. Is that on purpose? Is it exaggerated because of my grading? I checked & double-checked it, and frankly in the line drawing in the mag it also shows this weird curved front hem. I'd prefer a straight hem I think. I added at least 1 inch to the front at CF and decreased a bit of the curve (about 1/2") at the sides and still fell it's too short for comfort at CF.

The construction (no surprise) is a bit convoluted. This top is also "half-lined". There's a cutting line for the front & back bodices about halfway down and you basically line the top with this half-top facing. Weird, huh? I didn't cut that part because I thought I would just turn under & twin-needle stitch the hems.

The good news...I like the style alot! I think it's pretty flattering, even half finished (no neckline, armhole or hems sewn yet!) The gathered band in front is different. I also think the gathers and horizontal dart in front are really cute. It looked good before I put the band on.

I have plenty of this print to remake this top (btw, this cute dotty print was from Gorgeous Fabrics). I think I will start all over again after adjusting the pattern. The Plan: raise the V, take off a bit of shoulder height, straighten the front hem, maybe a tad more FBA, and try again!

Has anyone else made this yet?

Groove Thang

Anna Tunic is a wadder. I added the FBA and fiddled with all the adjustments mentioned previously, but the honest truth is...this just isn't flattering on me. So I'm not spending any more time on it and I don't have a picture to show you. I'm sorry!!

But I do have a good "Plus Size" picture of me for those who are doubting my booty heft. :P

This is me one week ago doing the Travolta with a couple of my buddies at school. Note the one on the right is "Audrey", I am in the middle as "Hairspray", and my buddy on the left is "Flashdance". HeHe. It was Decades Day.

I thought you'd get a kick out of seeing it! I really do sew with Plus sizes (and buy them in bottoms too. Look at that booty!) I just look good in skirts (nice ankles) and I photograph pretty well straight on because of a relatively slimmer torso. Note that I've probably sucked it WAY in, in the pic above because you know, I'm in front of a bunch of teenagers.

Moving on to the next project...I'm setting a new goal that my fellow PR sewists have been doing since January: Sewing something (ANYTHING) from each issue of BWOF. I want to make so many things from my back issues it gets overwhelming when I try to start a project (all that tracing!) So I'm starting with the 5/08 issue.

I like top #103 for a quick/easy top for summer:
The only downside is that it only comes to size 42. I need to start with a 46 at least so I'm hoping I can grade it up pretty easy. It's a knit, so that will help!

I also like #120 top/121 dress:
I need tops, so I probably won't be making the dress, but isn't it a cute style?

I have been hoarding these fabrics (My name is Angie and I hoard all the best fabrics.)


I'm thinking the floral for 120 and the dot for 103. Now I'm off to trace!

Tuesday, May 13, 2008

Amy Butler Anna Tunic

The next project up is the Anna Tunic by Amy Butler:


This isn't my usual style. It's a little too tunic-y and shapeless. I'm very hourglass and not a small hourglass at that! So I need all the slimming I can get from my clothes. But this one has a cute neckline, and the best part is that it uses wovens....the pattern envelopes encourage the use of all those beautiful Amy Butler (et al) prints I have in my quilting cabinet!

I researched a little and found a couple of CUTE examples. Check out Stephanie's adorable top. And this one from a PR reviewer is a plus version. There are actually 4 reviews over at PR for the Anna tunic (scroll down for reviews.)

Last night I made a muslin. Yes, the world ceased spinning for a few seconds. Got your bearings now? Ok. I decided on the muslin because AB (et al) fabric is 'spensive. And after the length disappointment of the Fave Things skirt, I'm not in the mood to take chances.

I started with a similar weight stash cotton and cut a straight XL. I didn't do any alterations, but stitched it together (no linings, not even the yoke.) This was a quick and dirty, check the fit potholes muslin. Boy am I glad I did!! There were potholes aplenty!

The front neck/chest fit well. The back neck gaped about an inch on each side of the placket. It was too tight across the back hips. I needed a forward shoulder adjustment, and a full-bust adjustment...there were two darts forming in the armhole. It was also tight across the bust, but the FBA would take care of that. I tried and tried to get a pic to show you, but forgive me, my 10 y/o paparrazi was already in bed.

On the positive side...it wasn't so hideous that I have decided to quit. The length was good. And the adjustments needed are all simple and pretty straightforward (and expected). I feel the top may run a bit small, at least in this size range. Based on measurements, I was pretty nearly a perfect XL with the exception of the full bust.

So I'm forging ahead! I will probably do another muslin (I know. I KNOW.) before I stitch it in real fabric. Mainly because I"m not sure what fabric I want to use yet.

Stay tuned!

Monday, May 12, 2008

Wave to the Peasants Skirt

And yet another finished project. Is this some kind of record? I present to you Simplicity 4605 - the peasant skirt:


I love this one! Makes me feel all bohemian. Only fitting that you wear it barefoot, yes? With kitties winding around your (too pale) legs?


Skirt was super easy to construct, but I, in my supreme laziness, found a way to make it even easier. For one thing, I didn't use the pattern pieces but instead measured them and then tore strips. No cutting! Plus, ripping fabric strips is a stress reliever.

I figured since it is a gathered, tiered skirt and I was tearing strips, it didn't really matter too much to follow a specific size, so I just measured the entire pattern piece for my strips (this pattern is size 18-24). Here are the strip sizes:

Yoke: 7-3/4" x 26"
1st Tier: 12" x 36" (Cut 2)
2nd Tier: 6" x 32" (Cut 3)
3rd Tier: 6" x 38" (Cut 3)

Next cheat: I seamed everything flat, starting from the bottom. This is a basic rule for making your life a LOT easier when doing a tiered skirt. Gather your longest strip first and seam it to the bottom of the next tier. Repeat up the skirt. (I hemmed my bottom tier first, of course.)

I seamed this skirt flat instead of "in the round", which also makes it a lot easier to apply trims! I added some pretty scraps of cluny lace and another cotton lace I had in stash.


I carefully pinned the side seams so that everything matched and seamed the side (you only have one side seam with this method). Create the casing for waist elastic and voila. You're done!

I really need tops...so maybe I'll focus on one of those next. Although I do have more fabric that would perfect for another skirt...

Sunday, May 11, 2008

Happy Mom's Day!


And I think it's time for a new project, don't you? And because I'm on something of a skirt kick right now, I've decided to do this OOP Simplicity (4605 from the Khaliah Ali line.)


Here are my fabric choices, newly purchased & ready to go! This is the Flutterby line by Tula Pink for Moda. (I snapped this shot this morning, and the color seems a bit off to me. Tula Pink's site shows better color accuracy.)


Jen (Tula Pink) has a great blog on her site, so go visit! There are SO many cute variations in these prints, and one I really, really lusted after wasn't available in yardage at my shop. But I am still pretty happy with my haul for the skirt!

I'll be making View F, the shorter skirt. I also plan to change the width of the middle two tiers. When I was purchasing the fabrics, I had it in my head that there were only 3 tiers (thus, 3 fabrics.) I'm wondering if I should root around in the stash for another print that "goes" or just do my original head-skirt with 3 tiers?

I got two other really fabulous Amy Butler prints too...but those can wait for another post.

OH...and Friday was "Decades Day" at our school centennial celebration and I went dressed as (my mom in) 1962 complete with a headband tucked into my beehive flip. I gotta tell you, it was WAY too much fun. I looked pretty good as 1962. Wish I had a picture to show you, I'll see if anyone snapped one while I wasn't paying attention.

My group also won 2nd place in the Decades Danceoff, with our rendition of the Hustle complete with a 4 count Travolta. We were robbed of 1st by the football coach who moonwalked and then dropped to the gym floor and did the worm!! I almost wet myself laughing. I am consoled by the fact that he was probably aLOT more sore than ME yesterday morning. :P

Wednesday, May 07, 2008

Literary Girl

Shannon has tagged me with a Literary Meme! The Rules:
1. Pick up the nearest book.
2. Open to page 123
3. Find the fifth sentence.
4. Post the next three sentences.
5. Tag five people, and acknowledge who tagged you.

Technically, the closest book (6 inches away) is in Japanese, LOL! (Sewing geek in ALL languages.) So the next closest book (2 feet away) is Chill Factor by Sandra Brown (great book!)

"Just another wave of dizziness." Leaving the bar, he walked over to one of the windows flanking the front door and pushed aside the drape. "I've been thinking."
(Ya'll are just lucky page 123 is of the non-racy variety. Ahem.)

My 5 literary peeps:
1. Shannon
2. Kat
3. Keely
4. Dawn
5. Debbie

In other news...got my BWOF yesterday in the mail! I love several things in it, but that will keep for another post. Happy Hump Day!!

Sunday, May 04, 2008

Hip Skirts - Fin.

Favorite Things Hip Skirts

I have bitten the bullet this morning and finished the Pleated Skirt from the Favorite Things Hip Skirts pattern. I'm still not completely happy with the length, but it is wearable now at least.

The discrepancy between the pattern photo and the finished skirt length was really not in my imagination either. Here's the pattern photo:


and here's my finished skirt:


I ended up not adding a contrast band as suggested by several of you, which I would normally do to add length. But I already had this contrast yoke and I felt that another print would be "too contrasty". Instead, I changed the yoke dimensions.

The pattern calls for the yoke (6" wide approx) to be seamed at the side seams and then folded in half lengthwise creating approx 3" depth for the yoke. I skipped this part and left the yoke 1 layer of fabric, making a casing at the top and seaming the bottom edge to the skirt. This added 3+ inches to the finished length. And it was STILL a bit too short!!

Obviously I'm not 20 anymore so I'm not wearing it way DOWN THERE on my hips, but even if I were I don't think the skirt would be as long as it appears in the photo. And I barely turned up 3/8 inch to hem this. Teeny hem.

I'm also not fond of my yoke fabric choice. I didn't think it would show with a top since it was only (supposed to be) about a 3" depth, so I wasn't worried about the print. However, by increasing the yoke depth to 6", I created a solid light-colored band of fabric right across the widest part of me. Not terribly flattering.

I'm just glad its finished so I can move on! I might wear it out and see if I like it. It's probably not going to be my favorite thing though. No pun intended.

Japanese Fashion

My Japanese sbooks have arrived! Yay! I ordered from YesAsia (This is a link to a bunch of sewing books to get you started!) This was my 2nd order from YesAsia and everything arrived like clockwork when they said it would (about 3 weeks.) Here's my haul (with ISBN ):

4579110005

4579109910

4579111435

4579111354

4579109619


Use the ISBN to google these too. And go check out pomadour24 on ebay or etsy. He/she gives interior pictures too, so it's easy to find the book with the projects you really like before purchasing. But BUY from YesAsia. You'll save about $10/book AND save on shipping.

It's going to be hard to pick a project. I am especially in love with the Fashion From Cinema book, which features a tiny snapshot of a movie (mostly vintage flicks) and a pattern for a garment in the character's style. Downside? These patterns are only offered in one size (which is unknown to me at this point.) And all black lines on the railroad track of pattern lines will be a nightmare to trace! This book will probably be inspiration only.

Couple of peeks inside: (Too much coffee, sorry for the really crappy pics this morning!)

A dress inspired by Julianne Moore in The Hours:

Top & skirt inspired by Renee Zellweger in Down with Love:

I also really really love the Skirt a la Carte book. (Actually I love all of Kayaki Machiko's books. Gorgeous clothes. Remember that Japanese read right to left, so you may have better luck searching for her online as Machiko Kayaki? I think there's a Flickr group dedicated to her stuff.)

Every skirt in here is CUTE. Here are a couple of I really like:


Comparing Sizing to BWOF...
Another plus with the skirt book is that the sizing is a bit expanded from most Japanese pattern books (7, 9, 11, 13, 15, which translates to Burda sizing 34, 36, 38, 40, 42) if you go by HIP measurement. Waist measurements are about a size to a size and a half smaller than the comparable Euro size (so a Japanese size 7 is the same hip measurement as a 34, but a Japanese size 7 waist is off the Burda chart (too small) by 3 cm. Ouch.

Translation: These are tiny people, people. :D

Let's not even get into the fact that my own pattern range STARTS at a size 46. (and the skirt book is the only one of my books that even goes as large as the 15/42!) Luckily, the styles are so simple and beautiful that they will be easily duplicated in patterns from stash/BWOF that DO fit.

Oh, and that WAY SMALL waist issue above...Ditto for bust. The bust sizing is at least half a pattern size smaller than the comparable BWOF hip size (about 2 cm smaller.)

Luckily, the sizing is perfect for dd Lu, who hasn't any bust issues yet! And she's outgrowing the kid line in the Big 4 fast, but too small for the women's line, so these will be perfect for her.

Reading in Japanese
Actually, you don't have to read Japanese to use these patterns. If you have a bit of sewing experience, you'll do fine! They include fabulous illustrations for any finicky parts, and the rest you can pretty much figure out using basic construction techniques. Also of note...my Japanese craft magazines all read in traditional Japanese Right to Left. BUT these pattern books read Left to Right.

Helpful Linkies
While researching which books to buy, I ran across a great blog a couple of months ago devoted to Japanese sewing books called Japanese Couture Addicts. It's in French, but I linked you to the google translated page. These girls are AWESOME! Not only do they actually buy the books AND sew from them, they do tutorials, take pictures, post often...what more could you ask? That it's in French is only a teeny tiny disadvantage because the translation is pretty clear. Scroll all the way down on the left and you can link to each book's blog posts (Book 1, Book 2, etc.)

Be sure to check out their links, because they have links to other translations (French to English Sewing, Japanese to English, etc) AND links to places to find/buy the books!! That can be a real hunt, because if you're buying online and don't have the ISBN#, you are searching in the dark! (Which is why you have mine up there! I'm such a helpful enabler.)

They also have a forum HERE, (also in French) but it might be helpful if you have a question. The translations are funny sometimes, but you can still get a good idea of what's going on. I got tickled at a sizing question (about busts) and one of the (google translated) answers was this:
I measured and calculated and would have a place to bring my chest which is not a chest of Japan ...

Ya. Me neither! LOL.