Friday, July 31, 2009

love.

I thought it would never happen, but I have fallen completely.

We've only been together 18 hours, but I just know it's the real thing this time.

Of course I had to make introductions, because I want to share my newfound happiness with all my friends... Meet my new roommate, the 13" Macbook Pro.

We are most definitely MFEO.
(made for each other)

He's so sleek and smoooth. Quite unlike my normal infatuations. Case in point:


and


Speaking of which, I had quite a nice time with the girlfriends yesterday afternoon ogling this


in this

Dirty, bad and wrong. But funny.

Then we went to Sally's and bought slutty nail polish. Good times.

Tuesday, July 28, 2009

anthropologie knockoff: a skirt story

I have two favorite snoop shopping stops on the web...anthroplogie and myshape.com. Both are favorites because I can mix and match pieces & accessories, and several things are suggested for different pieces. (Or at least that USED to be the case at anthro...their new site is much less user friendly and blah.)

I put together little collages of items and save them for sewing inspiration. Here's one I've been meaning to knock off since spring:


I love the whole outfit! The kimono overblouse, the turquoise gathered neckline tee, the chunky amethyst necklace... And the little skirt which is so simple but has some pretty touches. The anthropologie skirt is silk with a simple elastic waist, two layers. The underlayer is longer and has several rows of gold "handpicked" hem. Here's the anthropologie skirt hem:


To start, I had a piece of reddish pink lightweight chambray in stash (going on 7 years now), that was just enough to knock off this skirt! The color was hard to photograph today with the dodgy clouds, but here's the finished skirt:


Just 4 simple rectangles, the top layer shorter than the bottom. I basted them together at the top edge and made a casing through both layers to insert my 1/2" elastic. (If I'm going to wear an elastic waist, I'd much rather wear a narrow one!)


I used a poly embroidery thread in gold to do my topstitching on the bottom layer of the hem. There are 7 rows total:


Here's a shaded picture on me, this is a pretty accurate reflection of the color. I really like the skirt with my turquoise tee. I chose gold "gladiator" type sandals instead of brown slides though.


Ta da! A (formerly $90) skirt, for...about an hour and a half. Since I had all supplies on hand, and used stash fabric, it's basically a freebie.

In case you're wondering, I'm still not doing my hair:


Viva la Summer!!

Saturday, July 25, 2009

BWOF 6-08-107

I've been working on this for three days! And not because it was hard, I just kept running into those annoying little obstacles that prevent you from finishing. This top is from Burda World of Fashion 6/08 #107 in white dotted swiss:


I had to size up to a 44, then do an FBA. This one is pretty small through the chest, I would guess a B cup fit, not the usual BWOF C cup. Just be aware you probably want to muslin it even after you do an FBA. I ended up still needing just a smidge of room across the chest, so I folded the plackets about 1/4" narrower than the pattern called for. Luckily I was able to ease this extra neckline into the collar and stand.

Speaking of which...pretty pointed collar:


What really drew me to the pattern was the side casings with elastic inserts. I don't like to tuck in, but its hard to find woven shirts that look nice untucked. The pattern also has pleats in front & back, in addition to the gathered casing, but I left the pleats off. I had used them on the muslin and really didn't think they added enough to the top to keep them.


The sleeves also are a nice touch. They're sort of a cross between raglan and set in sleeves, which makes them very easy to insert. But instead of a plain jane gathering at the cuff, you have these great pleats with binding. I think these little extra details set BWOF apart.


I started out with these beautiful vintage pressed glass buttons in a pure white. And then I broke one! So I ended up using these pearly white shank buttons instead.


I promise I'll wear the top in a picture soon! I'm working on a skirt that will be perfect with it. I might even do my hair.

Thursday, July 23, 2009

Burda Plus#402

I have crappy pictures to share! Yay!

These are the plain front trousers from Burda Plus issue E952 (Spring 07, I think), pattern #402. Just a note about this great pattern. It's in the "Plus" issue, but for those of you unfamiliar with these special issues of Burda Fashion magazines, the sizing begins at 44 for most patterns (just like in the BWOF plus section), which is also on the higher end of regular sizes. That opens up these patterns to many more sewists! Here's the line drawing:

I didn't have quite enough of this tobacco twill to make full length pants, so I shortened the pattern to capri's. I had been crawling around the floor looking for something before taking these pictures, so excuse the messy, wrinkly appearance. Fit from the front is pretty perfect:


And the dreaded back view. ;) This one's not so bad though. Other than my high right hip (which I typically ignore since I can't see it), which has a few wrinkles pointing to it. Look in particular at my waistband, which is pulled over 1/4-1/2" to the right. I never realized my pants did that.


This pattern fits marvelously, almost right out of the magazine. I did a muslin using old quilting cotton I wasn't going to use, and tweaked the pattern with the following changes: added a bit at my front hip edge (always have to adjust for that no longer flat stomach. Damn thirties anyway); Minott method for full inner thighs (using Debbie's fabulous tutorial); extended the front crotch 1/2" (the front crotch on this pattern is really short).

After I made the second muslin (in this tobacco twill) I went back and lowered the crotch seam about 3/8" to fix a bit of pulling there. Here's a diagram of my changes. I know it looks like I changed alot, but really these are very minor changes for a pants pattern!!
I used a cute orange floral cotton for the waistband facing (rather than bulky twill):


And I used the same cute print as my fly shield:


I'm pretty excited to give these a try in a trouser weight fabric too! Since this pattern is so "plain" it will be a nice pattern to use as a base for other styles (change the leg cut, add pockets, etc.)

Next up is this top from 6/08 BWOF, in white dotted swiss:

My muslin (which I used a fabric I totally love on, and am a little bitter about now) wasn't much of a success. I wouldn't term it a complete wadder, but I'll probably never wear it so I didn't do any finishing details. I found the chest/bust area to be really snug. Definitely a smaller fit than the last top I made in this size (I would classify this one as a definite B cup pattern.)

I also think the pleats plus gathered side casing is repetitive and not really all that noticable in the finished product, so I'll just be doing the casing. The casing itself is positioned too high for my waist, so I'll be lowering that. I've had it cut out for 2 days, but things are just slow around here this week. Hopefully I'll finish it today!

Monday, July 20, 2009

moon-y.

Today is the 40th Anniversary of the Apollo Moon landing...

Very. Cool.


Friday, July 17, 2009

BWOF 4-07-111

Hey, my head didn't explode AND I finished my top!! Here's the BWOF top from 4-2007, #111 in an Amy Butler cotton print:


I really like it, but it's not exactly what I envisioned...partly because I didn't have enough fabric to do longer sleeves (I was thinking more elbow length, with a rolled up cuff). I was going for more of a "western" shirt feel, but I didn't have any pearl snaps lying around (who does except maybe Porter Wagner?) and I was too lazy (and, all right, chicken) to go buy some/set them in.

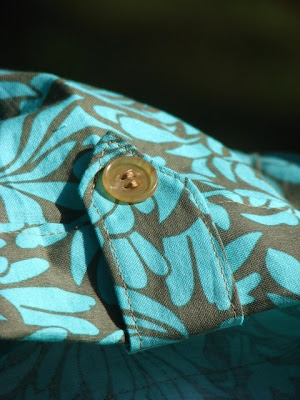
So I used buttons I had on hand in a tortoise-y khaki color, and they give the shirt an overall "hawaiian camp" feel that I wasn't expecting. But still, it's a cute shirt. Here it is on me, although I had the goofy camera on the wrong setting, so it's not a great picture. Also my face is incognito today (post headache puffy eye syndrome) so you'll have to use a wee bit of imagination here:


My favorite part?? It FITS. Like perfectly fits...I don't remember the last time I had a woven top that fit this well actually. I used the size 44 at the shoulders & armholes, and added an FBA using the pivot/slide technique. I also moved the fullest part of the bustline down just a bit.

There are lots of other little tweaks. I ran out of fabric, so I had to do a short sleeve. I added a topstitched cuff and a button on tab, which ventured a little further into camp shirt-military territory. (My shirt is schizo at this point.)


The shirt pattern has a straight hem, but I scooped out a more traditional shaped hem:


What I think adds to the magnificent fit of this top is the interesting dart treatment on the front. It's a princess seam that ends in a dart almost to the hem of the front. Very cool pattern piece, but a little finicky to finish the edges on (you end up with an unfinished portion of the dart/princess seam.) They aren't that visible in this top with the wild print, but I think you can see the princess seam darts below (I topstitched them too):


I'm also fond of the collar with stand. Such a nice, professional look! Unfortunately, the back neck is too high (common problem for me) and I didn't adjust this before attaching the collar. It's not enough to really bug me, and easy enough to fix on the pattern for next time. Pretty collar:


There are little tulip shaped pockets on one view of this shirt in the magazine and I may go back and add them later. For now, I'm so happy to have found a woven top pattern that fits well & was fairly easy to put together!!

I should mention I didn't use the BWOF directions at all. I used the Sew U book (from Built by Wendy) because it has a basic shirt with collar & stand in it. Any basic shirt pattern with instructions would be better than BWOF's. My next project might be a dress...OR possibly another top. I'm eyeing several in June 08 and a couple in June 09 in fact.

Wednesday, July 15, 2009

Simplicity 3964

I've been at a stand still on this one since Sunday, and its still not quite finished. It's pretty cute and different than any other version out there of this pattern! The sleeves/armholes are unfinished (more on that in a second) but here's the mostly finished top:


The fabric is a chambray rayon, and it is awesome! So light and drapey. Perfect for this little top (that started out with a LOT of volume, AND as a dress!!) I couldn't like the dress. I tried to like it! I got really close...but in the end I decided the very wrinkle prone fabric would make me self-conscious as a dress, so I whacked it off into a top.

I did put on the little flange-ish sleeves, but even with this very drapey rayon, I didn't care for them. Very Spock-like. So off they came as well. I'm going to use the chopped off skirt pieces to either make little capped sleeves (with a bit of puff maybe) or I'll make some more bias and I'll bind the armholes. It's pretty cute sleeveless!

Here's the shaped yoke, which is my favorite part:


I made a mistake in construction when I went to do the topstitching. I simply wasn't paying attention and I topstitched the INSIDE (lining portion) of the yokes! They ended up looking better than the "right side". Since I hadn't sewn side seams or sleeves or anything else yet...the inside is now the outside!! HA! Here's the topstitching around the cute yoke in detail (I couldn't get those sharp corners on the "right" side, so I plan to make this mistake the next time I make this top too.)


My other gripe about this one, and one that was almost a project-killer for me, was the voluminous skirt portion of the dress/top. I had always envisioned it with the belt, but even with tying the belt around me, it just looked sloppy. So...I stood in front of the mirror and played with belt placement until I liked it and marked a line with my washaway pen.

Then I ran a line of gathering stitches in the middle 2/3 of the front. The gathering extends from the center front to about the half point of the shoulder. I pulled up the gathering and tried it on again to make sure I could still get in and out of it (no problems there). Lastly, I topstitched my belt permanently in place over the gathering. The belt hangs free and ties in the back.

Topstitched belt:


Adding those gathers (in the rightplace) changed the entire look of this top from a frumpy, "I'm not sure I'll ever wear this dangit" item into an "I can't wait to put this on with my white jeans & gold gladiator sandals" item. (you know, once I finish the armholes/sleeves.)

The neckline is finished with a simple bias binding and ties in back:


I actually plan to make at least one more of these really soon, because I already have fabric picked out! I have some changes I'd like to make though, namely leaving off the gathering at the shaped yoke. I don't need that much volume, and I really want one of these without the attached belt. I also plan on making that topstitching mistake again, for perfectly pressed yoke corners & stitching! ;)

I feel like I've been away from the old blog a long time! I realize it's only been a few days, but it feels longer! I had a school workshop Monday and Tuesday this week so no sewing on those days. I've also suffered a migraine (since Sunday for Pete's sake) which simply will not completely go away. I've tried ice, heat, sleep, the usual drugs, caffeine, diet changes, etc... And still I sat here for most of the day today with an ice pack on my head.

I really want to get on to my next project, which is almost halfway completed. I can give you a peek...it's this BWOF top #111 from 4/2007:
As per the usual for BWOF, I never looked twice at this top in the issue because the fashion photo is so ridiculously unrevealing. This sucker is really cute though. I love the princess dart! I'm doing a short sleeve version, and even though the line drawing looks like your basic "white shirt"...of course I took a bit of a different route.

If you're good (and my head doesn't implode) I'll have something to show you tomorrow.

Friday, July 10, 2009

Weekend Sewing: Summer Blouse

Bet you thought I burned out, huh? Nope, at least not yet. Here's the "Summer Blouse" pattern from Heather Ross' book, Weekend Sewing:


This was my favorite project in the book and the one I wanted to run home and make after purchasing it. No surprise, but there are tons of these out there on the nets. I'm just late to the party!

The pattern needed a few adjustments. I started with the Medium and added a FBA using the Nancy Zeiman method. I had to lower the neckline 1-3/8 inch...it's really high (even for you Shan!) I lengthed the bodice pieces by 2 inches because I could tell right away they weren't long enough for this style. The proportion was off. (Next time I'll be adding at least 1 more inch. I only serged the edge to hem this one!)

Some bloggers have lengthened the sleeves, others have shortened them because they were too long. If it helps at all, they were "just right" for me. In length only though...I did a tissue fit but I still need about an inch in width at the biceip. It's not uncomfortably tight and should loosen up on wearing, so I'm not going to sweat it in this top.

Lastly, I lowered the bust dart 1". Now for the goods! I used an old favorite, a dark blue dotty print for my facings, binding, and the button loop:


It just barely shows through the fabric, which is a look I LOVE. I also hemstitched the facings from the right side, rather than plain old topstitched. It goes much better with the vintagey feel of the fabric (which is an awesome lightweight cotton from Hancocks! It looks and feels like a lovely vintage sheet!)


The placket ends in a V shape, and you slipstich the opening a few inches. This is purely decorative, only you can't "see" it. It's an odd treatment...and I'm not sure it will stand the test of time on someone with a bust. The model in the book isn't as well endowed as yours truly. ;)


I added a vintage lavender button from my antique button stash. I'll never be buttoning this top, but is a nice addition:


Here's the top on me (who hasn't fixed her hair or face yet. And probably won't today.)


Other than the slight snuggy feeling of the biceps, I LOVE THIS TOP!! I would wear it every single day. Which means I need to get some fabric washed & on the line so I can make another!

Lest you think I've been whiling away my time in front of the tv (I have) I'll have you know, I've also almost finished this little pattern, also a Built By Wendy:


But I'll save that post for another day.

Tuesday, July 07, 2009

Sew What Skirts: Drawstring

Ok, I know. I've posted 3 (or is it 4?) days in a row...each time with a new project. Don't get used to it. I'm just having a moment.

Anywho...I made another skirt from the Sew What Skirts book. This time I made the "gathered" skirt version, except I added a drawstring. I did have to make some changes to my original draft of the pattern. First though, here's the cutie patootie finished skirt:


When I drafted the gathered version using the directions in the book, it was VERY a-line! And too big all around. So I removed quite a bit from the side seams, and also lessened the angle of the hem. I'm guessing it's because there's a big old difference between my waist and hips? I vaguely remember doing this for my a-line draft too when I originally made it.

Here's the skirt on me (sorry, its a headless day!) It's not a straight skirt like it appears here, (and it really was on straight too.)


See, it's a-line! (I just have worse posture in this one, ha!)


I added the drawstring using the elastic/drawstring combo method I learned several years ago in a New Look pattern. You make 2 buttonholes in the CF, and then do your casing as usual (but you don't leave an opening for threading the elastic through.) Make 2 tubes for your drawstring ties and stitch these to a length of elastic. I measure the elastic by stretching it across my back from one side to the other. It's not an exact science. ;)

Thread through your button holes, then stitch in the ditch through the elastic at the side seams to secure it and keep it from moving around.

I also added white linen pockets with a self fabric flap, turned back on the diagonal (these are featured on the tablecloth skirt in the SWS book). The button is just decorative.


Last thought...isn't this fabric cute too?? I know I keep saying that but I've had really great luck finding cool fabrics lately. This is from Hancock's and is SO 1970's retro it is just one step away from our old family room curtains.

And I love it.

Monday, July 06, 2009

Simplicity 3835: Built by Wendy

Another day, another Built By Wendy top! This time I tried 3835, the peasant top version.

I love this one! I cut out the 18 and did an FBA using Nancy Zieman's pin & rotate method (I'm sure there's another name for it.) I was a little worried about the armhole depth since that was a problem on the last one, so I pin-fit before cutting out. No problem with the armhole this time!

It's a simple pattern to put together, elastic casing on armholes & neckline (note the super cute red & pink dotty print, another "Everything but the Kitchen Sink" print by RJR):

I did a simple turned up hem. I made a little tube to tie into a bow at the center front, like a drawstring (totally fake.)


I only have it pinned now, because I want to make one of these also, which would add another cute detail to pin on.


Or this one by my old ebay pal Meg:


And here's me in yet another not terribly good picture. (My hair, for one thing, isn't that red in real life! It's more the color it was in Sunday's photo!) I'm also way blown out by the sunset. Still...I think you can see what a cute top this is! It's very cute on, like a semi-fitted peasant top. The neckline is just perfect.


All in all, I'm very impressed with the Built by Wendy pattern line. I'm going to have to try one of the button front items, a jacket or her cute top. I do have the Sew U book that includes basic patterns, but they only go to a size 12 (who's brilliant idea was that anyway??)

I also hung laundry out on the line today, including more quilting cottons for future project.


And I made zucchini bread from my dad's neverending stash of fresh zucchini (a loaf for me and a loaf for my dad & mom!) I used Paula Deen's recipe on Food Network. It was YUMMY. (this obviously isn't a foodie blog, because we always eat the food before I remember to snap a pic! HA!)