Showing posts with label sew beautiful. Show all posts

Saturday, August 21, 2010

Sew Beautiful Blog Prize Winner!

Congratulations to....drumroll....

Comment #62!

In the interest of full disclosure, I did not count the "removed comment" when counting to 62 to find our winner. Comment #62 was left by "daycdoo", and I have your email. I will be emailing you shortly for your mailing info! Congratulations & enjoy your fabulous prize courtesy of the Martha Pullen Co. and Sew Beautiful Magazine.

Don't forget, you can still use the coupon code to the Martha Pullen Co. store! The code is BLOGTOUR and is good for 25% off your order There is no minimum order, one use per customer, and the code expires on Oct 31, 2010.

Stay tuned for....wait for it....

ACTUAL SEWING.


Sunday, August 15, 2010

Lu's pink organdy heirloom dress.

This is my very favorite dress from Lu's closet.

The pictures just can't do it justice, it's such a beautiful dress and a large part of its charm is the colors and textures that I think are better displayed in person. (I also had pitiful indoor lighting today since it started to rain just as I was preparing to take pictures!)

Can you stand the cuteness that is little Lu & G-man in 2004??


(G helped make his shirt, picking out all the "Mad Scientist" machine embroidery designs from...?? Lordy I'm getting old because I can't remember the name of this embroidery design artist! Threadsketches! SUCH cute designs. Alas, my kiddos have long since outgrown her.)

The bodice of the dress is white Italian organdy, embellished with a machine embroidery design I combined using Embird. I don't remember the card with the floral oval, but the fairy alphabet was a freebie from several years ago. I don't even have it on this computer to look it up. It's saved on a backup disk somewhere...


The bodice has puffing strips and beading lace, and every seam, including sleeves, is joined with pink entredeaux.


The white organdy sleeves have a shaped lace loop, pinstitched in place by machine...


Sleeve beading and lace ruffles:


The rest of the dress is a pale pink over-embroidered organdy. I had little more than one yard of the pink, and I saved it for a few years until I had the skill to design the perfect project. The skirt is almost entirely made of the pink, except for the shaped loops in the center front; each features machine embroidered white organdy center.


I used the same design card for the florals as the bodice, and added two of the fairies from the freebie alphabet. Here is a closeup of one of the side loops. All of the fairy wings and the "wing needle work" below is stitched with silver thread:


Here is the entire skirt front, flat:


The hem has a ruffle edged in lace, joined to the skirt with pink entredeaux.


This little dress is a size 6 and was Lu's Easter dress in 2004. Lu, age 6:


And one of my favorite photos of the 3 of us, all in pink (I must have really planned that year):


I wanted to show this dress because by this point in my sewing experience, I had enough skill to tackle the machine embroidery, the lace shaping, the fancy color entredeaux and expensive organdy fabrics. Sometimes as a beginner, you just KNOW you aren't ready for a project.

I had had the pink fabric from the time Lu was a small toddler, and I kept it stored safely away until I knew I was ready. And this turned out to be the perfect project to showcase it!

I hope you're all having a wonderful weekend! I'm going to try to concentrate my next sewing adventure on fall things for ME. I'm participating in Self-Stitched September and, well, I have nothing to wear! Yikes.

Tuesday, August 10, 2010

Sew Beautiful Blog Tour - Pt 5: Pintucking

If you've been following along in my sewing adventures for very long, you might remember that Sew Beautiful magazine was pivotal in my early interest in sewing. In fact, it could be said that if it weren't for the Easter issue of Sew Beautiful in 1998, I may never have found this wonderful hobby.

As a longtime subscriber & reader, I was thrilled a few months ago to be asked to participate in a special blog tour as part of Sew Beautiful's September/October issue! (Psst...To go right to the Pintucking video, scroll down this post!)


Sew Beautiful graciously asked me and several other heirloom enthusiast bloggers to join their blog tour, featuring a series of videos that the SB experts have filmed, highlighting just how attainable these beautiful techniques are. Even for beginners!

Along the tour route, you will learn all of the techniques required to complete this gorgeous camisole:


At first glance, such a lovely creation might seem overwhelming to someone unused to heirloom sewing. But the truth is, the basic techniques needed to complete this project are quite simple. You need little more than a straight stitch and zigzag stitch!

Each video "class" shares a basic technique needed to complete this pretty camisole, recreated from a vintage nightgown. SB shares the instructions and templates needed to create this camisole in their September/October issue #132.


You may click the button below to go to the very beginning of the tour, or scroll down this page to view the video for Part 5: Pintucking. And don't forget to enter my blog giveaway! SB has prepared a fabulous package of gifts for you. Detail are at the end of this post.


And now it's on with the show! The video below features Pintucking. It has been divided into 3 parts; click the links below the video to continue on to parts 2 & 3.


And don't forget to pick up the issue #132 of Sew Beautiful, for the written directions to accompany the tour videos!


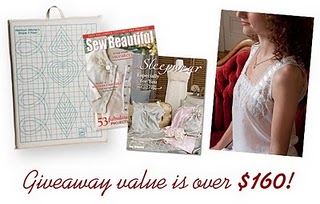
And now for the really fun part! Sew Beautiful has prepared an incredibly generous giveaway for readers of my blog. Total prize value is $160! Here's what the winner will receive:
• complete kit needed to make the Vintage Inspiration camisole, from sizes XS (2-4) to 3X (26-28). This kit also includes Maline laces and Swiss beading!
• a copy of the book: Sleepwear Especially for You. This book contains the basic tank top pattern suggested in the instructions.
• a copy of the new issue of Sew Beautiful
• a June Tailor Heirloom Stitcher's Shape 'N Press board

Leave a comment on this post by Friday, August 20 at 11:59 pm to be entered for a chance to win this fabulous prize package! I will use a random number generator to choose a comment, and will announce the winner on Saturday, August 21.

Additionally, Sew Beautiful and the Martha Pullen Co. would like to give ALL of my readers a special treat! They would like to offer a discount code for the Martha Pullen store at http://store.marthapullen.com/. The code is BLOGTOUR and is good for 25% off your order There is no minimum order, one use per customer, and the code expires on Oct 31, 2010.

I hope you'll join me in exploring this heirloom sewing blog tour, and in sewing this beautiful camisole. I personally think we should have a little sewalong!

And a great big thank you to Shannon Miller, Kathy Barnard, and the rest of the staff at Sew Beautiful and the Martha Pullen Co. for asking me to participate in such a wonderful event. I am honored to be included as part of such a talented group of bloggers.

Monday, July 26, 2010

Lu's Shadow Smocked Dress

Well, it's been quite a little weekend at my house! First I had a bit of a stomach virus (yay.) Then I discovered I was the proud owner of the rarest of rare Macbook Pro's....one with a crashing hardrive.

Do you know how long it takes to do a complete erase and install? Forever. Especially when it doesn't work and you have to do it again. And again. And finally give up and have to schedule a phone chat to explain it to the AppleStud (hi Mike!) who in the end says, 'Dang, girl. You already did everything I was going to make you do. Best send it in.'

ANYWAY. No sewing going on here, just dreaming of sewing. And no blog or email reading and I MISS YOU GUYS. I'm on a borrowed laptop now for kicks and giggles. (Addicted? Me?) And since I don't have anything new to show you, I thought I'd share something old!

This beautiful dress was an Easter dress for Lu when she was 3 years old.


The inspiration for the dress was an article in Sew Beautiful's Easter 1998 issue (my favorite issue ever!) I believe it was a Kay Guiles pictorial. I used a basic yoke dress pattern and the instructions in the magazine for the shadow smocking.

The smocked portion of the dress is at the waist, and involves a strip of fabric (in this case, a scalloped strip of blue cotton batiste) basted to the back of the skirt (white cotton batiste). When the skirt panel is pleated and smocked, the blue shadows through the white batiste creating the "shadow smocking".


The embroidery included a double feather stitch in cream with pink silk ribbon rosebuds.

The collars were treated to the same shadowed blue batiste and pink silk ribbon roses, then edged in gathered creamy cotton lace.


I have a real soft spot for this dress because of the laces. All three laces used on the center front bodice were vintage scraps from my grandma's sewing basket. I have a bit left of the narrow version, but I believe the wide center lace was the last of that piece. A little bit of my grandma stitched into Lu's dress. I'm the only grandchild who sews, so it has always been something I like to think I got from her.

There is featherstitching between the laces on the front, and I remember fussing over the silk floss I used (my first go at silk floss. And possibly my last. I've never mastered its slippery feel!)

The puff sleeves were trimmed in cotton laces, one a Swiss insertion and the other a gathered cotton.


The back of the dress buttoned down with creamy buttons. I hemstitched the placket by machine using one of my "fancy" stitches.


I hope you enjoyed this little walk back through early Quality Time sewing! I still have several things from Lu's baby & toddlerhood to share in the future. My utmost favorite dress, my own design, is yet to come. It is (if I do say so myself) DIVINE.

And there's sewing mojo too...I'm seriously into the 1930s right now, but another 1960s frock in white & blue madras plaid is calling my name too. Stay tuned!

Monday, March 01, 2010

baby things & a sunshine top

I really enjoy sharing my beginning projects with you, and you've been so sweet with comments. Even though I don't currently sew baby garments, I know many of you do. But even more important, you might be able to take a technique I used on one of these garments, and incorporate that into a current project.

Today I'm bringing you two baby/toddler garments that I loved. Lu was a mid-summer baby, so lightweight, cool clothing was a must in her baby/toddler years! Plus, the child just hated clothes. The first is a pink rosebud voile baby romper, made with the Old Fashioned Baby's Summer Clothes pattern.


I added folded release tucks at the shoulder seams and a dainty lace ruffle around the neckline. Three pearl buttons are for decoration only in the center front.


There is beading and lace trim around the leg openings. The crotch closes with buttons and buttonholes because I was still afraid of snaps at this point!


The romper buttons up the back.


This was such a sweet baby garment! I know it seems a little impractical with the crotch buttons, but it actually wasn't. Lu was a year old at this point and I wasn't changing diapers every hour like when she was tiny. I saw a discussion recently where a grandmother was lamenting her daughter-in-law throwing the handmade, lace-adorned dresses and rompers in the washer and dryer. I'd like to point out this romper is 12 years old and was washed & dried in the machine many times. Looks pretty darn good to me!

This next little dress is actually a pink pinafore, made from poly/cotton batiste. This dress features something I was sort of obsessed with figuring out at the time, the "t-yoke" dress. The yoke & center front of the dress form a "T", and then the side portions of the skirt front are gathered to the arms of the "T". It's a very vintage look.


The pattern was a free one in a back issue of Sew Beautiful (my older issues are in storage, so I don't have the issue number handy! Let me know if you want it!)

This little pinafore is just precious. I adore the sweetheart neckline and the t-yoke. I trimmed the neckline and armholes with flat lace edging, and then pin-stitched over the lace header.


I traced the little rabbit applique (it's a needle-turned applique, done by hand) and embroidery design from a great vintage book reprinted at about the time Lu was a baby. It's called "How to Make Handmades for Your Baby". The entire book is adorable. The rabbit is white batiste, and all of the embroidery is done using plain cotton floss.


I mentioned this was a pinafore, although it definitely passes for a sundress or suntop! But here's the back, where you can really see how cute this design is. The back closes with 4 buttons, and the back skirt is circular, creating a cute little flair.


Underneath is a plain white batiste slip. Lu wore this slip under most of her high yoke baby dresses. She had 3 or 4 of these because they are so easy to make. I traced the armhole and neckline from a bodice pattern, then scooped each out just a bit more. I turned under the seam allowances and did a shell hem for a seam finish. The bottom of the slip is finished with a lace-trimmed ruffle.


Baby clothes are so much fun to make. I wish I had saved everything of Lu's, I'd probably be sharing it for months if I did! I hope some of the techniques or patterns you see from my stash might inspire you in a future project.

Speaking of my Lu, she had a band concert tonight. Can you believe this beautiful girl once wore those tiny baby dresses? Amazing.


This weekend turned into a Hotpatterns weekend of sorts! I not only made the Once, Twice, Three Times a T-Shirt, I also made a HP Sunshine Top. Here's a sneak peek:


You'll have to wait for some daylight so I can snap a picture of it on moi! I love love love this tee. I need about a dozen, immediately. If you don't have this pattern you most definitely need it!

Wednesday, February 10, 2010

dandelion delight

In an earlier post I told you about the Easter dress that originally influenced my desire to learn to sew. That dress is called "Dandelion Delight" and is a vintage reproduction of a baby dress, featured in the 1998 Easter issue of Sew Beautiful Magazine.

This is my version of Dandelion Delight.


This dress was my original "first project", one that I failed miserably at. The experience made me determined, however, to learn to sew (and sew well) so that I could one day return and make this dress for my baby girl, Lu. I'm happy to say that Lu wore Dandelion Delight for her 2nd Easter.

This dress is so beautiful, and it featured so many difficulties for a new seamstress! The skirt is a full circular skirt, and it is in 2 layers, a batiste underskirt (trimmed in wide lace) and a point d'esprit netting lace overskirt:


Finding materials to make this dress proved difficult. As a single mom, there was no way I could afford traditional English netting point d'esprit (which is cotton). I found nylon point d'esprit netting lace in the bridal section though, and batiste in the cottons.


The wide lace for the hems is cotton lace. I purchased it from a mail order catalog, "Home Sew". This was still pre-internet days for me! The wide lace is zigzagged onto the hems of the netting skirt and the underskirt.


The shaped yoke gave me fits, I do remember that. I was stitching 2 layers of skirt remember, to a curved shape. Then, you apply the wide lace to the yoke seam, "pinstitching" OVER the lace header. It was nervewracking. But it turned out lovely.


I found a tiny stash of entredeaux at Hancocks too, and used it to trim the neckline, followed by a narrow cotton lace edging.

The tiny puff sleeves are netting lace with a row of entredeaux beading and gathered edging. I ran a narrow satin ribbon through the beading holes to draw up the sleeves to fit, then tied in a bow.


Sue Pennington Stewart designed the original reproduction, and the pattern was featured free in that issue of Sew Beautiful. Unfortunately that issue (the most beautiful of all my Sew Beautifuls!) has been out of print for more than 10 years. The good news is that Sue is now offering the Dandelion Delight pattern on her website! You can purchase it here.

As a special treat, here's a photo of Lu on that long ago Easter morning, wearing this dress I was so proud of, and a sweet bonnet (also a Sew Beautiful free pattern!)


And of course my gorgeous G-man at age 4, wearing a mommy-made button up shirt complete with a paper pieced farm scene. This was his all-time favorite shirt for a very long time!


It has special meaning for me too, because it was my first published piece. I wrote an instructional article for Sew Beautiful magazine the fall 2003 issue. The article includes the directions for inserting paper-pieced or smocked blocks in little boys shirts. If you have back issues, dig that one out and have a look!

Wednesday, January 27, 2010

Pink Lacy Baby Dress

This dress was an exciting project for me! It is a reproduction of an early 20th century baby dress, in pink cotton batiste and a variety of cotton laces (both tea-dyed).


After I fell in love with Sew Beautiful Magazine, I had ordered all the back issues I could find. The instructions for this sweet baby dress are in the Easter 1996 issue (now out of print). The article is called "Grandmother's Teddies". The original baby dress was created from an Edwardian slip, part of a mother's trousseau.


The instructions were for a size 2 and I had absolutely NO experience resizing patterns/instructions, so I just had to wait until Lu was old enough I could make this for her!! The bodice is entirely made of lace. Strips of varying widths are zigzagged together to form the majority of the bodice, with a mitered section forming the square neckline.


Vertical strips are then zigzagged onto the right and left edges to form the little cap sleeves. The neckline also has a slightly gathered piece of lace edging adding a sweet ruffle. For those of you unfamiliar with sewing with "French" laces, the lace that does not have a scalloped edge, but is straight on each side is called "insertion". The lace with a scalloped edge is called "edging". (**Note: my laces are actually domestic, not French. I couldn't afford French laces! I found a great mail order catalog that had a cheaper alternative cotton lace in pretty patterns.)


The skirt portion is just 2 rectangles of fabric. The pink batiste was off the bargain table at my local Wal-Mart (which used to carry fabrics!) It was so sheer and pretty. The skirt has 3 folded tucks above a lace "fancy band". A fancy band is really just strips of lace, sometimes bordered by a lace or fabric ruffle, and sometimes just a strip of edging to finish it off.


My tucks aren't exactly evenlly spaced, which probably drove me crazy back then since I was so particular. But now, I love those uneven tucks. I think they are so sweet! And its a testament to my growing skill set.

Underneath the little lace dress is a matching pink slip. I drafted the slip using the neckline and armholes of another dress pattern, and then just a-lining the skirt piece out (measuring the length of the finished lace dress first.) The hem is just a single piece of lace edging. This is just a quick easy way to hem things! I still like to hem with lace, because its so fast and pretty. Maybe I'll do a French sewing with lace tutorial if there's interest!


The neck and armholes are finished with a machine shell-hem. I had a basic machine back then, no bells and whistles, so I used the "blind hem" stitch to cheat this. Looks so dainty! Of course, as tiny as this dress is, it wouldn't have taken long to do by hand. But I was learning how to do all of these techniques and I was always excited to see something actually work out!


I know I am repeating myself, but this is one of my very favorites. I love, love, love this little dress. The original dress in the article was passed down from generation to generation, each baby girl being photographed in the lace dress. I hope that some day I will have future babies in the family to pass on this adorable dress.