
What's a tute you ask? Well...for those unused to the www's network of craftsters, a Tute is short for tutorial. I see things asked ALL the time on boutique boards that I actually know the answer to... So I just decided to start a tutorial haven. Easy stuff, quickies if you will. Because I'm nothing if not lazy.
The quote above comes from a fabulous site about vintage sewing techniques. The Paris Frocks book in particular has bunches of quotable advice. I'm usually grinning like a fool while reading. For instance...
"Short necks must be given space. Give them air."
and
"Do not draw material tightly around any of your round rear contours" (NOTE from a: Ok...anybody who refers to my bum in so lovely a turn of phrase as "round rear contours" is my new best friend!)
and this one (put down your drink so life-threatening snorting is kept at a minimum)
"Place bows discreetly: - on flat places - yes, if you wish; on contours - never. Consider the appearance of bows on large bosoms. It just must not be done, that's all."
and finally...
"But what of the woman who is really matronly in build? No puffy bouffants for her. She would become terrifyingly enormous."
Ok, "terrifyingly enormous" is the phrase of the day!! GO! Use it in a sentence straightaway!
Oh yea. In all the fun I forgot the tute. So....first up: Seam Finishes.
Anyway, inside seams should be finished. Otherwise the fabric frays all to
Serged. The nice thing about sergers is that they're FAST. I mean, Earnhardt fast. And they trim off excess fabric while enclosing your raw edges ALL AT THE SAME TIME. Quite a modern marvel it 'tis. "Serged Seams" are 2 buzzwords on ebay, apparently attesting to quality. (Given the difficulty in obtaining correct tension, threading, and tying off with most home sergers, I have my doubts. It takes a pretty knowledgable serger operator to consistently produce great results.) Here's a pic:

French: Another buzzword in ebay boutique auctions. French seams had basically fallen away from current use with the advent of sergers (and even zig zag machines, for that matter). Prior to zigzag machines, people either pinked their seams, turned under the raw edge & stitched, rolled & whipped, OR did a French seam. It's different than any other seam in that you actually make your first seam WRONG sides together, instead of right sides together. Then you trim, turn & press open, then press again RIGHT sides together. Sew 1/8 - 1/4 inch seam. This treatment totally enases the raw edges in fabric. It's most commonly still used in ready-to-wear in sheer fabrics like chiffon or organza. Oh, and it's used a lot in boutique too, which is why I'm mentioning it! TIP: Don't try french seams on curves. There will be crying. Pic:
Faux Rolled & Whipped: Now this one is my personal fave, for several reasons. 1) You can get a perfect match to any fabric. 2) You never have to leave the sewing machine. 3) It's as sturdy as a French seam, and will never come "undone" like a serged seam might. 4) Did I mention you never have to leave the sewing machine? It's also your basic zigzag stitch, so anyone with a plain-jane machine can do one.
So here's the 411...after sewing your straight seam, you trim down to say 1/8 inch. Then you sew again, but this time with a zig-zag. Shorten your stitch length to 1.5 (or even 1 if you want a tight roll) and widen the stitch width to 4-6...depending on the seam allowance you've left. You want the zig to bite into the fabric right next to the straight seam, and the zag to fall off the edge. Then tighten your top tension just a notch (not necessary actually, but cool.) and GO. The raw edges will magically "roll" up inside that zigzag seam.
This seam treatment evolved from renewed interest in "heirloom" sewing using machine techniques. Rolling & whipping you'll remember was mentioned above as a seam treatment, and it used to be done by hand. Like this:
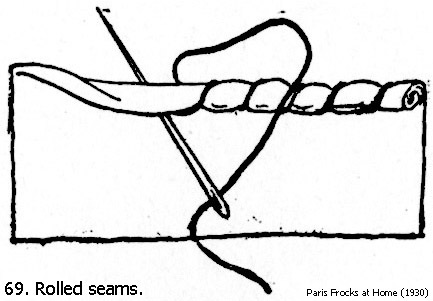 Can't find a good pic of the faux version, but it looks basically the same when you do it by machine.
So that's it for today's Friday Tute! Fun, huh? Try a new seam finish! And don't forget to say to your best girlfriend..."Hon, your rounded rear contours look FABU in those pants!"
laters!
 a
a
No comments:
Post a Comment
I love hearing from you, and thank you in advance for reading and commenting! &