It is SUCH a sweet little blouse! I love it! I made my version in a white spotted voile, nearly a dead ringer for the cover illustration. I made View B, with the yoke from View A.
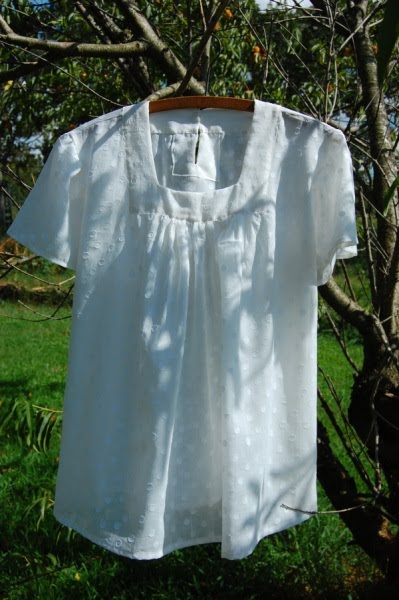
View B has a separate pattern piece for the yoke, a straight piece with darts marked to miter a straight piece of lace or ribbon to create the yoke. Very clever! View A has a traditional square-shaped yoke piece that is self-fabric faced. I love the gathered center front! I needed no alteration to this pattern other than scooting the CF away from the fold 1.5" to allow for a bit of an FBA.

The yoke is applied to the bodice front/back by turning under the seam allowance on the yoke, then topstitching in place. I see this technique all the time on 1930s and 1940s patterns. There were so many interesting seams in that era, and using this technique would be the easiest way to achieve intricate seaming. Here's a closeup of the topstitching:

The facing is then handstitched to the inside, covering the seam.

The back bodice has a small, faced placket. The placket & facing square are slit, stitched along the edge of the slit, then the facing turned in. Edges are turned under and topstitched. Very simple and actually very pretty! There is a loop & button closure at the neckline.

I used a vintage white rhinestone center button. It's just faded and "old" enough to make me very happy to see it at the back neck! Hopefully the rhinestone doesn't fall out the first time I handwash this blouse! (I have spare rhinestones, no worries!) My blanket-stitched button loop is just sad. I'll be cutting it off and redoing it shortly. I'm out of practice!

There are tiny turned up hems at the sleeves and hem. I did not gather and apply the binding to the short, puffed sleeve. It was a last minute decision because I thought the fluttery effect was well suited to this voile blouse.

I will say the center front gathering does have the slightest maternity look if untucked. But the fabric is lightweight enough that it does not pouf out in the least. I've already worn it! I wore it to the movies last night with my buddy StickGirl. I didn't get a photo of it on, but I'll try to get one in the next couple of days. I spilled coffee on it getting in the car for the ride home of course! So it's already been handwashed and needs pressed again.
Love, Love Love this. I can see more in my future! One of the things I've been learning from my vintage pattern endeavors, is to slow down and pay attention to the experience of creating garments. There are so many little bits of sewing information and techniques that require you to take your time or at least put a little though into them.
For example, carefully pressing under the seam allowance of the yoke with precision so that it matches the seamline of the blouse, or creating a blanket-stitched thread loop by hand. Every few steps in the instructions there is reason for me to pause and take my time in the creation process.
Nothing I've encountered has been difficult or, to be honest, better replaced by a more modern technique. In fact, I find I'm preferring the vintage techniques over modern shortcuts.
Next, I've got to finish a couple of skirts! I have 5 days of summer vacation left and I plan to make the most of them! One more parting shot of my pretty, vintage blouse:

I'll be cross-posting at We Sew Vintage!