Showing posts with label SWAP. Show all posts

Monday, May 14, 2012

Summer SWAP: Sewing with a Plan Pt 1

Is it still a SWAP  if it doesn't all match?  Anywho.  I've decided to empty my closet and start from scratch.  There's a ton of stuff in there I never wear.  Then I gotta fill it back up!  I'm gathering images from my inspiration folder  (and my Pinterest Stylish board) to add to a SWAP composite.

The first thing I'm adding is this top. I found this image of Gabrielle Anwar back in the winter months and I've been dying for warmer weather so I could knock it off ever since!

Credit: Albert Ortega


More easy vintagey tops...
anthropologie

anthropologie

anthropologie

anthropologie

anthropologie

anthropologie

I'm loving this one.  I didn't save it with a source.  I have the Simplicity pattern that is so similar (and sadly OOP):

Image source unknown.


I'm also going to conquer cute shorts. 

Lena Hoschek

Tara Starlet

Tara Starlet

Alice Nightingale
anthropologie

anthropologie
Carole Lombard
I have the Colette pattern that should be a good staple if I can get a good fit, and I have a vintage pj shorts pattern that was pratically made for me.

Some lightweight summery skirts, especially loving the current lacy vintagey trend. Of course.

Casey - Elegant Musings

Lena Hoschek

Hollywood Movie Costumes Blog - Footloose 2012

OMG

Lena Hoschek
anthropologie

Oh. Excuse me, we got a little off track.  Where were we?

Oh yeah.  Summer dresses. 

modcloth? Sorry...can't remember! Blame our detour.

Lena Hoschek
anthropologie

anthropologie

anthropologie


Summer SWAP.  It's a good thing.  I plan on doing a more complete SWAP inspiration board this week, including fabrics and patterns.   Keepin' you posted!

Thursday, September 10, 2009

MOSWAP

Well, I have tried and tried...for over a week!... to form a plan for the PR SWAP.

Here were my (self-imposed) rules:
  • Sew from Stash
  • Not black and white
  • Use some of those cute patterns I keep dog-earing in BWOF or Ottobre
  • Try to incorporate the vintage look I really love (new or old)
Well, this proved nearly impossible. For one thing, I can't coordinate my stash fabrics (of which there are plenty) into the pattern choices that feel even remotely unified, AND still have the whole thing fit the PR guidelines which are:
  • 5 tops
  • 4 bottoms
  • 1 topper
  • all tops must go with all bottoms
  • topper must go with everything
  • must use a print
  • no dresses (ok, this isn't really a rule, but is discouraged by the other rules. The dress has to either go with all the tops and the topper, or be worn over all the pants.)
My biggest problem seemed to be the print. The B&W self-imposed rule was an issue for me too, since I have a ton of black and white. But the print was the hardest. I just don't have a print that goes with everything else, without resorting to a stripe or plaid/houndstooth (which felt like cheating to me).

And I keep seeing dresses I want to make. Of course.

Which brings me to...My new plan, the non-SWAP SWAP. I won't be entering the PR contest, but I'll be sewing along this fall and blogging it here. You know, assuming I actually have progress to blog about.

Here are my new rules:
  • Sew some of the BWOF & Ottobre I love
  • Sew from stash
  • Not all black and white!
  • Have some vintagey goodness
  • There are no other rules.
HAHAHAHA!!! I crack myself up. No, there are no rules. I'm MOWSAPing. My Own Sewing With A Plan.

For example, I'd like the tops to go with most bottoms, I just don't require they go with ALL of them. I want to incorporate dresses. I really like the topper idea, but I don't need it to go with everything.

Here are some pieces I've been wanting to make, but that didn't fit the SWAP rules no matter how I tweaked and fiddled. (and moaned and groaned. Ask Shannon. )

This fabulous dress from 11/08 BWOF. I even have the perfect plummy purple doubleknit for it in stash:

This great cowl top was in the newest Burda Plus magazine! LOVE it.

Same Burda Plus issue was this great dress. And, I have a great charcoal knit, but it's sort of scratchy which worries me. It's not a cotton or rayon, but some sort of poly I guess. Still, I could wear this with a cute thin turtleneck in the winter and I'll never know it's scratchy!


From the 8/09 issue of BWOF, this great vintagey top. It needs a pretty, flowing chiffon or georgette. I may have to purchase that, all my chiffon and georgette is in solids, and I'd like to see it in a great print! (Wish I still had some of that cream and black dot georgette. Darnit.)


LOVE this dress. June 09 BWOF issue maybe?? Possibly July.


I've been wanting to try these pants since last November when I got this BWOF issue! They look SO similar to my favorite Eddie Bauer pant.

I've always loved this jacket too. And the skirt is cute too! These are from the 9/08 issue of BWOF.

Just a great, fun top. Also from the 9/08 issue.

I've been meaning to make this knit top since September of 2007 when the issue first came out. Bout time to follow through!Ok, maybe you can tell I'm a little disorganized and have too many great ideas! I do actually have more bottoms too... Marlene trousers (BWOF had one recently in the plus section I think?) Possibly a denim trouser. I'll be pulling out the fabrics and looking at all my options this weekend to finish up a storyboard. So be on the lookout for that soon!!

Tuesday, September 01, 2009

swing swing swing

Speaking of vintage...I just won this on ebay a couple weeks ago:


I'm seriously smitten with the red print view. I also have this blouse pattern, from the same era:


Love love view 2. Call me crazy but I'm toying with a vintage SWAP. Not entirely vintage of course since I would like to do pants too, and I have NO vintage pant patterns. But I do have a couple of recent retro/vintage-y Simplicity pant patterns. Like this one:

And you know I still have that adorable cherry fabric (prewashed and petted aLOT since last year swap time, but never cut into). In fact I have 3 of the fabrics from last year's swap, still uncut.


I'd definitely be making this spectacular 1940s vibey blouse from the June (?) issue of BWOF:

And from another issue this year (June also??) this fabulous skirt:


And don't forget this fabulous dress from the March issue:

And a retro/vintage swap is the perfect excuse to make a capelet! Epsecially when the rules require it. ;)

Here is last year's mini swap storyboard, which I still LOVE:


I'd still take all of these pieces! The NL top has been muslined, but not the Vogue. The pants were muslined a few times...to no avail. I actually did make the skirt in another fabric, because I couldn't bear to cut into my cherry fabric (even though I came seriously close one day last fall).

(Dawn, don't tell my mojo I'm planning. M'kay??)


Monday, August 31, 2009

this...

is stunning.


It's from J Peterman and $229. So probably not in my current budget. But oh, how I lust. Pondering its recreation, I remembered this BWOF top from last fall:

Not exactly it, but a possible starting point. A true vintage pattern may be a better starting point, but my stash of vintage is 1940s, and this dress has a very 30's feel. I'm actually curious if I could self draft this, based off of a combo of peasant top and button front top patterns.

I have this pattern from Children's Corner from when Lu was small:


Note that it's a round yoke (albeit much shallower than the dress above) with gathered sleeve/bodice. I think the yoke/gathered bodice concept for the dress (in my size of course) would be the same. The yoke itself should be easy enough to draft off of a well fitting woven shirt.

In theory, that is.

My other option is to look at a true vintage pattern. If only I could get my hands on this one, a 1930s Butterick #6432. It's sold though (on sovintagepatterns.com). But wow, its close.


Hmmm. I'll keep you posted if I come up with anything better.

I'm considering the wardrobe contest over at PR. I know some of you are too! The only thing holding me back (it's a long contest, 3 months!) is the fact that once I finalize a plan I typically lose all interest in working on it. So we'll just have to see if I can make one and stick to it. Seeing as I just got my mojo kickstarted, I'm sorta loathe to jinx it now!

But be on the lookout for a potential storyboard this week anyway!

Sunday, August 30, 2009

Mac Storyboard Tute

I get requests for this one all the time. My original storyboard tutorial was done on a PC with Paint.Net, a free program (that is, btw, awesome.) You can find the original HERE (it's also linked in my sidebar on the right.)

Unfortunately Paint.Net isn't available for the Mac, and probably never will be. Your Mac does come with a very decent photo editor, however, called Preview. I'm going to use Preview today to show you how to create my storyboard tutorial. It's a few more steps than the Paint.Net version, since we don't have the same layer abilities...but the end result is the same!

If Preview is not located on your Dock, go to Applications and scroll down til you find it!

To start, open a picture of the line drawing you want to use in your storyboard. I'm using an image from the (awful) new Simplicity website, since they no longer have the line drawings (grrr.) This particular pattern does feature illustrated drawings on the pattern cover.

First we're going to use the Rectangular Selection tool (see below) to draw a rectangle around the skirt illustration that I'm planning to use:
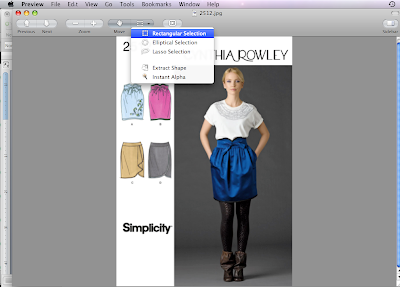
Once the rectangle is drawn around the skirt, we'll crop out everything else. (Tools > Crop, or just hit the crop button if its on your toolbar.) **NOTE: You can customize your Preview toolbar to include most-used things. Go to View > Customize Toolbar> and in the popup box drag the tools you like onto your Preview toolbar. Click Done.
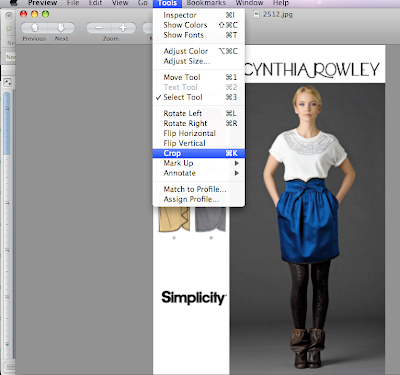

Now we just have our skirt illustration, but its filled with pink and I want to fill it with a fabric I have a picture saved of. So we're going to use another selection tool. This one is called "Instant Alpha" and it's under the select dropdown menu. It's similar to the "Magic Wand" in other programs, but this one works in percentages.
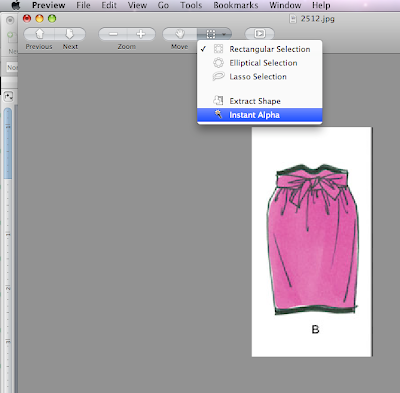

Click it and drag over the part you want to get rid of (in my case, the pink). You'll see it sort of "fill in" with a selection color (a transparent red).
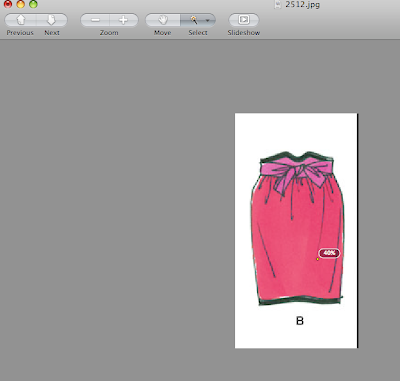

Press the RETURN key (enter) on your keyboard and the highlighted portion will be deleted. (You get a little popup reminder box to tell you how to do this, which helps!)
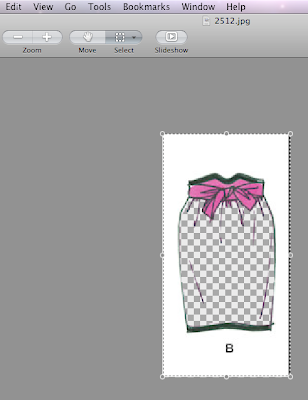

If you don't get the checkerboard background (which just means "transparent") go to View and see if you have Show Image Background checked/unchecked. You may have to click on that to get the checkerboard to show (to remove the background when you hit Return). Repeat with the remainder of the parts you want to remove:
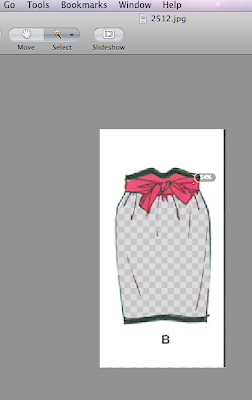

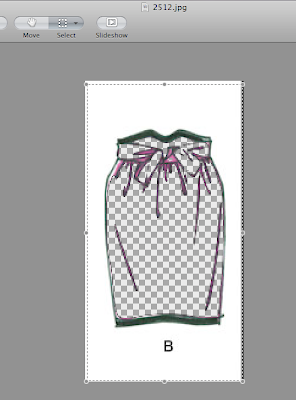
I still have bits and pieces of pink, but once I get my "fabric" added, it won't be that noticeable. And, hopefully you'll be working with a plain white filled line drawing, which is much easier than these goofy illustrated ones! Here's my "empty" line drawing of the skirt:

Now we're going to open the image of our fabric. I chose this super cool Beatles retro print:
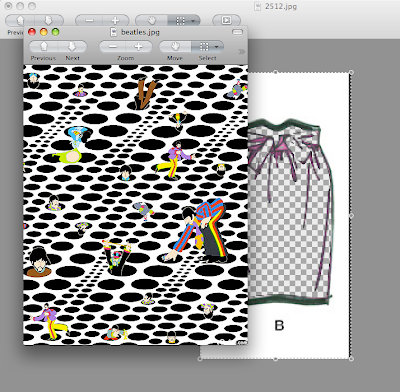

This is the part where we wish we had layers! But all is not lost, just because we don't have a traditional layer mechanism. Go to your skirt image and use the rectangle selection tool to draw a selection all around it. Command-C to copy it. (or Edit > Copy)
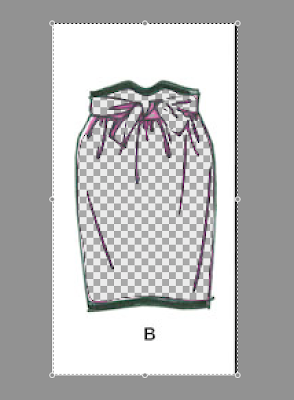

Flip back to your Fabric (Beatles) image and paste it (Command-V is paste, or Edit > Paste). Voila! We cheated a layer! We're so smart.
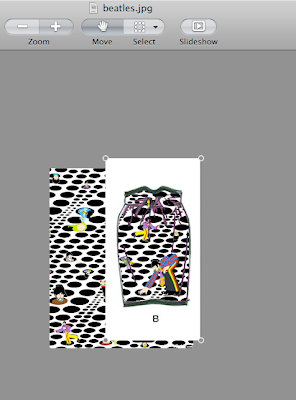

Now go ahead and use the Rectangle Select to draw a selection around just your skirt portion and Crop it:
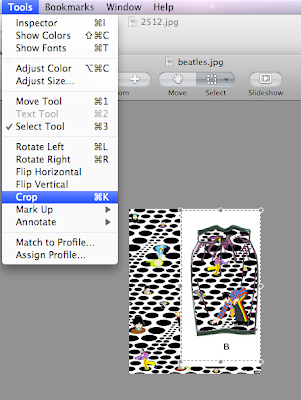

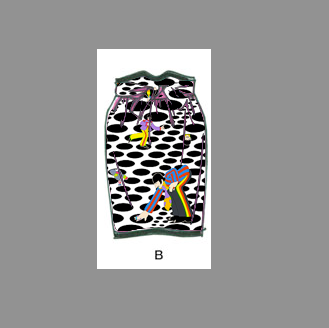
So we have just our fabric-filled skirt:

Now here's where the real tomfoolery begins. Open an image that is large enough to be your storyboard "canvas". By this, I mean, wide enough and tall enough to hold all your pattern images, text, etc. Probably at least 800 pixels wide by 600 high. Anything smaller is going to be pretty small, but this size is a good size to upload easily to a message board, etc. and still be large enough to "see" detail. You can of course go much larger and then resize a copy to use for uploading too (just name it something different. I add an "sm" to the end of the file name.)

I opened an 800 pixel wide Vogue photo I had. The actual photo DOESN'T MATTER. We just want the dimensions to use for a blank canvas. If we had the ability in Preview to "create" an original blank image (like most "paint" programs) we would. In this case, we're just going to create one using a premade image.

Go to Tools > Adjust Color
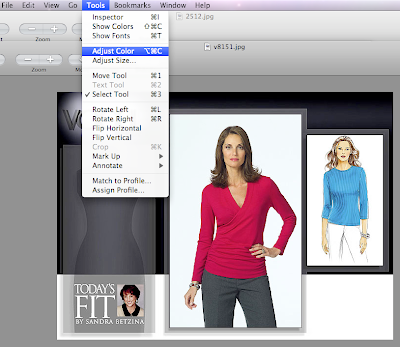

In the Adjust Color dialog box, play with the sliders until you lose all color in your image (making it entirely white, or entirely black might be cool too.) The sliders that are your friend for this: Contrast, Brightness, Saturation, Black Level, and White Level. You can see my results below:
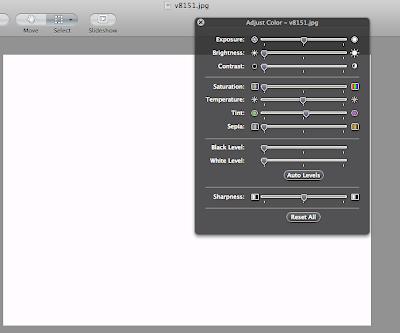

I created a blank 800 pixel image to make my storyboard, using a photo! Slick, huh?

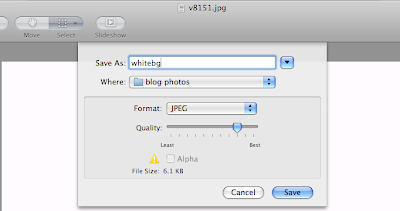
At this point I would save your background image as "background" or in my case "whitebg", so you have it preserved for another storyboard in the future.

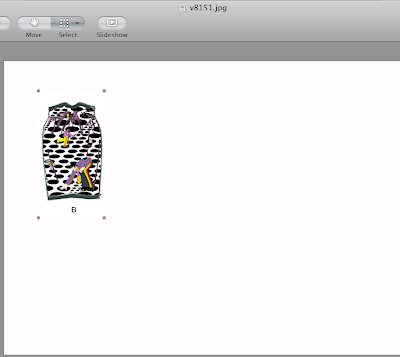
Ok, so now we're ready to start building our actual Storyboard. Go back to your cropped skirt image and select the whole thing with your rectangle select. COMMAND-C to copy. Click over to your white background and COMMAND-V to paste:

Now we just need to add text, because a Storyboard is inspirational only if you can remember what pattern you planned to use! For text, stop looking for the traditional "text" tool. There isn't one. Instead we're going to "Annotate". You can go to Tools > Annotate and choose "Note". If it is grayed out, use the directions above to add the annotation tool to your toolbar. It should work then.

From the Annotate menu choose Note:
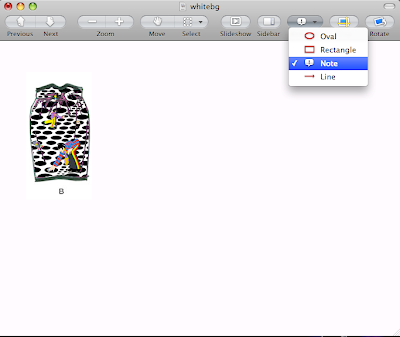

Draw a rectangle where you'd like your text to appear and then type in your text:
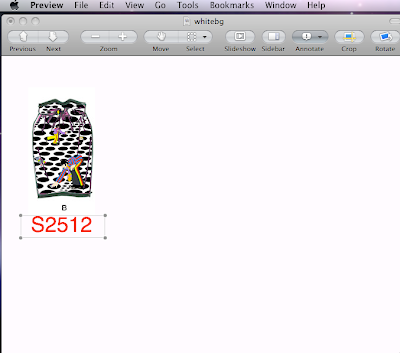

You do have ability to change font, font color, etc. That's all located under Tools > Show Fonts and Tools > Show Colors.

Here's the finished Storyboard, with a pink Annotated Rectangle drawn around the edge so you can see the dimensions:
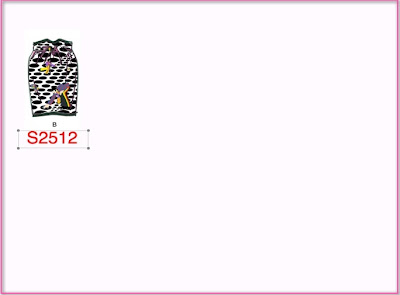

I hope if you have a Mac, and don't have Photoshop or some other editing program that is Mac-compatible, you'll give Preview a try! A couple more tips...

You could just make all of your patterns with fabric images in Preview, then insert them into a Word document, or a PowerPoint slide. You could also try one of the free, or inexpensive Mac compatible photo editing programs. A free one that is limited, but has layers and a magic wand (really all you need for a storyboard) is Seashore. A minimal cost program that has great reviews is Pixelmator ($59 US).