Showing posts with label decorating. Show all posts

Thursday, June 21, 2012

Nested: Bathroom

I was really inspired a couple of weeks ago by Dawn's bathroom redo.  I HATE my bathroom sink/console.  It's oak finish, it's standard "builder's grade".  It's just not me at all, but I've never been able to afford a replacement, so I just ignore it.  Mostly.

After seeing Dawn's refinished cabinet, it hit me that I could PAINT it.  What a concept!  I don't know why I didn't think of it before...I love paint.  So that's what I did yesterday!  I didn't go to the trouble of the 3-step process Dawn uses, simply because my bathroom had a pipe burst issue last year and the cabinet has some bubbling on the sides from water damage.  (I really do need a new one... but at least the sides don't really show!)  I went with straight up primer and paint.


The color is Blue River by Benjamin Moore.  Love love it.  I had plenty of it all over my legs by the time I was finished to admire it well into the evening. heh.  Waiting to replace the door and 2nd drawer until everything has cured for a while longer.

Trusty painter's stool. You get to practice your balancing skills while painting.  Bonus.

I went with a creamy ivory for all of the trim, "Latte Light" by Ace Hardware's Royal paints.


It is very, very light ivory.  Definitely a shade or two lighter  than my paint chip when dry, which is weird.  For paint I mean.  Once I get a window treatment up, it won't be so very...white.

I picked up a few new accessories too.  From Wal-mart and the Dollar General of all places!  I couldn't resist the little owl, he's so cute.  And I had completely forgotten Dawn had an owl too. Dawn, I'm copying you!

The floral print is a shower curtain, but I have a shower stall in that bathroom.  I'll be cutting it up to make my window treatment.  The colors were perfect, and even have the perfect shade of yellow.

You know the biggest issue I have with redecorating?  It's neverending!  Did I mention that before??  Now I want new towels.  Preferably these (Target, but selling out everywhere. Of course.)


And this rug, also Target: 


And then... baskets and a shelf and new trash container and...  See what I mean?  

Off to peruse Pinterest and Anthropologie while I eat my salad! 

Monday, June 18, 2012

Nested.

It's Monday!

I don't usually know what day it is in the summer, so I feel very accomplished already.

I spent the past several days spiffing things up around the house, mostly tabletops and shelves and walls.  Those paint fumes initiated a whole new level of nesting. 

First up, I made a gallery wall, easily the hardest thing I attempted.  The math alone made my eyes cross.  After I had the photos printed, I had to find frames.  Note to self: Next time find out what frame sizes are readily available first.


Isn't it awesome?  I was inspired by this blog, but no way I'll ever be able to afford all of those canvases.  Still, I did want something sleek that allowed the photos to take center stage.  I ultimately bought archive "Quick Frames" from Hobby Lobby.  They were inexpensive, had real glass, and are reasonably substantial (i.e. they don't look too "cheap").

All of these are my all-time favorite photos of my kiddos, I blubbed like a baby going through all of my photo CD's trying to choose.  OMG.  BUT... the two largest photos are my OF ALL TIME TIMES INFINITY all time favorite photos, and at 18x24 inches, I had to use poster frames.  Cheap and icky, but once they were on the wall with all the rest...they didn't bother me so much.  If I can find the quick frames in 18x24 size, then I'll buy two and replace them eventually.   

I also played with the spray paint.  Basically nothing is safe when I've got a new can of Krylon or Rustoleum.  This weekend, it was mustard (Krylon Bauhaus Gold) and jadeite (Krylon Avocado and Jade). Banner Red and Heirloom White are two other faves.   Dingy old clay pot with a new dried floral arrangement (pieced together from a dingy old dried floral arrangement):
I tore up an old silk hydrangea flower bush and dispersed the pieces around the place.  Some are in a glass bowl on the dresser in front of the gallery wall above.  The scraps I used for this cutie:

 The gravy boat was languishing in a cabinet.  Talk about necessity being the mother of invention.  This might be my favorite thing!

I had a "hole" on top of a surface that needed a photo or some art or something. Had this cute square frame I got in a gift bag at some point that was the right size, so I just slapped some cute scrapbook paper in it.  Instant art.

Other than the gallery wall frames and 2 cans of spray paint, all of the above was accomplished using things I already had.   I did purchase the green print rug (TJ Maxx), the black damask cushion (Gordman's) and hydrangea stems (Hobby Lobby clearance, $2 ea!), all seen below, to spiff up this little seating area.


Now I'm moving on to the bathroom.  Both of our bathrooms need serious updating, and unfortunately I'm about out of ingenuity and "have on hand" supplies.  Rats.  I did cut a piece of vintage feedsack to fit this square frame I already had hanging in my bath:


I think I'm going to paint the frame white though.  The black is just too stark.  LOVE the feedsack.  Not lovin the black frame. 

I still need to get my craft table arranged and I'll share pictures of it too, hopefully this week.  It's pretty sweet, I have to say.  SO. Much. Room.

Here's to a great new week!

Friday, February 10, 2012

dream sewing spaces.

 Lovely sewing and craft rooms, big and small.

link
link
link

link

link
link
link
link
link
linka
link

Dream big.  Am I right?


Saturday, January 21, 2012

Vintage Kitchen

As part of my Vintage Kitchen Spruce Up of 2012 (didn't I mention that? No?) I've been scooping up vintage kitchen pretties over the past couple of months.  The light was pretty today so I snapped a few shots to share.


I couldn't pick a favorite, but that little green bird is the sweetest.  It's a lone single from a salt and pepper shaker set, c. 1950.  The hen & nest is very small, only about 3.5 inches tall.

The full set of Tripp milkglass shakers (with original red metal stand!) was a find (and a steal) on etsy a month ago.  I was positively giddy (that bright turquoise in the corner was holding sweet peas for my lunch, it's a vintage Pyrex refrigerator dish).

Of course, I couldn't resist the Japanese kokeshi salt & pepper shakers when I saw them.  I love their little faces and bright colors.

My kitchen is settling into a jadeite and red colorway that I didn't expect or plan.  In fact, I was sure it was going to be yellow, turquoise/blue and red.  I'm actually considering painting my kitchen a soft jadeite color (and my cabinets bright white) as soon as it warms up this spring.

This kitchen (from my Pinterest board) is darling:


Of course Pinterest is an endless source of inspiration for all things!

Sunday, December 11, 2011

Retro Cafe Curtains

I had quiet time this afternoon, so I whipped up a pair of vintage-inspired cafe curtains:

 
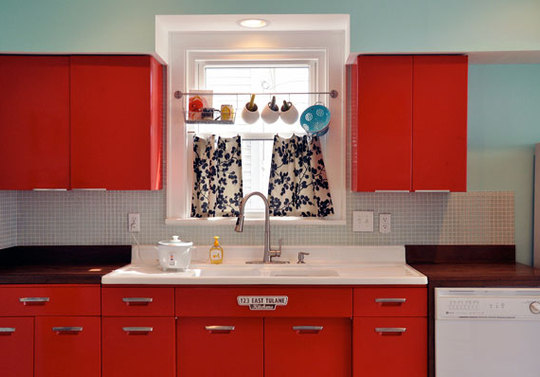
This week while I was perusing that magical time suck Pinterest, I saw this photo and got all inspired.


Darn if I can find the link now though.   I also love the towel rod with hooks to hang colanders and baskets (instead of a valance). Cute idea that still lets lots of light in.

I used a Darlene Zimmerman "Clothesline Club" 1930s print, red and blue rickrack, and my last bit of red pom pom trim. I didn't even swap out thread to match.  I sort of like the contrast.  No pattern, just measurements for the width and length, plus hem and pocket (with a little ruffle).


They are bright and cheery and I love them.  Easy Sunday project!

ps...How fun is that evil little potholder face.  I love him.  He's my favorite!

Saturday, December 10, 2011

Once Upon a Time: Episode 6 "The Shepherd"

This was a Prince Charming background episode, and I loved it.  We had lots of Charming himself.


We also got King Midas. And a DRAGON.  Didn't see that comin.

In Storybrooke, we were treated to a couple of cute dresses and the briefest shot of MM's bedroom. So let's recap (that means let's talk about the clothes. And maybe the apartment).  Charming (David) tracks down Mary Margaret and finds her in what could be a seriously cute little pea coat.  I'm not sure.  It's too dark.  (I just like their earnest expressions so it deserves a spot.)


Then we find MM scrubbing dishes in her little kitchen and BAM.  I'm knocked for a loop at the bunny on her cabinet (and more wire baskets for shelving!)


I have that exact bunny. Er, I had that exact bunny. 
I think I might have just thrown him out in a fit of organizing.
Drat.

Then I notice she's in a silk (silk-y??) top and jeans (very un-MM-like, and I'm diggin it), but wait! 

Bedroom!
Of course her bed is wrought iron.

Now you're picturing Charming amongst all that frothy voile and pale bedding.  Aren't you.

No? Just me then.

Next we are treated to a very retro 80s navy polkadot dress and red cardi.  I love the skinny red belt.


Last we see her, MM is getting her heart broken, in a fashion much as she suspected.


At least she looked lovely.  I recognized the dress immediately.


Dress by anthropologie:

Tomorrow's episode looks extremely interesting...  The sheriff is becoming one of my favorite characters.  Can't wait!

Sunday, January 06, 2008

The $5 Makeover

Tomorrow, it's back to school for me. Sigh. Today, instead of surfing all your pretty blogs, I re-did a favorite old chair of mine. And just in case you might have a similar chair tucked away because it's not quite fabulous enough...here's a brief tute on how easy you can complete a chair makeover in an afternoon!

Here's the before picture. Keep in mind, this little chair has already suffered through one of my makeovers, but I'm frankly sick of the cheery yellow.


and here's the seat removed; see it has a stain and needed to be recovered anyway!


Usually these types of padded seat cushions have a thin wood base and are attached to the chair with screws. Just flip the chair over & unscrew it...the padded top will pull right off.

I removed the old home-dec fabric & lay it over my newly chosen fabric to cut out the right size piece (no pattern needed! yay!)


Next, I ironed on a slightly smaller piece of Pellon fusible batting to my fabric, because I chose a quilting cotton this time, not a home-dec fabric. This will give it a little body. Keep in mind I didn't remove any of the original foam or anything, I'm just covering right over the top of it.


(Now's the time all you upholstery purists should stop reading and skip to the bottom for the after picture. ) I lay the Pellon fused fabric over the padded seat and position it so the pattern is pretty & centered. Flip the padded top over & pull from opposite sides to get it even, taut & smooth. I used pins to hold for gluing. Uh, yup. I said the G word. Now, I also use a staple gun, but I'm telling you a glue gun works really well for this project!

I pull the corners over first before gluing the sides, so I can get a nice , smooth corner.


Then glue (or staple) the sides down. Remember, work from opposite sides and everything will stay nice and smooth. Here's the bottom after gluing all the sides.


Since this will never be seen, I'm leaving it the way it is. You could cover with a nice piece of felt or something if you wanted a finished seat bottom though. Here's the pretty seat all finished:


A can of Krylon in a new yummy aqua shade completes this pretty chair makeover!

a different angle of the seat


Parting shot...a fabulous vintage cushion I picked up while at the flea market this weekend):