

Lovely, right?
Of course, as is the case with many of my vintage patterns (especially bottoms) this one is way too small. Pattern waist = 26 inches. angie.a's waist = more than that.
(Oh all right. In the interest of full discloser, 10 inches more than that.)
So, how about a little tutorial on upsizing a vintage trouser/short pattern? (And when I say little, I mean in miniature. hehe.)
Step 1: Gather supplies. I use at least 2 colors of pen or marker, scotch tape (or acid free if you have it), scissors, things to use for weighting down tissue/tracing paper.

Step 2: Carefully press out any wrinkles in vintage tissue if necessary (I never use heat since that would degrade tissue further. I just gently press with my fingers on a smooth, hard surface). I also carefully tape any tears or rips in the (usually very old and brittle) tissue.
Trace pattern transferring all markings to tissue or tracing paper. (I use a 36" roll of tracing paper from Dick Blick Art Supplies).
Step 3: Math. I need to add 10" to my pattern at the waist and hip. There are 4 side seams (2 front, 2 back), and I have always had good luck with pants and skirts by just adding to the side seams. Some books say no more than 2" but I've added more than that lots of times. You will probably have to fiddle with your pleat/dart placement later.
So, 10" divided by 4 seams = 2.5". I make a mark near the top (waist) 2.5" from the side seam with a new color pen.

Slide your original pattern piece over to the mark and line up the waistline. Look at the grainline markings on both your tracing and the original (you can see through the original tissue) to make sure they are parallel. Trace your new side seam.

Step 4: Alot of people need to remove crotch depth in 30s/40s trousers, but I personally like to add a bit more. I have a full high hip, and am very short waisted (so, conversely, I'm long from waist to crotch). Generally a 40s trouser pattern's extra long crotch depth is usually good for me as drafted. I'm adding 1" here because this particular pattern doesn't appear to have that gigantic crotch length I'm used to seeing in this era.
Using a similar slide method, I measure up from the waistband 1" and make a mark. Then slide the waist of my original pattern up and retrace the waistline at 1".

Slide pattern piece over to align at your new side seam and trace the rest of your widened) waistline.

**Note that if you have a more normal "crotch length" style of pant and you need to grade up, you would likely need to add to the crotch length in this same manner. I just don't have to do this with the extra long length in 30s and 40s patterns as a rule.
Step 5: Now let's adjust those tucks! Remember though, dart and tuck and pleat placement is pretty relative. You can always pin them and try on your muslin and adjust placement until they are in the most flattering spot.
The original pattern shows the tuck placement to be approximately in the center of the pant front. So, I just scoot the original over so that there's an equal distance from side seam and center front (to the original), like this:

Then I redraw the darts in their new placement (with the new color so I don't get confused).

I will probably have to increase the distance between the tucks too, so the proportions are still good. That's what a muslin is for, right?
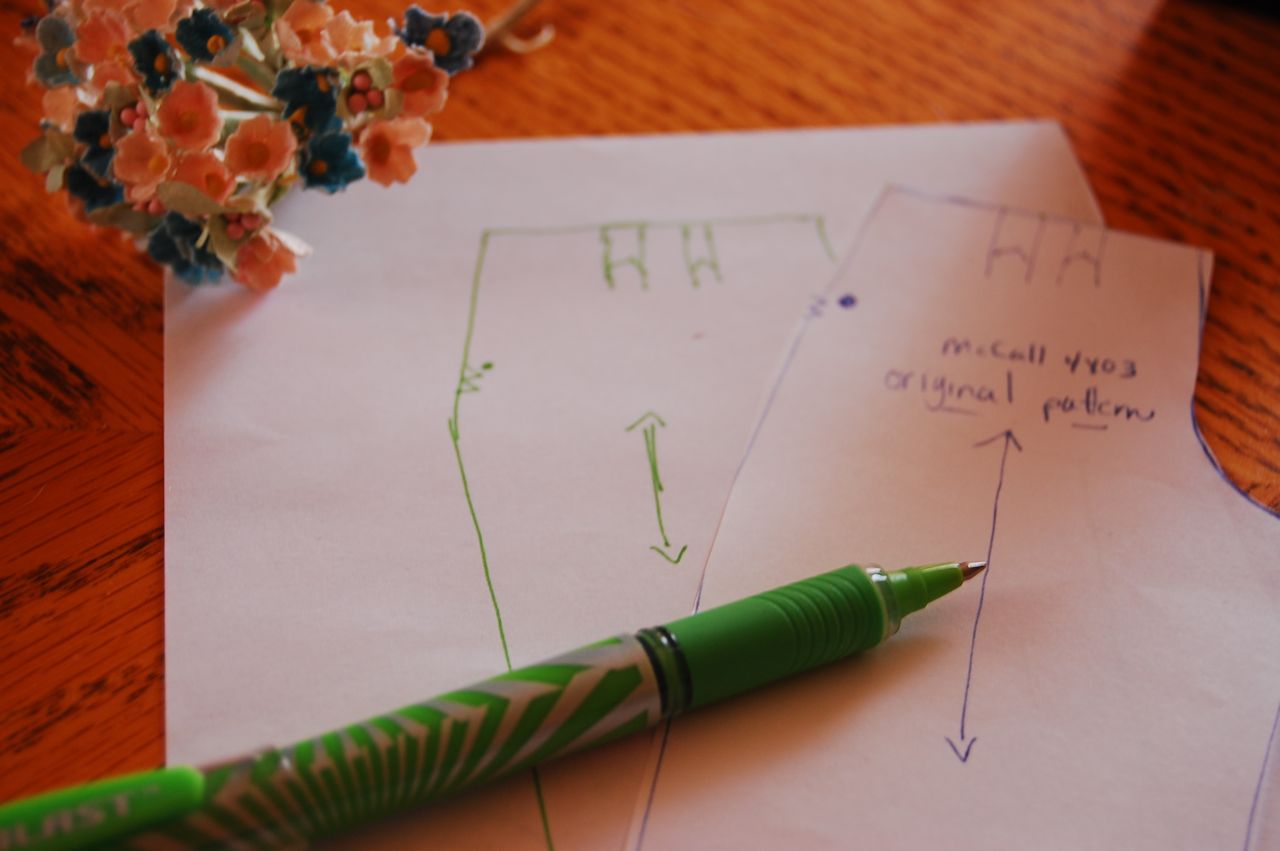
Here's my actual (graded) pattern tracing:

I hope this might help some of you who are putting off trying those too-small vintage patterns in your stash (or your etsy cart!)
Next up, MUSLIN!
You are doing much better than I am, no time lately. I have to clean for inlaws visit tomorrow. Beautiful pattern.
ReplyDeleteThanks for the tutorial. Lovely pattern. I've always been partial to that style of trousers, even though it doesn't suit me at all.
ReplyDeleteEnabler! Enabler! Just kidding, you're very sweet to share your smarts with all of us, and it's very helpful! But, I'm not taking the bait and filling up an Etsy cart. I'll just look around... ;)
ReplyDeleteAren't you awesome!! I'm going to have to post a link to this on my blog for everyone to see. Thanks for the fabulous tutorial. Pants can be such a pain!
ReplyDeletexoxo
You crack me up! I just finished my 'out of the house' chores. Now time for the 'in the house' ones before I can sew. And I need to eat - I'm starving. g
ReplyDeleteThank you for a clear and illustrated tutorial. I have seen so many gorgeous patterns that are too small, so I don't buy them. Now I can re-think that thought! :-)
ReplyDeleteThank you! Very helpful.
ReplyDeleteThank you so much! I have way too many vintage patterns I would love to use, but most are too small. I had almost decided to get rid of them, but maybe I'll try this first.
ReplyDeleteDid you add any wearing ease?
ReplyDeleteHeidi--
ReplyDeleteI'm grading a too-small pattern to fit me, so the wearing ease (original drafting) is included with this method. I'm just adding additional width (the difference between my waist/hip measurement and the waist/hip measurement on the back of the pattern; not the actual flat pattern measurement).
Hope that helps!