Anyway, here's BWOF 2/09 #118, the puff-sleeve tee. It was pretty simple to sew, even with the odd insertion of the sleeve. Please forgive the no makeup, unfixed hair pic (it had been in a clip all day!) You know I love you guys when I slap something like this out there for all to see!

And since you can't see a thing in all that black (even with the flash) I blew this closeup out a little bit so you can at least some of the details of the top:

I really like the seam above my bust. I was more worried about that seam, than the puffy sleeves (which is what most with a bust to speak of were worried about.) I like it though, AND I love the sleeves! Sure, they're puffy, but that's kind of the point. They're "in your face!" puffy, not a fickle "will she or won't she" puffy.
I didn't have any trouble with the sleeve insertion directions, and that almost never happens with BWOF. The first time I read them, I could see what they were talking about. (But you know, people who sew for kids HATE Children's Corner directions and they have always made the most sense to me!)
I'm not positive, but I think the confusion comes from the very first place in the directions where you attach the sleeve (the gathered one) to the front & back bodice (which have been stitched at shoulder seams already). You don't attach the sleeve lining at this point, although it looks as though you would. The directions are pretty good about separating "sleeve" from "sleeve lining" though, and they really mean for the lining to be left free until the end.
Also, you end up with this weird little flat seam space on the bodice at the underarm, about 1.5" on either side (you can see it in the line drawing in my previous post). It looks like that sleeve will never go together...but it just does. Here are some pictures & explanations of the only section I had to stop & re-read a couple times & fiddle with pins (sleeve & bodice in hand) to figure it out.
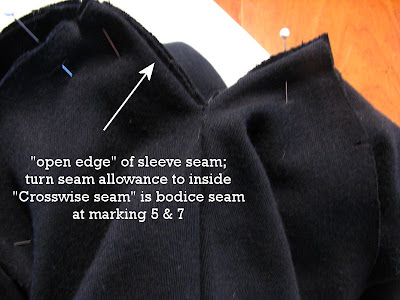
After you are told to press the sleeve lining to the inside of the sleeve (near the end of the instructions) it says to "turn in the open edges of sleeve seams". You've stitched the entire sleeve & lining seam at this point up to notch #10, which is near the raw edge of the lining. So that "open edge" refers to the 1.5" of unsewn sleeve lining. I've made a picture of it turned in and pinned in place below.

You're supposed to pin it to the "Crosswise seam". But if you flip the top over so you can see the sleeve, bodice & side seams, then you can see there actually is a little "T" formed at the junction of the side seam. It perfectly matches the sleeve lining edge you turned in:

That's pretty much it. At that point, you just pin & stitch the remainder of the lining to the sleeve seam allowance. It isn't the neatest finish, but I just zigzagged it together with a wide zigzag. I was still assuming I was just working out the kinks on the pattern, so wasn't too concerned with interior neatness. Next time I might see if that area is suitable to serge (not sure because it does have that odd crosswise seam.)
You can read my review HERE at PR. I think it's a distinctive look, so it's probably not for everyone. You better have the sass to actually wear it!!
It is a snugger fit through the torso than the last few BWOF tee's I've made. I think this is to balance the puffs. It's also short, which is true for most of the BWOF tee's I've made. :D
I'd like to make it again because it was quick & easy pattern to put together , and I have a print knit that I think would be great. Then that will probably be my last version of this tee. There are plenty of other sassy patterns out there I need to get busy on.
And...I have a 4-day weekend! Woohoo!

Cute top! I'm glad it ends up not being as hard as it looked... Sorry about the flu, and congrats on the 4 day weekend. I get a 5 day weekend next week!
ReplyDeleteThat is a super cute top!! It is definitely on my to do list for spring. Thank you for the tutorial on the sleeve. I will be needing it after reading those BWOF instructions. LOL!
ReplyDeleteThis is such a cute top but I think a little too jeune fille for me. Since you've made it, and done a great job BTW, do you think one could lengthen the sleeves easily? I think this might make it more suitable for me.
ReplyDeleteI, too , am busty and I think i would love that seam above rather than below the bust line. The seams below are never low enough and cut right across the bust and looks weird.
ReplyDeleteYou looks so cute in this!
ReplyDeleteVery cute top, it looks great on you. I think a print would be fantastic, too.
ReplyDeleteReally cute! Everybody needs a little bit of sass too.
ReplyDeleteOh I am so glad to see your top. I want to make this one and I saw Dawn's review and her tutorial with sleeves. So between hers and yours I should not have any problems! Right!. I like the sleeves they look good!
ReplyDelete